Database Export Connector > Help
Database Export Connector – Help
Content
1. Overview
2. How does it work
3. Installation & Activation
4. Requesting a trial activation code
5. Running the included demo job
6. Defining an ODBC source
7. Where to find the 32 bit ODBC drivers on Windows 7 and Windows 8 64 bit?
8. Configuring the database connector
9. Field mapping
10. Saving PDF files in BLOB fields
11. Updating a database with a multi-line (multi-value) field.
12. Your suggestions…
1. Overview
The most straightforward way of image enabling a business process is by adding a reference to a scanned document in an existing database.
This could be a Microsoft SQL patient database, Oracle employee database, Sybase manufactured goods database.
For a small business or department, it could be a customer or supplier MS-Access database or Excel table.
As long as you can connect to the database through an ODBC data source, it is possible to directly update your database with the CaptureBites™ Database export connector.
With Microsoft SQL databases, you can also directly connect through an SQL Connection string and make use of BLOB fields to upload images. BLOB fields are also referred to as Varbinary data types.
2. How does it work?
To explain how the database export connector works, let’s use the patient record use case as an example.
When a new patient enters the hospital, he or she gets registered in the patient database. The database automatically assigns a unique patient record reference code which is printed as a bar code sticker and is applied on the cover of the patient’s document file. After the patient leaves the hospital, the patient’s document file is scanned and exported with the CaptureBites Database Export Connector.
During export, the CaptureBites Database Connector performs following functions:
- All documents are exported in PDF or PDF/A format to a file server of choice with configurable file naming rules. Alternatively, you can upload the files to a BLOB field in your SQL database.
- It connects to the patient database through ODBC (or directly to an SQL DB)
- For each scanned patient document it retrieves the corresponding patient record in the database by means of the bar code label on the cover sheet
- It then updates the database with the correct references to the scanned documents on the file server
- If the patient is not yet present in the database it will automatically enter a new record in the database (optionally you can always add a record and never update existing records)
3. Installation & Activation
1. Install Kofax Express
If you haven’t done so yet, you first need to install Kofax Express. You can download Kofax Express from here. The link brings you to a request form. Just fill out the form to get access to the Kofax Express download.
You can find detailed instructions how to install the Kofax Express trial here.
After installation and initial start up of Kofax Express you will be able to use it without a license and start it in Demo mode. Demo mode will apply a demo stamp to any scanned or imported image. But for the rest the software is fully functional.
If you already bought a license and Kofax supplied you a serial number and product code, you can also activate the software and work in full production mode. Any jobs you defined in demo mode remain available after activation so you don’t have to redo the job definition after you switch the software to production mode.
2. Install the CaptureBites Database connector
Download the CaptureBites database connector from here. Then, run the installer and follow instructions.
Without a license, the CaptureBites connector automatically switches to demo mode and will apply demo seals on all exported images. You can switch the demo version to full production mode by entering an activation code which you can purchase through our partners. You can continue using any of the jobs you configured in demo mode after activation of the software.
Activiting a CaptureBites export connector is explained here.
If you want to try the software in full production mode, click here to contact us for a trial code.
If your security settings don’t allow to download or run the installer, please contact us and we will email a zipped version of the installer.
4. Requesting a trial activation code
The CaptureBites Database connector works in demo mode when it is not activated. In demo mode, a demo seal will be stamped in all exported images.
If you want to try out this product in full production mode without any limitation we can email you a trial code. Just follow the instructions when filling out this form.
5. Running the included demo job
A good way to see the Database connector in action is by trying it out with the included demo job. The demo job comes with a sample MS Excel Sheet and MS Access Database.
After you have installed the CaptureBites Database connector (see previous section), just start Kofax Express.
Make sure batches for “All Jobs” are displayed in the batch list.
Locate the CB Database DB-0001 in the batch list and select it to open it.
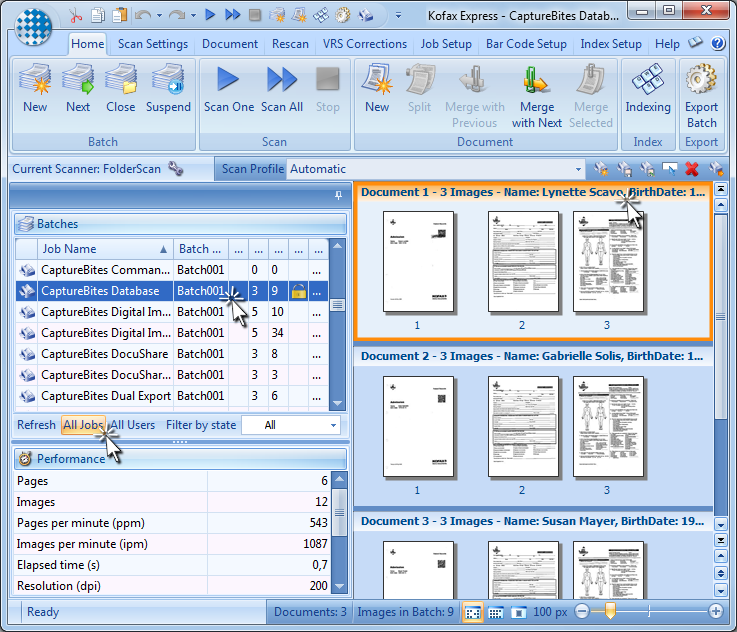
The batch shows some patient records and all index fields are already filled out thanks to the QR bar code on the cover sheet.
The idea behind the demo is to:
- export the images to a folder on your desktop in PDF format
- update an Excel table with all the index data
- update the Excel table with the location of the images on your disk
First have a look how the Excel table looks like before export. Go to your desktop and locate Desktop\CaptureBites\CaptureBitesTables.xls. Open the table in Excel. It looks like this:
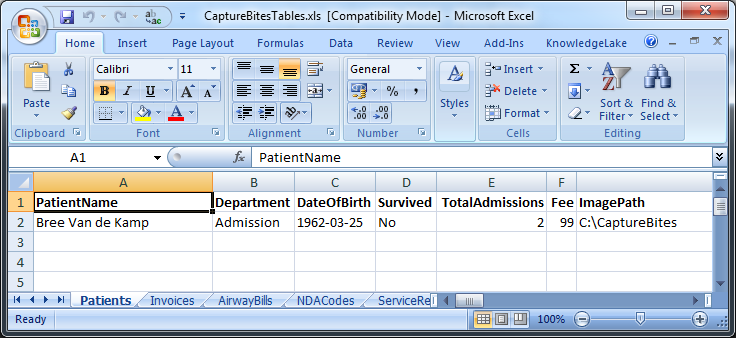
There is only one patient in the table.
Close Excel and return to Kofax Express.
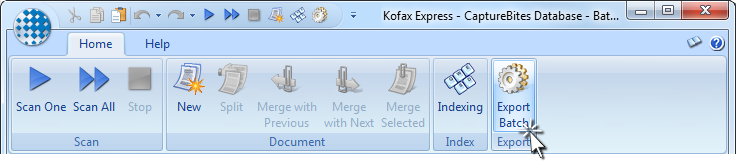
Export the batch by clicking on the Export Batch button in the Home tab.
Open the Excel sheet again and check how the table was updated with all index data for each the three documents. Also the location (path) where the PDF files were exported to is added in the ImagePath column.

In your database implementation, you could now easily add a function that opens the image in the PDF viewer based on the image location information in the database.
To check how you can also update existing records, you can re-open the batch in Kofax Express, change one of the birth dates or fee amounts and export again. You will notice that the modified fields get updated for existing patients in the table. Since we use the patient name to locate the record in this basic demo, you will notice that if you change the name of the patient of one of the documents, a matching record cannot be found anymore and a new record will be created.
Technical background about the pre-configured ODBC Data Sources
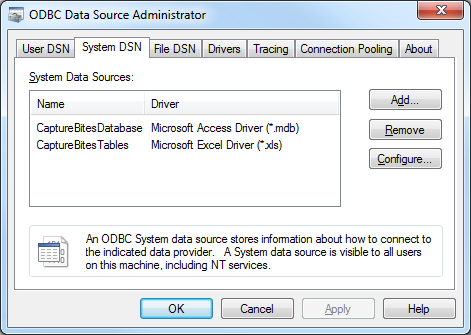
If you want to know where to find the automatically defined ODBC Data sources and their respective names. Just open Control Panel / System and Security /Administrative Tools / Data Sources (ODBC)
This will open the ODBC Source Administrator. Select the System DSN tab and notice the 2 defined data sources. They have the same name as the file they refer to.
6. Defining an ODBC data source (DSN) in Windows of installing an ODBC driver for your database to be able to communicate with it.
What is ODBC? ODBC is short for Open Database Connectivity.The main purpose of ODBC is to standardize connection and communication with databases. Once you have designed your software application to be ODBC compliant, it’s a matter of installing an ODBC driver for your database to be able to communicate with it.
Learn more about ODBC
The purpose of this layer is to translate the application’s data queries into commands that the DBMS understands. For this to work, both the application and the DBMS must be ODBC-compliant — that is, the application must be capable of issuing ODBC commands and the DBMS must be capable of responding to them.
Both Kofax Express (for database lookups and to load pick lists) and the CaptureBites Database connector (for matching and updating database records with index data and document path location) are ODBC compliant.
Microsoft Windows and Microsoft Office comes with a range of database drivers pre-installed to connect to Excel tables, Access databases, DBase, etc. If you use any of the Microsoft SQL Database Server products, ODBC drivers are bundled with the installation. If you don’t find an ODBC driver for your database on your system, just do a web search for ODBC driver “Your Database Name” and you will find pages where you can download ODBC drivers, often free of charge.
Defining an ODBC Source Step by Step
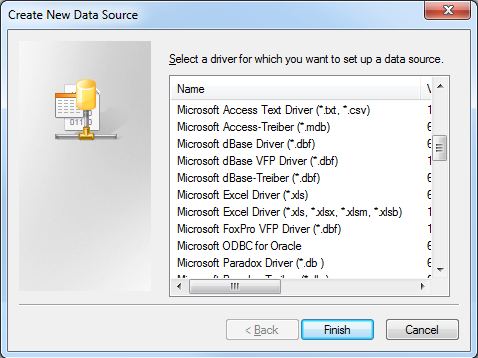
First open Windows Control Panel and then walk through below screens and settings step by step. The example shows how to setup a connection with an Excel sheet but the process is similar for other database types. Make sure you create a System DSN (available to all windows users) and not a User DSN (only available to the current windows user)
Click on the graphic to see a larger version.

Or you can only see a couple of 64 bit ODBC drivers you have installed yourself but not the standard 32 bit Excel, Access, DBase, Text, etc. drivers.
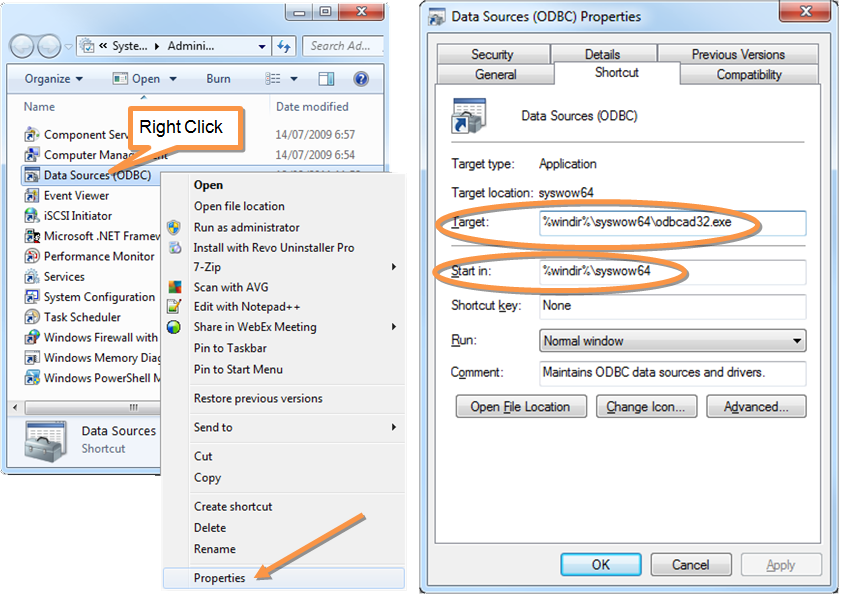
To expose all the 32 bit drivers like in below screen shot, follow below instructions.
- Right Click the Data Sources (ODBC) Link in the Administrative Tools window
- Select Properties in the pop-up menu
- Change the ‘Target’ to %windir%\syswow64\odbcad32.exe instead of %windir%\system32\odbcad32.exe and the ‘Start in’ to %windir%\syswow64 instead of %windir%\system32
- Click OK to save your changes
If you now define an ODBC source you will get access to all standard 32bit ODBC drivers on your Windows 7 64bit system.
Also find detailed information about this issue in following Microsoft article:
Unable to create DSN for Microsoft Office System Driver on 64-bit versions of Windows
8. Configuring the Database Connector

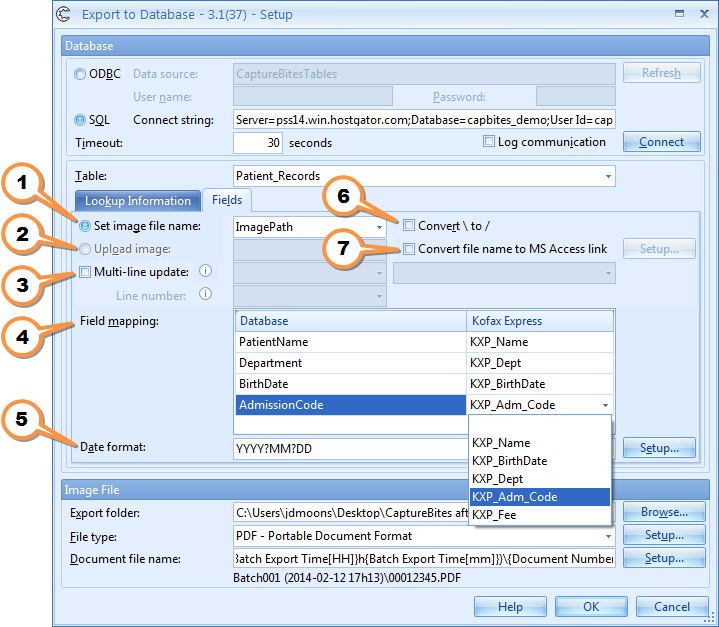
![]() Select the ODBC source you want to use. All defined ODBC sources will be listed here including the ones you have defined yourself. In the example we downloaded and installed the free MySQL ODBC driver and connected to a demo MySQL database on the CaptureBites server. For more information about defining an ODBC source, please read this section.
Select the ODBC source you want to use. All defined ODBC sources will be listed here including the ones you have defined yourself. In the example we downloaded and installed the free MySQL ODBC driver and connected to a demo MySQL database on the CaptureBites server. For more information about defining an ODBC source, please read this section.
![]() The User name and Password are optional. Most local databases such as MS Access or Excel sheets don’t require a user and password. With some ODBC drivers you can set the user and password in the source setup. In our example, the MySQL database requires a user name and password.
The User name and Password are optional. Most local databases such as MS Access or Excel sheets don’t require a user and password. With some ODBC drivers you can set the user and password in the source setup. In our example, the MySQL database requires a user name and password.
![]() Check the SQL box if you do not want to connect through ODBC but directly to a Microsoft SQL database through a connection string. Good information about connection strings can be found on https://www.connectionstrings.com/. The best way to find out whether you can connect through a connection string is by downloading and trying out the database connector.
Check the SQL box if you do not want to connect through ODBC but directly to a Microsoft SQL database through a connection string. Good information about connection strings can be found on https://www.connectionstrings.com/. The best way to find out whether you can connect through a connection string is by downloading and trying out the database connector.
Note: If you want to populate BLOB fields (also refered to as Varbinary data types) with document files in your database then you need to connect to your database with a connection string. ODBC does not support BLOB type fields.
![]() The Log communication option is only used for diagnostic purposes. In production you should leave this option disabled.
The Log communication option is only used for diagnostic purposes. In production you should leave this option disabled.
![]() After you entered all information in the database section, click Connect. Once you have successfully connected to your database, the Table drop down list is filled with all available tables in the Database. Select the Table you want to populate with Kofax Express Index fields.
After you entered all information in the database section, click Connect. Once you have successfully connected to your database, the Table drop down list is filled with all available tables in the Database. Select the Table you want to populate with Kofax Express Index fields.
![]() In the Lookup tab, you need to define whether you always want to add records or update existing records.
In the Lookup tab, you need to define whether you always want to add records or update existing records.
 If you want to always add records select {No lookup, always add records} in the Lookup Field drop down list. This disables the lookup feature.
If you want to search for a record to update it with additional data such as the image path where the related scanned documents are stored, then select the field that you want to use to search for the record in the Field list. The search field is typically an indexed (fast search) field with a unique value per record.
![]() Select the Kofax Express field that contains the value that will be used to search in the database to locate the record that needs to be updated. This box is disabled when you select {No lookup, always add records}in the Lookup Field list.
Select the Kofax Express field that contains the value that will be used to search in the database to locate the record that needs to be updated. This box is disabled when you select {No lookup, always add records}in the Lookup Field list.
![]() Generally you don’t store the PDF image files in the database but rather on a file server. The database only contains a pointer to the corresponding image files. The export folder is the location where your PDF image files will be stored. Browse to the Export folder or copy / paste the path.
Generally you don’t store the PDF image files in the database but rather on a file server. The database only contains a pointer to the corresponding image files. The export folder is the location where your PDF image files will be stored. Browse to the Export folder or copy / paste the path.
![]() Select whether you want to store multi page PDF or PDF/A image files. The setup button next to the File type selection provides access to the standard Kofax Express PDF options such as enabling OCR to generate searchable PDF or configuring PDF super compression.
Select whether you want to store multi page PDF or PDF/A image files. The setup button next to the File type selection provides access to the standard Kofax Express PDF options such as enabling OCR to generate searchable PDF or configuring PDF super compression.
![]() Use a combination of fixed values, folder separators, index fields, system values etc. to construct the folder structure and file naming. Click on the Setup button to open a menu of possible values.
Use a combination of fixed values, folder separators, index fields, system values etc. to construct the folder structure and file naming. Click on the Setup button to open a menu of possible values.
![]() The Help button opens this on-line help page.
The Help button opens this on-line help page.
9. Mapping Index Fields
The options in the Fields tab are only active when you have successfully connected to your database and have selected a Table.
![]() Set image file name: In the Set image file name list, you select the database field that will hold the path where the PDF images are stored. This is the field that bridges the database with the scanned documents on the file server.
Set image file name: In the Set image file name list, you select the database field that will hold the path where the PDF images are stored. This is the field that bridges the database with the scanned documents on the file server.
![]() Upload image: The Upload image option is only available when you connect through an SQL connection string and if you define a lookup field in the Lookup Information Tab. You can then select a BLOB field, also known as Varbinary(Max), to store the PDF images directly in the database.
Upload image: The Upload image option is only available when you connect through an SQL connection string and if you define a lookup field in the Lookup Information Tab. You can then select a BLOB field, also known as Varbinary(Max), to store the PDF images directly in the database.
Learn more about using BLOB fields to store image files
If you don’t specify the lookup field we don’t know how to search for the record to upload the PDF to.
There are two possible scenario’s:
1) The lookup field value does not exist in the DB:
- A record gets created and all mapped index fields in the DB get populated
- Thanks to the specified lookup field, we know which field to use to locate the just created record
- We locate the just created record
- We upload the image in the BLOB field
2) The record already exists:
- The record is located
- We upload the image in the BLOB field. If the record already contains an image it is replaced with the new image
If you always want to add a record and never update an existing one, you just need to create a unique index in Express, for example a batch name/date/time stamp, and create the same index field in your database. Then use that as the lookup field. Because each value is unique, a new record will be created every time you export.
To make use of BLOB (varbinary(max) fields, you need to connect through an SQL connection string and define a lookup field in the Lookup Infromation tab:

The upload image option will become available and will list all BLOB / Varbinary(max) fields in the drop down list. Select the field you want to upload the PDF file to.

For example, a single document containing multiple bar code values can be used to update the database multiple times. Each value will generate a new record in the database pointing to the same PDF file. You just select the database field and the corresponding multi-line Kofax Express index field in the connector’s setup.
Optionally you can also populate a database field with the line number of the corresponding line in the Kofax Express multi-line field.
Learn how to setup multi-line database update

- 010541288500452621220030255436
- 010541288500452621220030255435
- 010541288500452621220030255452
- 010541288500452621220030255451
- 010541288500452621220030255446
- 010541288500452621220030255447
- 010541288500452621220030255448
- 010541288500452621220030255449
We created a Kofax Express field called “AllBarCodes” and when the document is scanned, it contains all 8 bar codes on the list.
This is the way we have defined the Multi-line settings in the Database connector. Fields on the left are database fields, fields on the right are Kofax Express fields.
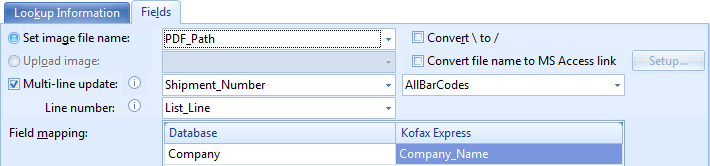
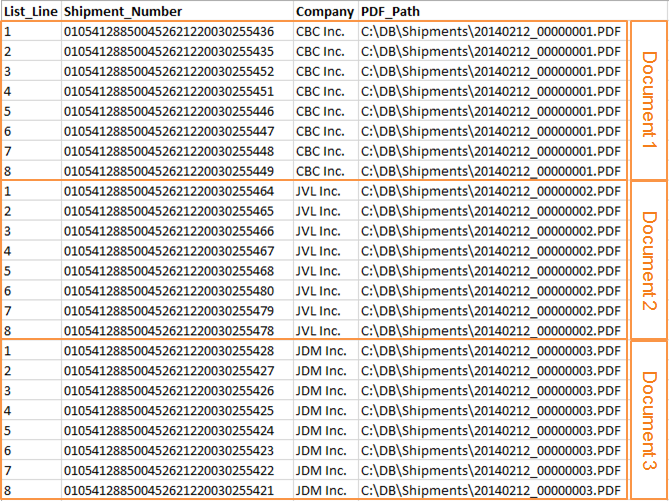
The image of the list will be saved as a PDF and the link to the PDF will be stored in the PDF_Path database field.
The AllBarCodes Kofax Express index field is set as the Multi-line field and mapped with the Shipment_Number database field.
The name of the Account, which changes for each scanned list, is manually entered in the Kofax Express Company_Name index field and mapped with the Company database field.
The List_Line database field will be updated with the line number on the scanned list. After export the database will look like this:
- Each document will generate 8 records.
- Each record will have a unique shipment number corresponding with a line in the multi-line Kofax Express field.
- For each document, all 8 records will point to the same document (PDF_Path is the same for all 8 records)
- Single-line fields, in this case Company, are repeated for each document.
- The List_Line database field contains the line number of the corresponding line in the Kofax Express multi-line field. For example “010541288500452621220030255452” is the 3d value on Document 1.
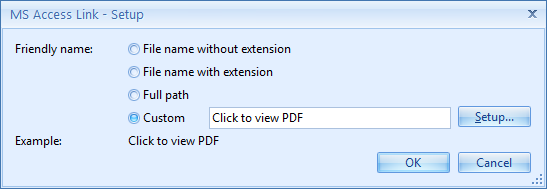
Press Setup… next to the option to define a friendly name for the hyperlink. You can also define friendly names using system values and Kofax Express index fields.
![]() Field mapping: Use the Field mapping grid to map Database fields with Kofax Express index fields. Each cell is a pick list showing the available fields. Make sure that mapped database fields are not “read-only” and that required database fields also map with Kofax Express index fields that are also defined as required.
Field mapping: Use the Field mapping grid to map Database fields with Kofax Express index fields. Each cell is a pick list showing the available fields. Make sure that mapped database fields are not “read-only” and that required database fields also map with Kofax Express index fields that are also defined as required.
![]() Date format: The Date format is only relevant if you map with a database field of the “Date” type. In that case the connector needs to know how dates are formatted in Kofax Express so they can be correctly uploaded in the database. For example in the demo job, birth dates are entered in Kofax Express as YYYY-MM-DD. The Date format mask needs to match this format.
Date format: The Date format is only relevant if you map with a database field of the “Date” type. In that case the connector needs to know how dates are formatted in Kofax Express so they can be correctly uploaded in the database. For example in the demo job, birth dates are entered in Kofax Express as YYYY-MM-DD. The Date format mask needs to match this format.
![]() Convert \ to /: This option is used in combination with Oracle databases.
Convert \ to /: This option is used in combination with Oracle databases.
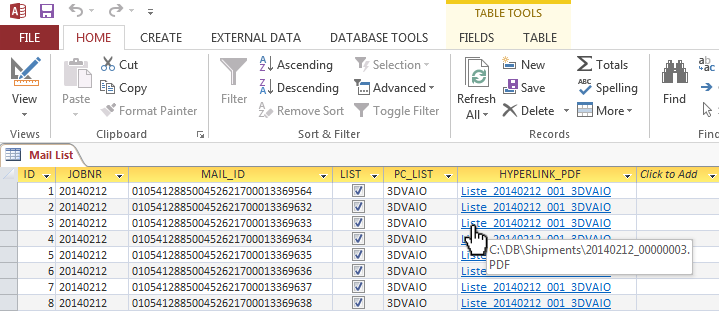
![]() Convert file name to MS Access link: This create hyperlinks to your PDF files when using a Microsoft Access database. A single click on the link in the Microsoft Access table will open the PDF file in the associated PDF viewer.
Convert file name to MS Access link: This create hyperlinks to your PDF files when using a Microsoft Access database. A single click on the link in the Microsoft Access table will open the PDF file in the associated PDF viewer.
12. Your suggestions are welcome!
Share with us your ideas about how to use the Database Connector or let us know how to improve it by clicking here.