Email Export Connector > Help
Email Export Connector – Help
Content
General
1. Requesting a trial activation code
2. SMTP and email header setup
3. Email body setup
4. Some basic email body HTML samples
5. Creating an HTML Email body using a web editor
6. Document thumbnail in Email body
7. Quick Tips
Kofax Express
1. Installation Kofax Express connector
2. Demo Kofax Express
3. Attachment setup in Kofax Express
Kofax Capture
1. Installation Kofax Capture connector
2. Installing the Kofax Capture demo batch class
3. Demo Kofax Capture
4. Attachment setup in Kofax Capture
5. Errors
Overview
- With the CaptureBites™ Email export connector you can scan a batch of documents and distribute them electronically via standard email.
- Document index fields can be used to specify the email recipient(s), subject, attachment’s file name and to define a dynamic body text.
- You can define a simple body text or create the body text very accurately in HTML format
- The HTML format can include different font types, styles, colors and sizes, hyperlinks, a thumbnail of the scanned document and images
- You can also insert document index fields to customize the text dynamically per scanned document.
- Here are some examples of uses cases.
- The CaptureBites Email connector can be used to email scanned documents internally to trigger a business process.
- Or it can be used in the mail room to scan incoming mail and distribute it to remote workers.
- For fast indexing, you ideally setup Kofax Express or Kofax Capture index fields to select an email address from a pick list or through database look-up. That index field is then used to email the scanned documents.
- After scanning and exporting the documents, emails with PDF attachments are automatically delivered to specified recipients.
- It is also possible to specify one or more cc email addresses for archiving all incoming mail in a special “archive” mailbox.
- The Email connector is available for:
- Kofax Express 3.0 and above
- Kofax Capture 9.0
- Kofax Capture 10.0
- For older versions of Kofax Capture or Kofax Express, please contact us.
General
1. Requesting a trial activation code
The CaptureBites email connector works in demo mode when it is not activated. In demo mode, a demo seal will be stamped in all exported images.
If you want to try out this product in full production mode without any limitation we can email you a trial code. Just follow the instructions when filling out the form.
2. SMTP and Email Header Setup
![]() Press the ? button to open this Help page.
Press the ? button to open this Help page.
Use the maximize button to enlarge the setup screen.
You can also resize the setup window by stretching it vertically or horizontally.
![]() Fill in your SMTP server address. The demo job comes pre-configured with the CaptureBites SMTP server settings . When used in production, please change these to your own server settings.
Fill in your SMTP server address. The demo job comes pre-configured with the CaptureBites SMTP server settings . When used in production, please change these to your own server settings.
You can find the SMTP settings of a range of popular email systems here.
![]() The user name is typically your email address. When in doubt, please contact your IT department.
The user name is typically your email address. When in doubt, please contact your IT department.
![]() Enter your SMTP server password. This is often the password you use to log into your email system.
Enter your SMTP server password. This is often the password you use to log into your email system.

![]() If you have a very slow or erratic internet connection, consider to increase the Timeout setting.
If you have a very slow or erratic internet connection, consider to increase the Timeout setting.
![]() SSL (secure socket layer) is a way of encrypting your email data as it travels across the Internet, so that the data will be secure and private. Gmail for example requires SSL.
SSL (secure socket layer) is a way of encrypting your email data as it travels across the Internet, so that the data will be secure and private. Gmail for example requires SSL.
![]() The port is most often Port 25. For Gmail it is 587 or 465 with SSL
The port is most often Port 25. For Gmail it is 587 or 465 with SSL
![]() Enter the sender’s email address. Received messages will appear to be sent by this email.
Enter the sender’s email address. Received messages will appear to be sent by this email.
![]() This is the sender’s “friendly” name. For example, you could send mails as NoReply@company.com and use The Mail Room as the friendly name. The email address will then be converted into the “friendly” display name at the receiver’s end.
This is the sender’s “friendly” name. For example, you could send mails as NoReply@company.com and use The Mail Room as the friendly name. The email address will then be converted into the “friendly” display name at the receiver’s end.
![]() Fill in an existing email address to test your settings, then press Test to send a test email. Check the inbox of the specified email address.
Fill in an existing email address to test your settings, then press Test to send a test email. Check the inbox of the specified email address.
If the Test fails, Kofax Express will not be able to export documents through the email connector.
If the Test fails, Double check your SMTP settings or contact your IT department for assistance.
![]() Select the Kofax Express index field that contains the receiver’s email address.
Select the Kofax Express index field that contains the receiver’s email address.
In the index field value, you can (optionally) specify the display name by separating it with a comma. Eg. name@customer.com,John.
You can also specify multiple email addresses by separating them with semi colons (;) or colons (:)
![]() Do not email document when…: Enable this option, if for some documents, the email address index field is blank.
Do not email document when…: Enable this option, if for some documents, the email address index field is blank.
Be aware that documents with blank email addresses, will not be emailed at all (cc only works when the main email address is not blank).
We recommend to use this option with care and in combination with our Multi Export connector to ensure that all documents, including those without email-address, are exported to a system of choice for exception handling.
![]() You can specify one or more cc email addresses.
You can specify one or more cc email addresses.
For example you can scan incoming orders and email them to your customers as a confirmation and cc a person in sales administration to fulfill the order.
You can also include an”Archive” email address in the cc list to archive all outgoing emails for later reference.
![]() To compose the email subject, you can combine fixed words, index fields and system variables. Click Setup to pick from a list of possible values.
To compose the email subject, you can combine fixed words, index fields and system variables. Click Setup to pick from a list of possible values.

![]() Press Activate to activate your license and enter your activation code.
Press Activate to activate your license and enter your activation code.
Without activation the email connector will show following behavior:
- Kofax Express will put demo stamps in the email-ed images
- Kofax Capture 10 will be fully functional if you have a partner license
- Kofax Capture 9 requires a trial or production code
![]() Press Help to open this page.
Press Help to open this page.
 When you see a blue information icon next to an option, just hover over it to see additional information.
3. Email Body Setup
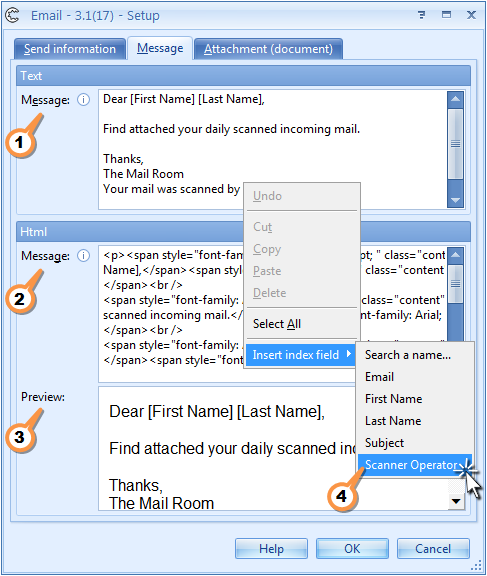
![]() Enter plain text here. This is the text that will be displayed if the receiving email client does not support formatted HTML text.
Enter plain text here. This is the text that will be displayed if the receiving email client does not support formatted HTML text.
![]() Fill the message in HTML format here. With HTML you can use various font styles and insert hyperlinks and images in your body text. Typically you create the HTML code with an HTML editor like TinyMCE. In such editor you can format the text with standard word processing tools and the tool will generate the HTML code for you.
Fill the message in HTML format here. With HTML you can use various font styles and insert hyperlinks and images in your body text. Typically you create the HTML code with an HTML editor like TinyMCE. In such editor you can format the text with standard word processing tools and the tool will generate the HTML code for you.
For more details how to do this, please go to this section.
![]() The preview box shows the result of the HTML code. The preview is updated in real time as you modify the HTML code.
The preview box shows the result of the HTML code. The preview is updated in real time as you modify the HTML code.
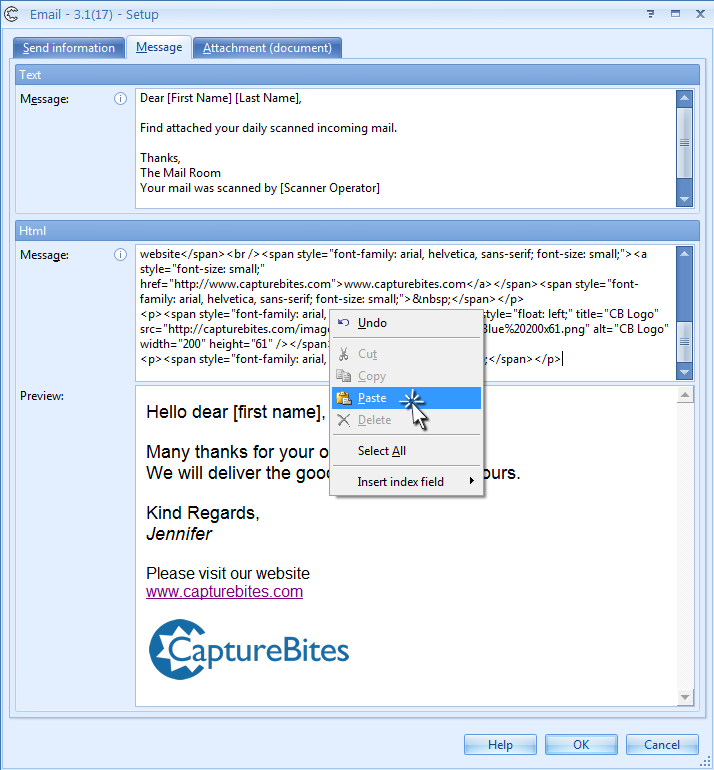
![]() Right click anywhere in the Plain Text or HTML Code to insert a Kofax Express system value or one of your index values.
Right click anywhere in the Plain Text or HTML Code to insert a Kofax Express system value or one of your index values.
4. Some basic email body HTML samples
Copy below blue HTML body text as a starting point in the Html box of the email connector’s setup. Then adjust at will:
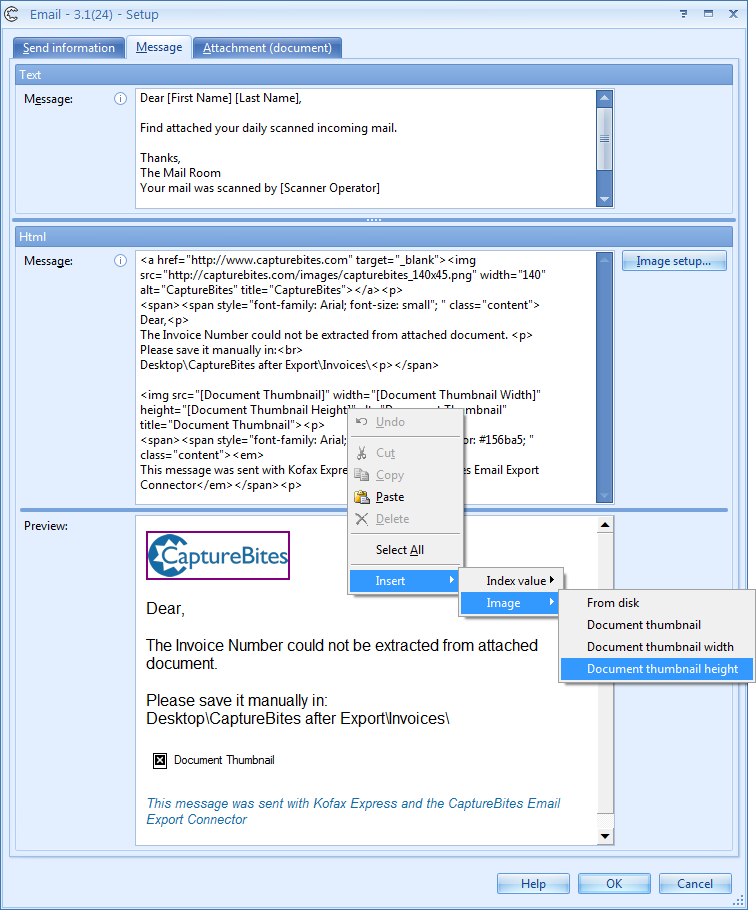
<a href="https:/capturebites.com" target="_blank"><img src="[Image From Disk]" width="140" height="45" alt="CaptureBites" title="CaptureBites"></a><p><span><span style="font-family: Arial; font-size: small"; " class="content">
Dear,<p>The Invoice Number could not be extracted from attached document. <p>Please save it manually in:<br>Desktop\CaptureBites after Export\Invoices\<p></span><img src="[Document Thumbnail]" width="[Document Thumbnail Width]" height="[Document Thumbnail Height]" alt="Document Thumbnail" title="Document Thumbnail"><p>
<span><span style="font-family: Arial; font-size: smaller; color: #156ba5; " class="content"><em>
This message was sent with Kofax Express and the CaptureBites Email Export Connector</em></span><p>
And this is how it looks in the Email setup window:
You can already generate a nice looking email body with some basic HTML tags. Just copy paste the below examples in your Html email body setup and tweak at will:
<br> starts a new line
<p> starts a new paragraph
<img src= "[Image From Disk]" width="140" height="45"><p> inserts a picture in the body. You can select a picture by pressing the Image setup... button.
Note: The image will also display when the width and height in pixels is not specified but it may be deformed in some email clients.
<img src="C:\ProgramData\CaptureBites\Express\ExportConnectors\Email\Data\ePost_Icon.png" width="54" height="67"><p>
Inserts the ePost icon in the body.
<a href="https:/capturebites.com"><img src="C:\ProgramData\CaptureBites\Express\ExportConnectors\Email\Data\ePost_Icon.png" width="54"></a><p>
Places a hyperlink on the inserted image. Change the hyperlink or image as you please.
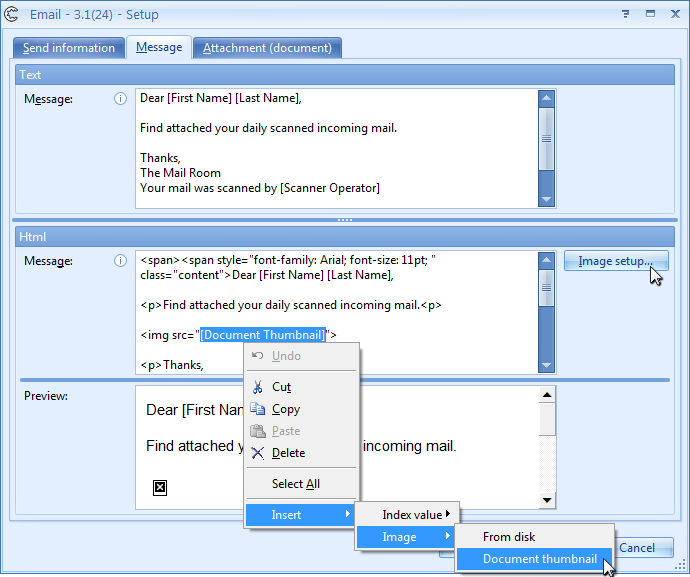
<img src="[Document Thumbnail]" width="[Document Thumbnail Width]" height="[Document Thumbnail Height]" alt="Document Thumbnail" title="Document Thumbnail"><p>
Inserts a thumbnail of a page of the document in the email body. The thumbnail settings (width, height, border) are defined by pressing Image setup in the Message tab. The [Document Thumbnail Width] and [Document Thumbnail Height] tags are automatically subsituted with the correct value when the email is generated.
<img src="[Image From Disk]" width="140" height="45"><p>
Embeds an image from your local disk in the email body. The image can be selected by pressing Image setup in the Message tab. Make sure to set the width and height correctly so it matches the pixel width and height of the selected image.
<span><span style="font-family: Arial; font-size: small"; ">Your text...</span><p> to set the text to Arial instead of default Times Roman.
Valid text sizes are: medium | xx-small | x-small | small | large | x-large | xx-large | smaller | larger 12pt (replace 12 with any other size)
5. Creating a formatted HTML email body using a web editor
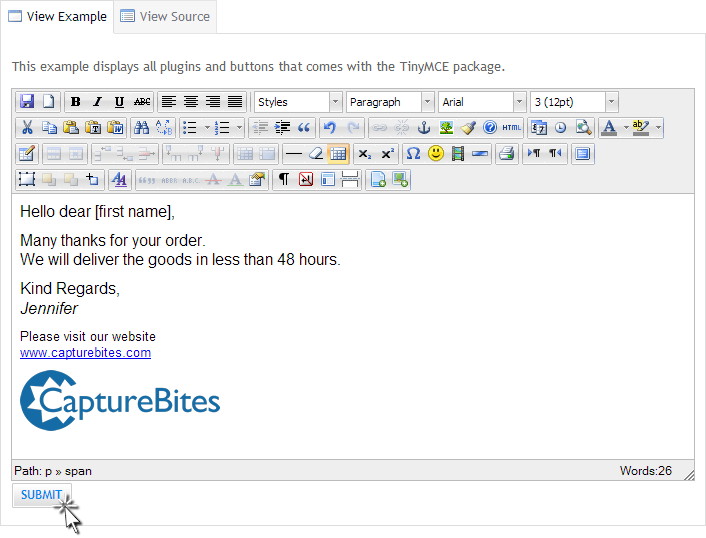
If you’re not familiar with HTML but still want to generate a more complex HTML body text, then you can use one of the many on-line HTML conversion tools on the web like TinyMCE or CuteEditor. If you want to work off-line, consider Coda. Below example is based on TinyMCE.
- Navigate to the TinyMCE page
- Start by deleting all the sample text in the View Example tab and enter your own. Format your text using the formatting tools, insert images and add links etc. Then click Submit to generate the HTML Code.
- Select and copy all the HTML code.
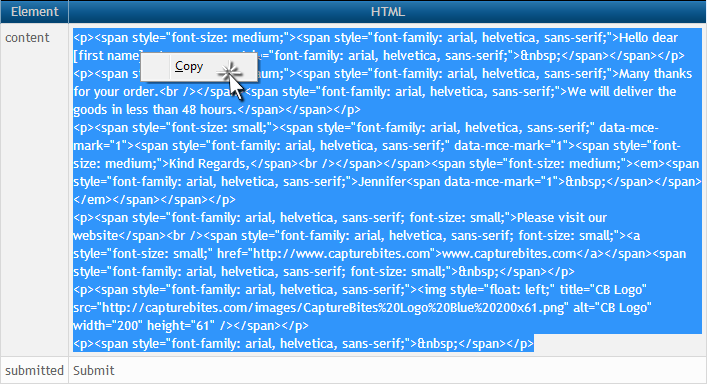
- Paste the HTML code into the CaptureBites HTML body text field and you’ll immediately see the result of your HTML body text in the preview box.
6. Inserting a document thumbnail in the body of the email
You can insert a thumbnail of a page of the scanned document in the email body.
With a large thumbnail (about 600 x 800 pixels), the recipient of the email can immediately see what document without opening the PDF attachment.
If you use [Document Thumbnail] as the image location in your HTML body, it will insert a thumbnail of a page of the document*. Like in
<img src="[Document Thumbnail]" width="[Document Thumbnail Width]" height="[Document Thumbnail Height]" alt="Document Thumbnail" title="Document Thumbnail"><p>
The [Document Thumbnail] tags can be selected from the right-click menu. Don’t forget to also use the [Document Thumbnail Width] and [Document Thumbnail Height] tags in your HTML code like in above example. Otherwise some email clients may show the thumbnail with incorrect proportions.
Insert the [Image From Disk] tag, if you want to insert a fixed image, like for example a logo with a link to your website, in the email body use following HTML:
<a href="https:/capturebites.com" target="_blank"><img src="[Image From Disk]" width="140" height="45" alt="Press here to open www.capturebites.com" title="www.capturebites.com"></a><p>
Make sure to set the width and height correctly so it matches the pixel width and heigth of the selected image.
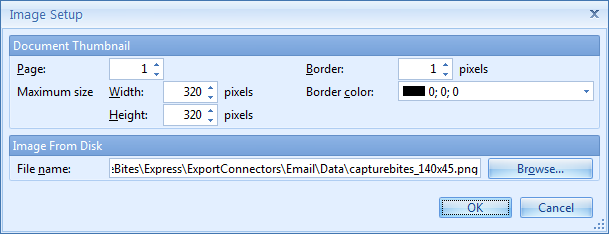 Fine tune the appearance of the thumbnail by pressing the Image setup… button.
Set the page of the document you want to insert as a thumbnail.
Examples: 1 = first page, 2 = second page, -1 = last page, -2 = page before last page
Set the color and thickness of the border around the thumbnail. 0 pixels is no border.
Set the width and heigth of the thumbnail. When the pages vary in format and size, the thumbnail will automatically be sized for a maximum fit in the defined width and height. The thumbnail will always preserve the page’s original proportions.
The [Document Thumbnail Width] and [Document Thumbnail Height] tags are automatically subsituted with the correct values when the email is generated.
With the browse button, you can select the image you want to use in case you make use of the [Image From Disk] tag in your email body. All web mail compatible images such as jpg, png, gif and bmp are supported. Other formats can be selected but could render unpredictable results.
*Note: It is normal that the page thumbnail is not displayed in the preview. It will display correctly in the actual email messages.
Quick Tips
When you see a blue information icon next to an option, just hover over it to see additional information.
Your suggestions are welcome!
Share with us your ideas about how to use the CaptureBites Email Connector or let us know how to improve it by clicking here.
Kofax Express
Kofax Express Demo Job
- If you also installed the sample jobs, open Kofax Express and open the sample job CB Email to familiarize yourself with the functionality.
- For more information about the demo, please go to the Demo Kofax Express section on this help page.
2. Running the Demo with Kofax Express
IMPORTANT: Before you proceed, make sure the CaptureBites Email Connector for Kofax Express is installed. If not, please go to the Installation Kofax Express connector section on this page for instructions. Start Kofax Express. Open the CB Email – MAIL-0001 batch. If the batch is not visible press All Jobs.
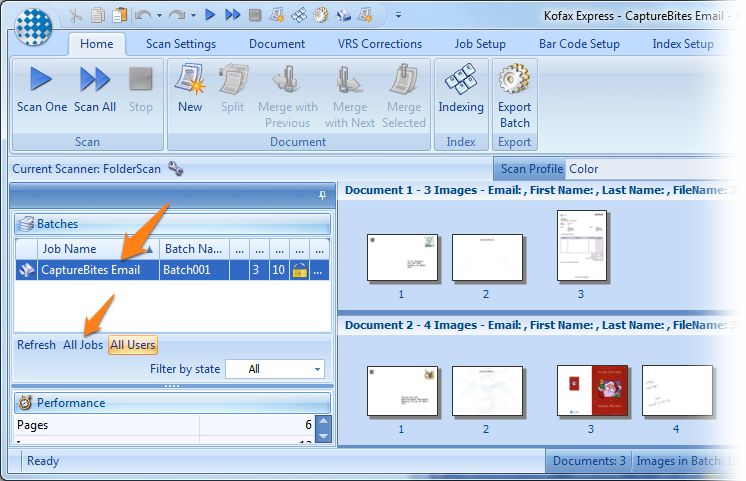
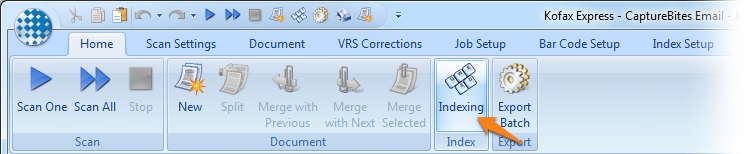
The pre-scanned batch contains 3 mail items. To look up the email addresses for each item, press Index in the Home Tab.

If the image is too small in the Indexing Viewer, click on the Page fit button in the bottom tool bar.
Start typing the recipient’s first name in the Search a name… index field. This field is connected to a database and instantly searches for names that start with the letters you type.
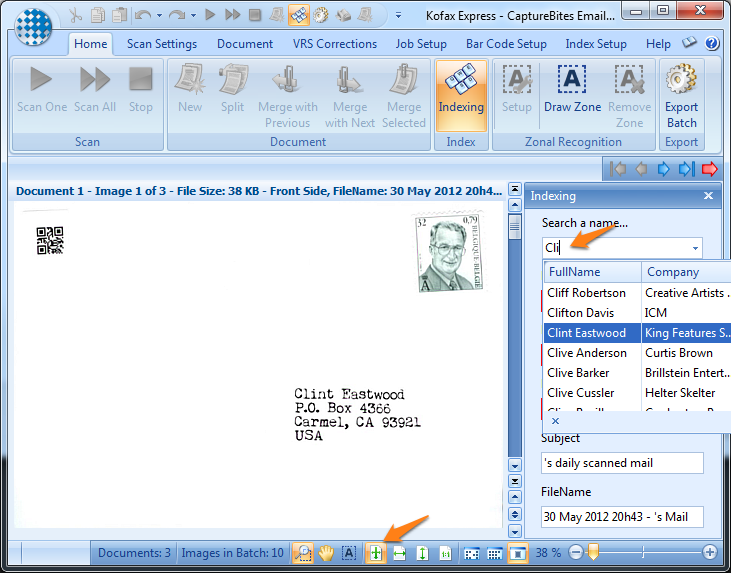
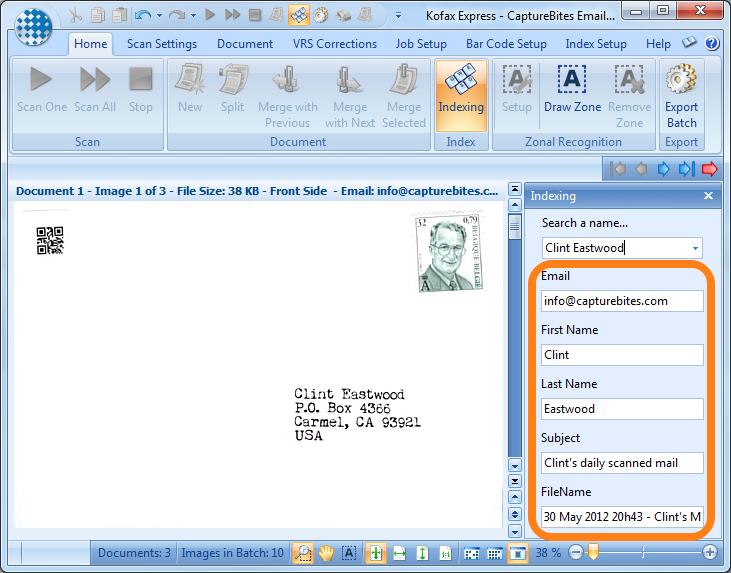
As soon as you select the correct name, all the other fields, including the email address are auto-filled. Because we don’t want to send the mail item to the real Clint, Sandra or Arnold, the database always fills in our info email in the email address field. Feel free to fill out your own email address to send the mail items to yourself and see the result after export in your inbox.
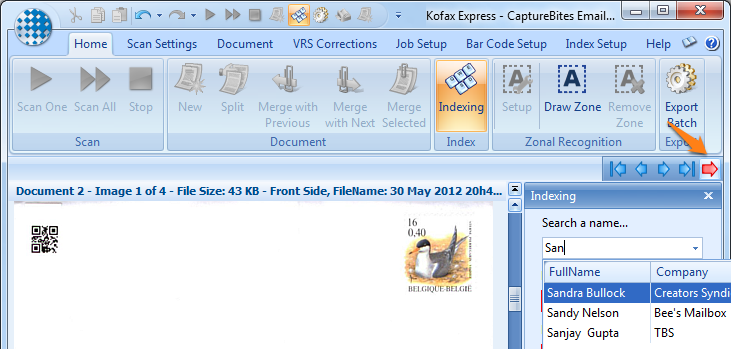
Click on the red arrow to navigate to the next mail item and look up the email address for Sandra and Arnold as well. Replace the email address with yours to receive the items in your own inbox.
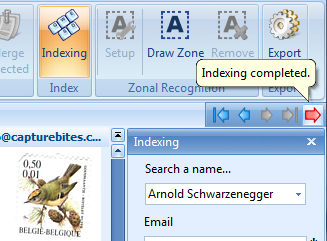
When you have indexed all three items, a balloon message appears, indicating that indexing has completed.
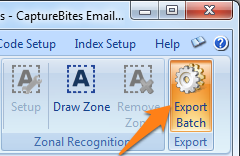
Press Export Batch and confirm that you want to Export the batch. During export, the three mail items will be send to the specified email addresses. Each email message will be dynamically composed with the provided index information.
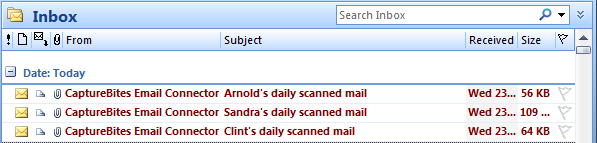
If you have filled out your own email address, just check your inbox and you’ll find three mail items like this. Notice how the Subject of each mail is based on its index information. The From name and the Subject is completely configurable in the Email Export setup.
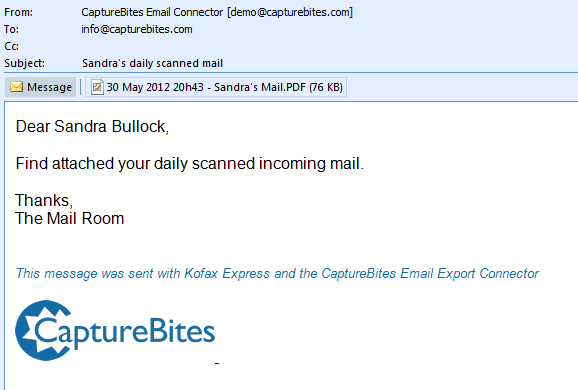
Open one of the messages and notice how the Attachment’s name and body text is composed of variable index data and other data like date and time stamps. The body text also includes an image with a hyperlink.
All these elements can be customized through the Email Export setup.
For more information about how to configure the CaptureBites Email Export Connector, open any of the Tabs covering this subject.
3. Attachment Settings for Kofax Express
- Define the name of your attachment by selecting Kofax Express system values or any of your index fields. Combine them with separators and fixed text as you please.

- Define your attachment as PDF or PDF/A format. Click Setup next to the PDF type to configure additional PDF options.

- You can super compress your PDF files to minimize attachment file size and enable OCR to make the PDF files searchable.

- You can completely disable the file attachment in case you just want to use the Email connector to send a confirmation in combination with another connector using the CaptureBites Multi Export connector. In the Multi Export connector setup, just make sure to make the email connector follow the connector you want to send a confirmation for.

Kofax Capture
1. Installation Procedure for Kofax Capture
- Download the installer from here.
- Run the installer and follow instructions.
- If you use a Kofax Capture Server configuration and install the connector on one of the clients, then the installation will take longer. Please be patient.
- At the end of the installation process, a message appears.

- The connector is now installed and registered in Kofax Capture and can be assigned to a Document Class.
Demo Batch Class
- We prepared a demo Batch Class which you can easily import into Kofax Capture 9 or Kofax Capture 10.
- For more details about the demo, go to the Install demo batch class in Kofax Capture section on this help page.
2. Installing the Kofax Capture Email demo batch class step by step
Installing the Email demo batch class is simple, just follow the installation procedure below, step by step. IMPORTANT: Before you proceed, make sure the CaptureBites Email Connector for Kofax Capture is installed. If not, please go to the Installation Kofax Capture connector for more details.
Quick guide for the experienced Kofax Capture user
This is the quick guide for the experienced Kofax Capture user. If you’re not familiar with Kofax Capture, proceed to step 1.
- Download the CB_Email_Batch_Class.cab file and sample images from here.
- Import the batch class in Kofax Capture.
- This is the structure of the batch class after import:

- The CaptureBites Email for KC connector is associated with the Incoming Mail Document Class.
- To activate the connector, open the CaptureBites Email Connector’s setup and proceed with step 12 through 16.
- Import some of the sample images with KC Scan, enter your email in KC Validation, run KC PDF Generator and run KC Export. Check the result in your e-mail inbox.
- You could enhance the demo Batch Class with database look-up to search for the name and email during Validation.
- STEP 1: The sample batch class and sample TIF images can be downloaded from here. This will open a browser window like this:

- STEP 2: Just right click on the CB_Email_Batch_Class.cab file and select Save target as… This can vary from browser to browser. Do this for the three sample TIF images as well.
- STEP 3: Save CB_Email_Batch_Class.cab and the sample images in a location where you can easily find them. For example on your desktop.
- STEP 4: Open Kofax Capture Administration and press Import Batch Class in the Home Tab in Kofax Capture 10 or select the File/Import… menu in Kofax Capture 9.
In Kofax Capture 10

In Kofax Capture 9

- STEP 5: Browse to the folder where you saved CB_Email_Batch_Class.cab, select it and click Open.

- STEP 6: A message appears informing you that the Batch Class is unpacked. Just click OK.

- STEP 7: The Import dialogue opens and you just need to Add the CaptureBites Email Batch class to the Selected Batch Classes list, select the Replace duplicates with items imported option then click Import.


- STEP 8: The Import Progress window appears, Just click OK and wait a few seconds. The actual importing is now taking place and the import window will automatically close when importing has finished.

- STEP 9: The CaptureBites Email Batch Class is now available in Kofax Capture.

- STEP 10: To activate the Capture Email Connector, expand the CaptureBites Email Batch Class and right click on the Incoming Mail Document Class. Select Export Connectors…

- STEP 11: The Email for Kofax Capture export connector is already selected, nothing to do here. Just click Setup.

- STEP 12: Click the License… button.

- STEP 13: Check whether your license is activated. If the Activation status is Yes, you can continue with the next Step.
If the Activation Status is No and you received a valid Activation code, copy it in the Activation code box and click Activate. The Activation status will turn to Yes and you can continue with the next Step.

If you don’t have an activation code, please, you can request a quote or request a trial activation code.

- STEP 14: After successful activation, you can just close the Activation window, click OK in the Email for Kofax Capture Setup window and Close the Export Connectors window to return to the main screen of the Kofax Capture Administration module.
- STEP 15: Final step is to publish the Batch Class to try it out! Right click on the CaptureBites Email batch class and select Publish…

- FINAL STEP 16: Select the CaptureBites Email Batch Class in the list and click Publish. wait a few seconds and as soon as the status says “Publishing successful” the Batch Class is ready to use.

Close the Publish window and you’re DONE!
Go to the Running the demo with Kofax Capture section to learn about the demo.
3. Running the Demo with Kofax Capture
IMPORTANT: Before you proceed, make sure the Kofax Capture Demo Batch Class is installed. If not, please go to the Installing the Kofax Capture demo batch class for instructions.
Open Kofax Capture Scan, Create a Batch, Select CaptureBites Email as the batch class and click OK.

Click Scan All, navigate to the folder where you have placed the sample images, select all three sample TIF images and click Open.
If you have not yet downloaded the sample TIF images, download them from here.

All three mail items are now imported in Kofax Capture. Close the batch to make it available for Validation.

Open Kofax Capture Validation. Enter the First Name and your Email address for each of the items. The email field is sticky, so you only have to enter it once.
You can save the information and navigate to the next item by clicking the Save button.

When you have saved the information of the last item, a message appears: All documents have been processed. Close batch? Yes / No
Select Yes.
Open Kofax Capture PDF Generator and Kofax Capture Export
These are “unattended” modules and they will process batches automatically as they become available.


During export, the three mail items will be send to the specified email addresses. Each email message will be dynamically composed with the provided index information.
If you have filled out your own email address, just check your inbox and you’ll find three mail items like this.

Notice how the Subject of each mail is composed of a fixed part and a variable time stamp part. The From name and the Subject is completely configurable in the Email Export setup.
Open one of the messages and notice how the Attachment’s name and body text is composed of variable index data and other data like the name of the scanner operator, date and time stamp. The body text also includes an image with a hyperlink.
All these elements can be customized through the Email Export setup.

For more information about how to configure the CaptureBites Email Export Connector go to any of the relevant help sections.
4. Attachment Settings for Kofax Capture
The CaptureBites Email connector supports PDF attachments. These PDF files need to be generated by Kofax Capture before they are exported by the CaptureBites Email connector.
- To generate PDF files with Kofax Capture you have to add the PDF Generator to your Batch Class Queues.

- The PDF settings are defined at Document Class level. Open your document class properties, select the PDF Tab and set desired options.

- The name of the attachment is defined in the Attachment Tab of the CaptureBites Email connector’s settings. You can compose the name of your attachment by selecting Kofax Capture system values or any of your index fields. Combine them with separators and fixed text as you please.

5. Errors
What does Export Error -1 in Kofax Capture mean?
The complete error is: Error in document #1, Export Connector Returned -1. Your export connector may need to be re-installed.
This is Kofax Capture’s general error message when something goes wrong during export and it typically does not mean you need to re-install your connector 🙂

Find the exact reason by opening Kofax Capture’s log file.
- In a Kofax Capture Client Server environment, you find the log file by default in: C:\ProgramData\Kofax\CaptureSV\Logs
- In a Kofax Capture Standalone environment, you find the log file by default in: C:\ProgramData\Kofax\Capture\Logs
Open the most recent log file in the Logs folder and navigate to the last entries in the log file. Find below a sample log file from our test system. We highlighted the two most common reasons why the export can go wrong.

Most common reasons for export error -1 and suggested solutions
Reason 1: Your connector is not correctly activated. Please check the page about activation here to resolve this issue.
Reason 2: You have not added the PDF Generator Queue to your batch class and/or forgot to enable the PDF format in the Document Class properties. For more information, open the Attachment Setup Kofax Capture Tab.
Reason 3: You have not defined your email index field as a required field in Kofax Capture causing some emails to be blank. To resolve this issue, make the email index field a required field or enable the option Do not email document if the index value used in “To” is empty in the CaptureBites Email connector setup. Read more about this option in the SMTP and Email Header Setup section.
Reason 4: Your SMTP settings are incorrect causing the SMTP connection to time out. Go to the SMTP and email header setup section to read more about testing and configuring your SMTP server settings.
I'm not able to log in through Office 365
When logging into your Office 365 account and testing your connection, you get an error.
This error could be caused by the fact that you have the "Authenticated SMTP" option disabled for that user. You still need SMTP to authenticate using OAuth. OAuth is the login method. SMTP is the outgoing email protocol.
You can check if SMTP is still enabled in the Office 365 admin portal for your user.
As a reference, this is how it looks on another system.
Enable SMTP for specific mailboxes
- Open the Microsoft 365 admin center and go to Users > Active users.
- Select the user, and in the flyout that appears, click “Mail”.
- In the “Email apps” section, click “Manage email apps”.

4. Verify the “Authenticated SMTP” setting: unchecked = disabled, checked = enabled
