Email Export Connector
Scan batches of documents and assign an email address to each document for electronic distribution
 With the CaptureBites™ Email export connector you can scan a batch of documents and distribute them electronically.
Index fields can be used to specify the email recipient(s), subject, attachment’s file name and to define the body text.
You can use the CaptureBites Email connector to email scanned documents internally and trigger a business process.
It can also be used in the mail room to scan incoming mail with Kofax Express or with Kofax Capture / TotalAgility. Each mail item is associated with an email address from a pick list or through database look-up.
After scanning and exporting the mail, emails with PDF attachments are automatically delivered to specified recipients. It is also possible to specify one or more cc email addresses for archiving all incoming mail in an “archive” mailbox.
Use cases for the CaptureBites Email connector
- Combine the Email connector with another connector using the CaptureBites Multi Export Connector to store your documents in a system of choice (SQL Server, Alfresco, SharePoint, IBM CMOD, etc.) and send a confirmation email to the related customer or to administration to take action on the document.
- Scan invoices to a document management system and send an email to your accountant for further handling.
- Process documents automatically with AutoBites and MetaTool and email exceptions to an email address for manual handling.
- Some systems can accept documents by sending them to a special email address and automatically tag them with words in the subject line
- For example read this short article about using email to file documents in Evernote.
- Or have a look at Send to Dropbox to email scanned documents directly into your DropBox account
Email export connector settings
For a detailed explanation of each of the settings, please refer to the Email Connector’s On-Line Help. The setup of the Kofax Express and Kofax Capture / TotalAgility versions are almost identical with only a few subtle difference explained in the On-Line Help.
SMTP server and email header settings

Setting up the email body text
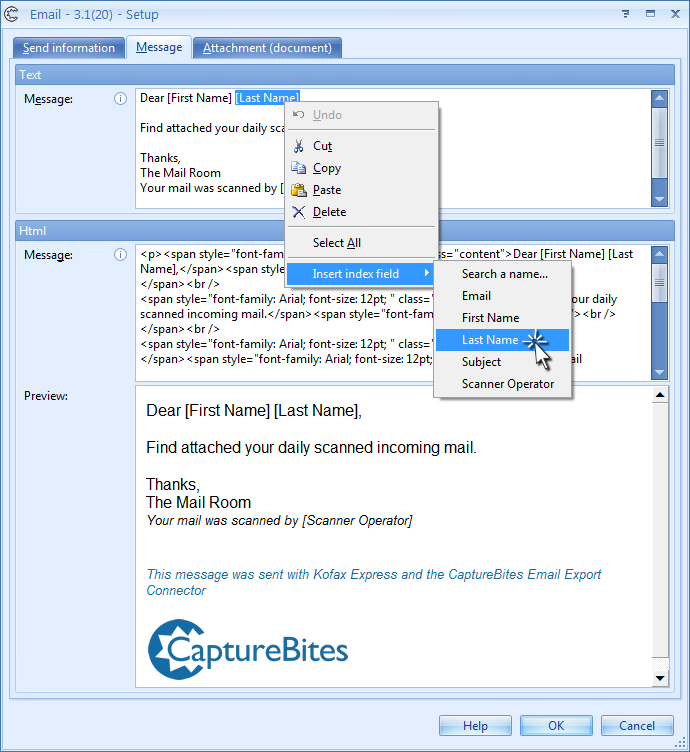
In the Message tab, you define the body text. In the body text you can use Kofax Express or Kofax Capture / TotalAgility index fields to create a greeting that changes dynamically. Just insert the index fields between square brackets. Or even easier, just insert index fields by right clicking in the body text box and pick index fields from a list. The body text will be updated with the correct index field values for each exported document.
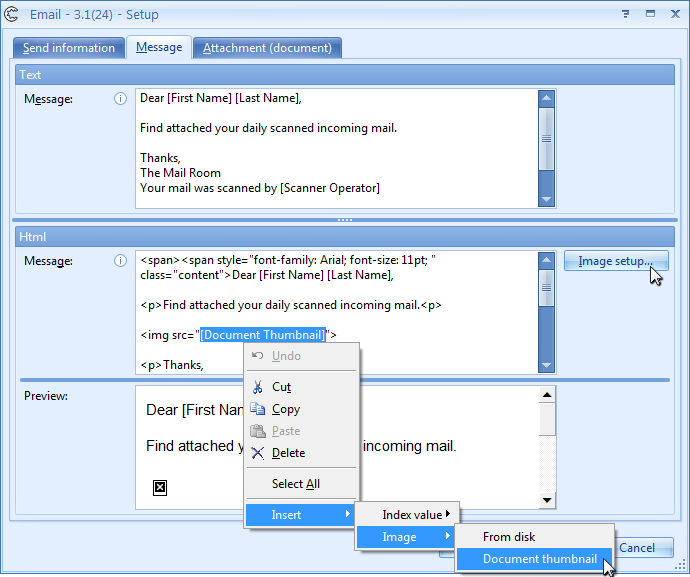
You can optionally define HTML body text to create formatted messages using a font type of choice, insert hyperlinks, a thumbnail of a page of choice of the scanned document, a logo with a hyperlinkg etc.
If you enter both a plain text and HTML body text, the recipient’s email system will automatically select the version it supports.
If you’re not familiar with HTML but still want to generate a nicely formatted HTML body text? Just use one of the many on-line HTML generator tools on the internet We have good experience with CuteEditor. With this on-line tool, you can format the body text at will, create hot-links, tables, insert images and generate the HTML code by selecting the HTML tab. Just paste the HTML code in the email connector’s setup and you’ll immediately see the result of your HTML body text in the preview box.
Inserting a thumbnail of your document in the email body
Insert the [Image From Disk] tag, if you want to insert a fixed image, like for example a logo, in the email body.
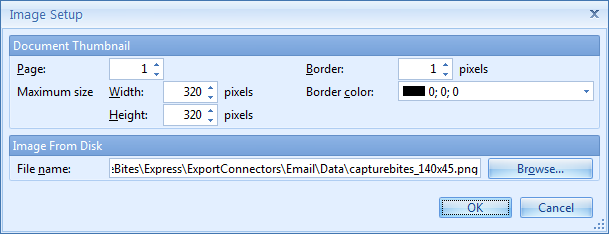
Set the color and thickness of the border around the thumbnail. 0 pixels is no border.
Set the width and heigth of the thumbnail.
*Note: It is normal that the page thumbnail is not displayed in the preview. It will display correctly in the actual email messages.
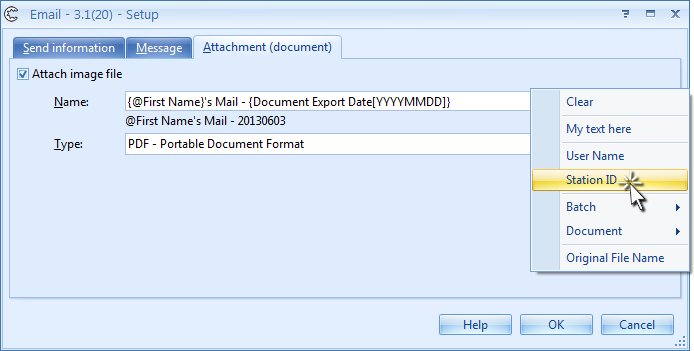
Defining the attachment name and PDF setup
You can completely disable the file attachment in case you just want to use the Email connector to send a confirmation in combination with another connector using the CaptureBites Multi Export connector.
In the Multi Export setup, just make sure to make the email connector follow the connector you want to send a confirmation for.
The resulting email
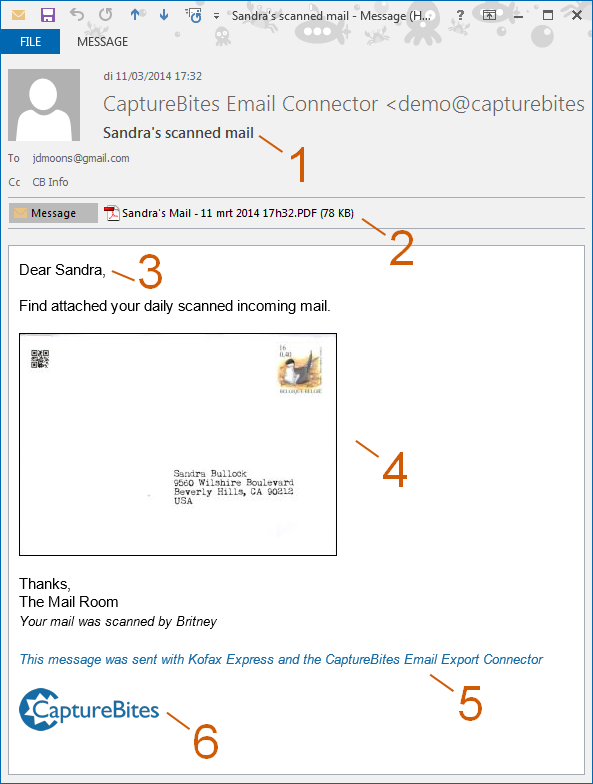
2Use index values, date and time stamps and fixed values to define the name of the PDF attachment.
3Combine fixed text and index values in the body of the text.
4Insert a thumbnail of a page of the document in the email body. Define the size and optionally add a border.
5Format the body of the text at will using standard HTML.
6Insert a fixed image (jpg, png, gif, etc) such as a logo and hyperlink it with a web page of your choice.
Combine this product with CaptureBites MetaTool for advanced index extraction and more
Use this product in combination with CaptureBites MetaTool for advanced index extraction, keyword document separation, floating data extraction, multi-field and drill down database lookup and other advanced functionality.
To learn more about MetaTool, press any of the feature buttons below.

The MetaTool presents itself as a standard Kofax Express export connector and passes through extracted data and processed images to an export destination of choice such as Email, Folder Structure, FTP Server, Database, MS SharePoint Server & Online, Alfresco, OpenText Content Server, Xerox DocuShare, or other DMS systems.
About the download and included demo jobs
The download button on top of this page installs a functional version of this CaptureBites product. It also includes some demo images and a demo job to show the functionality.
In demo mode, a demo seal will be stamped in all exported images. You can switch the demo version to full production mode by entering an activation code which you can purchase from our partners. You can continue using any of the jobs you configured in demo mode after activation of the software.
If you don't have Tungsten / Kofax Express yet, you can download a trial from here.