Create Installer > Help
Create Installer Tool Help
Content
1. What is the “Create Installer Tool”?
2. Installing the “Create Installer Tool”
3. Creating a new profile
4. Adding elements to a profile
5. Building an installer
6. Uploading and sharing your installer
7. The result is a custom installer. What does it do?
8. Using FolderScan as your scanner
9. Installing a database for DB lookup
10. Checking for updates and installing additional products
11. Suppressing the Windows User Account Control message when starting the Create Installer Tool
12. Share your installer
13. I get a system error when running the Create Installer tool, what’s wrong?
With the Create Installer Tool you can create your own installers to share a complete configuration with a single installer file. It is based on a tool that we have been using for several years, but we now productized the tool and made it available to our partners and customers.
For Kofax Express, you just select jobs, batches, FolderScan images, connectors etc. that you want to include in your installer.
For Kofax Capture and Kofax TotalAgility, you just select export connectors, demo images, etc. that you want to include in your installer.
For CaptureBites MetaServer, you just select workflows, demo folders, database files, MetaServer modules, etc. that you want to include in your installer
You then press “Build“ to generate the installer. With the upload function you can generate a download link that you can share with your customer.
The Create Installer Tool directly accesses all Kofax Express jobs, Kofax Capture / TotalAgility export connectors, MetaServer workflows, CaptureBites connectors, batches, scanner profiles as they exist on your system. So when you want to create a new version of your installer, you just make adjustments to your job configuration directly in Kofax Express or to your MetaServer workflow configuration, adjust the version number of your installer and build and upload a new version of the installer.
The fastest way to get familiar with the Create Installer Tool is by watching the 5 minute video tutorial.
Download and install the tool from here.
The tool requires Microsoft .NET Framework 4.5 or higher on your system. If you have Windows Update in automatic update mode, it is normally already on your system. Otherwise, you can download Microsoft .NET Framework 4.5 from here.
After installation, the tool will provide access to all connectors, jobs, batches, workflows, etc. which are already present on your system.
The Create Installer Tool installer does not install any CaptureBites connectors or programs. But once installed, the tool will check for updates and install new versions of CaptureBites products already on your system to make them compatible with the tool.
You can easily install additional products by pressing Check for Updates…
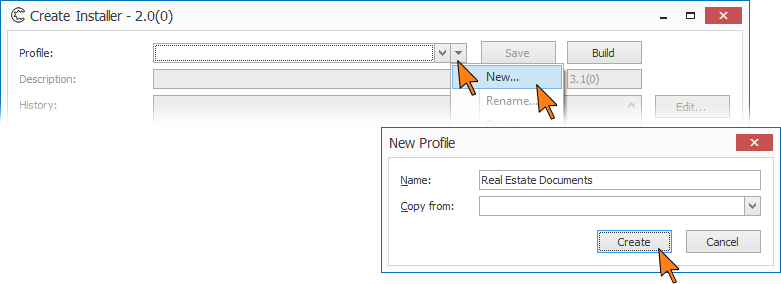
The first time you open the Create Installer Tool, you need to create a new installer profile.
You do so by pressing “New…” in the menu button next to the profile list. Name your profile and press “Create”.
If you have already created profiles before, you can base new profiles on an existing one by selecting it from the “Copy from“ list.
Now you can start adding different elements to your installer. You can include following elements:
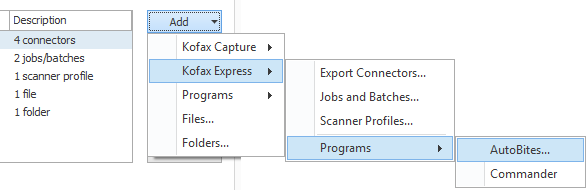
Kofax Express related elements
- Export connectors
- Jobs
- Batches
- Scanner Profiles
- AutoBites
- Commander
Kofax Express related items
- Export connectors
- Batches
- Scanner Profiles
- AutoBites
- Commander
Kofax Capture related elements
- Export connectors
- Batch classes can be first exported as a .cab file with Kofax Capture and then included by means of the Add Files function (see below)
CaptureBites programs
- MetaServer and MetaServer modules
- Bar Code Generator
- Registered Mail Matcher
- Create Installer Tool
Files
- Database files such as CSV, MDB or XLS files (with optional auto-configuration of ODBC sources)
- PNG files for printing transparent watermarks with the CaptureBites Digital Imprinter or CaptureBites Print connectors
- Readme files
- Etc.
Folders
- Folders containing FolderScan images or Demo documents
- Folders containing other installers such as a PDF viewer or TIFF viewer
History
Document your installer by adding the version and date to the Version History by pressing “Insert Version” and add some descriptive text for later reference.
After you have included all the required elements, Save your profile.
Once you have included all the elements that you want to include in your installer, you can create the installer by pressing “Build”.

Everytime you share an updated version of your installer it is good practice to increment the version number and keep track of the changes in the History.
When the build process is completed, the Create Installer tool will automatically open the folder where the installer is located. You can now test your installer.
The Create Installer Tool comes with an integrated upload function. Just press Upload and your installer will be published on the web. It actually creates a micro-site with clear download instructions for your customer.
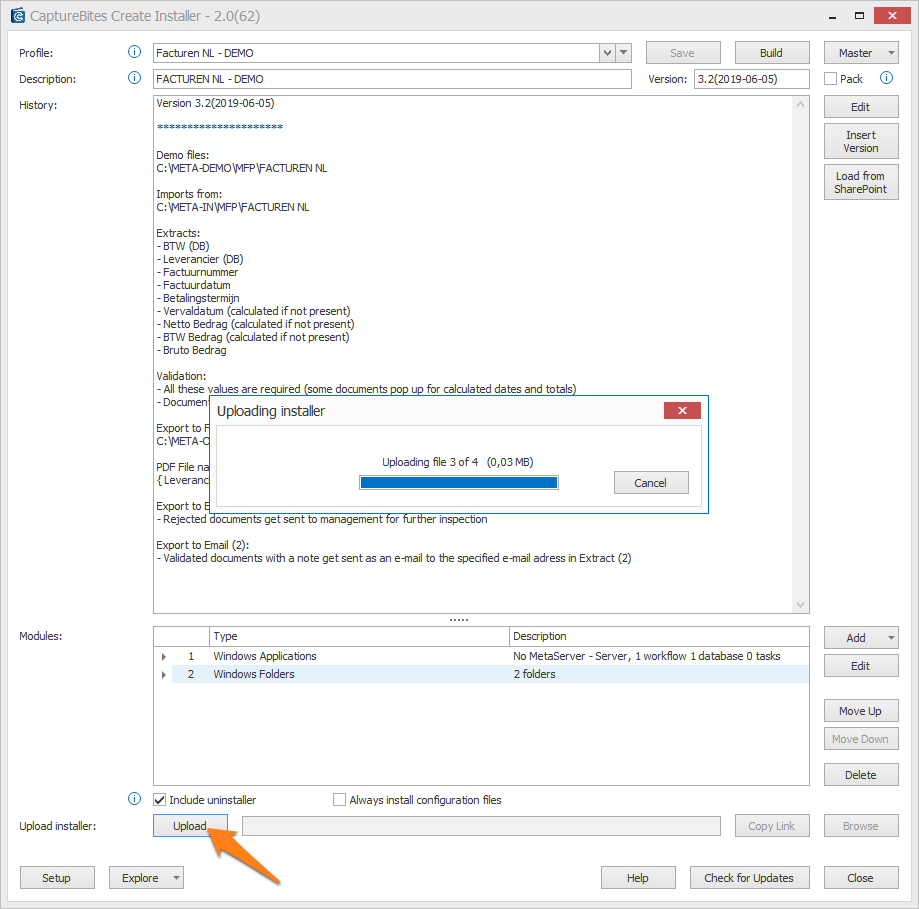
When the upload is done, a download link will be generated. You can test the link by pressing the “Browse” button or copy it by pressing the “Copy Link” button.

The expiration date is automatically set to 30 days after upload. If you want to make your installer available again after 30 days, just upload again and a new link will be generated with a new expiration date.
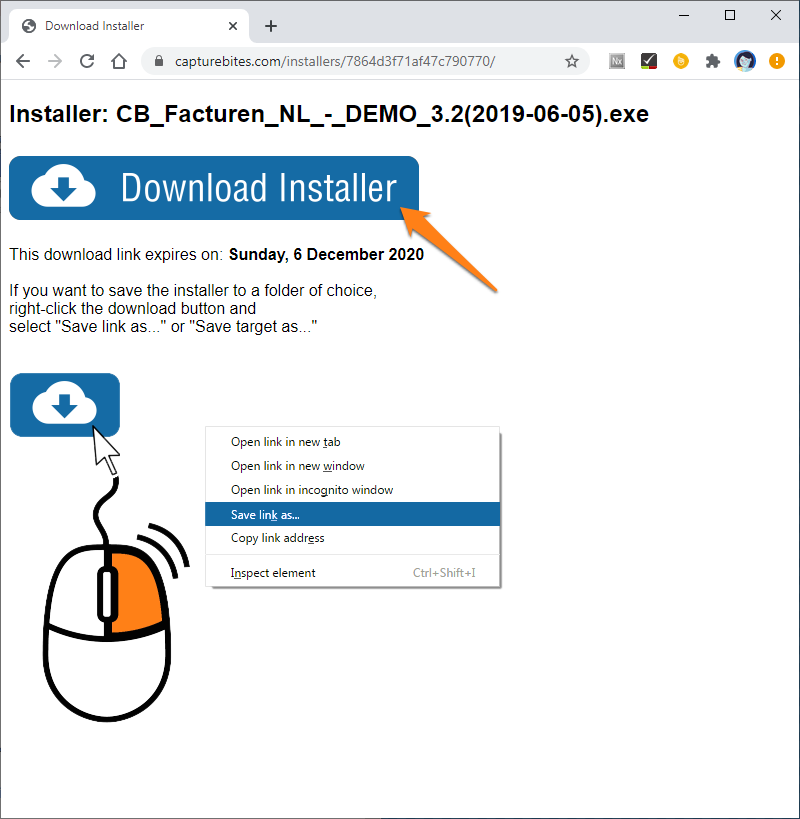
When your customer presses the download link, the micro-site opens and looks like this.
After download the customer can run the installer which looks like this. The functions are self-explanatory.
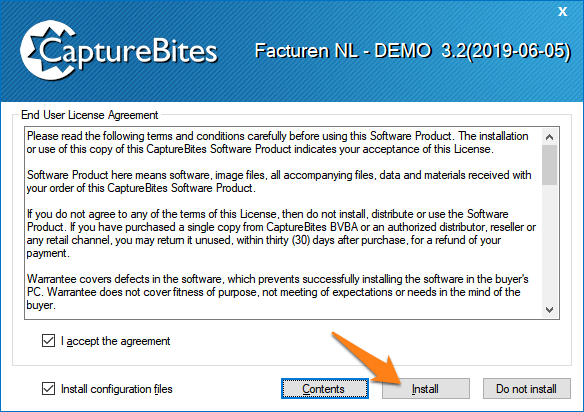
Unchecking the Install demo files option, only installs the included connectors and products and none of the other elements.
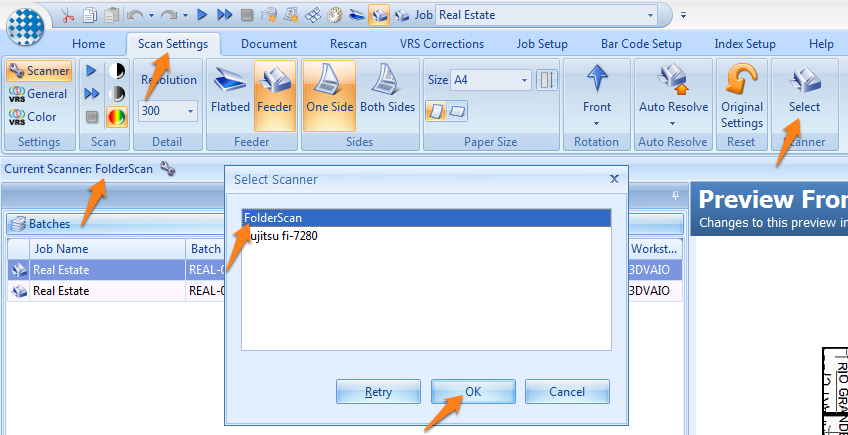
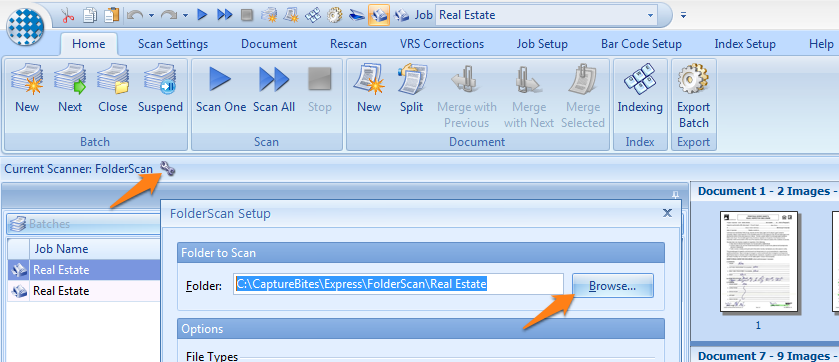
Unless you know the scanner make and model that is already installed on your customer’s system, we recommend to select FolderScan in your Kofax Express job settings. FolderScan is always present on any Kofax Express system. If you select a scanner that is not present on the target system, the user will get errors when opening the job on his system because the selected scanner cannot be found.
Then select a folder with images relevant to the job and include this folder in your installer as well.
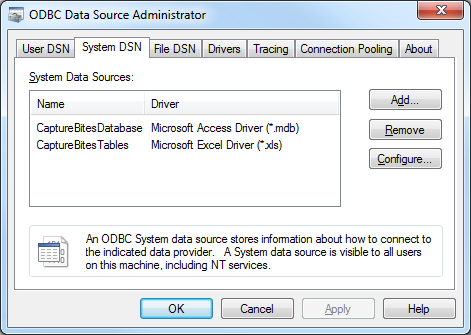
When you include an XLS file (Excel), MDB file (Access) or SQLite (SQLite) file, you have the option to have the installer automatically generate the ODBC sources on the target system.
The name of the ODBC source will be identical to the name of the XLS, MDB or SQLite file. In other words, if your Excel file is called Postcodes.xls, then the ODBC source will be called Postcodes.
The ODBC source will be defined as a system DSN (stands for Date Source Name). A system DSN is available for all Windows user which assures that any user on the target system has access to the data source.
So it is important that you define your Kofax Express jobs correctly by pointing to the correct ODBC source name.
If you have trouble creating an ODBC Source on a 64 bit Windows, please read the section about Defining an ODBC Source following this link.
Tip!
A simple trick to be sure the ODBC source is correctly named and configured, is by making a simple installer with the Create Installer tool.
Just include the XLS, MDB or SQlite file that you want to use, build the installer and run it to automatically configure the ODBC source. Then use that ODBC source in your Kofax Express job.
Jobs, batches and scanner profiles on a Kofax Express Client/Server System
On a Kofax Express client-server system, jobs, batches and scanner profiles are only saved on the server. The paths are also different from the paths on a standalone system.
Job path on a client-server system (win7 or higher):
C:\ProgramData\Kofax\Kofax Express 3.3\Server\Jobs\
Scanner profiles path on a client-server system (win7 or higher):
C:\ProgramData\Kofax\Kofax Express 3.3\Server\Scanners\Profiles\
Batches path on a client-server system (win7 or higher):
C:\ProgramData\Kofax\Kofax Express 3.3\Server\Jobs\
NOTE: When you copy jobs, batches or scanner profiles from one client-server installation to another, you need to restart the service called Kofax Express Server on the PC acting as Kofax Express server to make them visible for the server and clients.
Some do’s and don’ts related to database files:
- Excel files are easy to work with because most customer own and know Excel very well. But using an Excel table as a lookup database has some limitations. For example Excel slows down beyond 20000 rows.
- Don’t use Excel if you have more than 20000 rows but use an Access MDB file instead which is better tuned for large quantities of records.
- Don’t use hyphens “-” in column names, ODBC cannot handle them and will generate errors.
- Don’t use spaces ” ” in column names and replace them with underscores “_”, Example: Instead of using “Customer Number”, use “Customer_Number” as the column name. The Excel ODBC driver cannot handle spaces and will generate errors.
- Make sure that post codes, customer numbers, invoice numbers etc. are not considered as “numeric” but as “text” by selecting “Text” as the column format in Excel and Access. Otherwise, a post code like 01234 will be converted to 1234. Or an invoice number like 2014.001 will turn into a decimal number.
- Make sure that there are no empty rows at the end of your Excel table. You can check that by pressing CTRL-END in your table. This will jump to the last row. Delete all empty rows by selecting the empty row numbers, right-clicking the selection and pressing “Delete” from the context menu. Save the Excel sheet and perform the CTRL-END test to make sure no empty rows are present anymore.
- Always place the XLS file or MDB file in a place that is accesible by all users. Putting it on the Desktop or in My Documents is not recommended. Because those places are only available to the user owning that desktop or document folder. For example, we put our database files in C:CaptureBitesDB which is always accessible to all users.
Jobs, batches and scanner profiles on a Kofax Express Client/Server System
On a Kofax Express client-server system, jobs, batches and scanner profiles are only saved on the server. The paths are also different from the paths on a standalone system.
Job path on a client-server system (win7 or higher):
C:\ProgramData\Kofax\Kofax Express 3.3\Server\Jobs\
Scanner profiles path on a client-server system (win7 or higher):
C:\ProgramData\Kofax\Kofax Express 3.3\Server\Scanners\Profiles\
Batches path on a client-server system (win7 or higher):
C:\ProgramData\Kofax\Kofax Express 3.3\Server\Jobs\
NOTE: When you copy jobs, batches or scanner profiles from one client-server installation to another, you need to restart the service called Kofax Express Server on the PC acting as Kofax Express server to make them visible for the server and clients.
NOTE: an internet connection is required for this function.
The Create Installer Tool installer does not install any CaptureBites connectors or programs, it only installs itself and then provides access to any connectors, programs, jobs, etc. that are already installed on your system.
The first time you run it, it will update your installed CaptureBites products to the latest versions. This is required for the Create Installer Tool to work correctly. Please let it proceed with the update.
After this first (automatic) check, you can easily check if there are new versions of CaptureBites connectors and programs by pressing “Check for Updates”. This will provide a list of all CaptureBites products installed on your system and indicate in bold if a new version is available, the version history is just one click away to check what’s new in a more recent version.
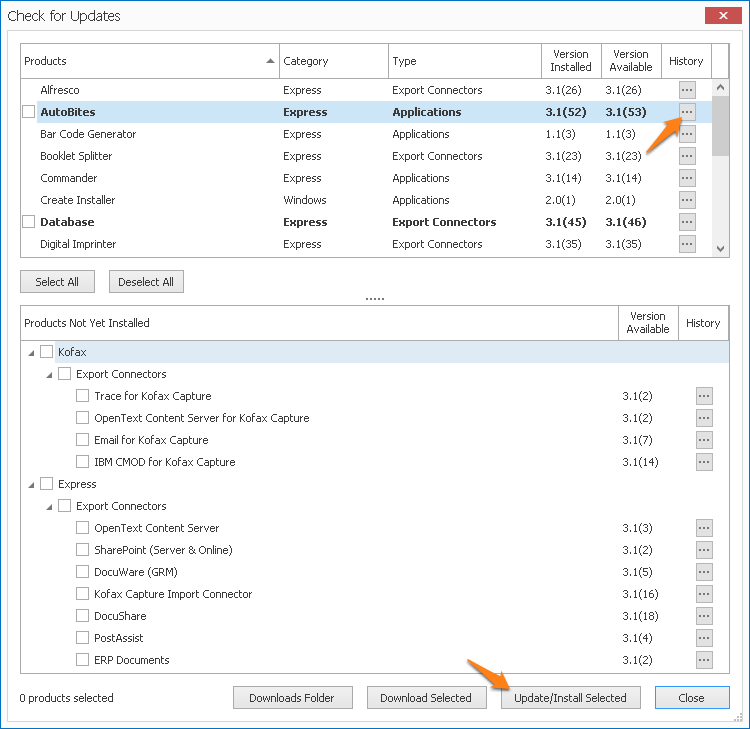
Any CaptureBites products that are not installed on your system are also listed in the bottom list. You can simply check them to also install these products.
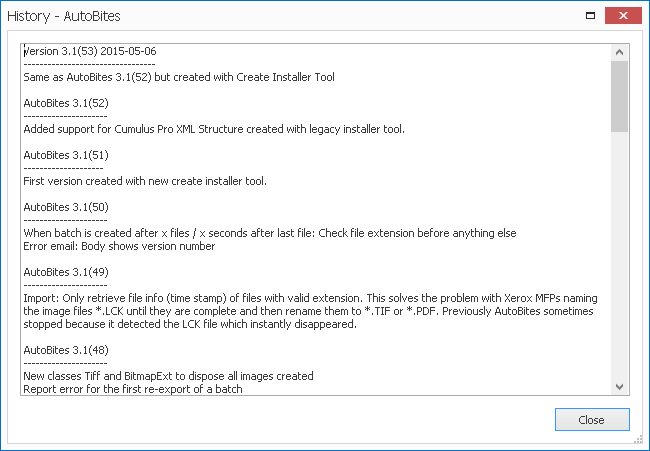
If you want to check the version history before downloading, just press the History button next to the product and more information will be retrieved (an internet connection is required).
After you have selected a number of products and start the installation process, we recommend not to start Kofax Express during the installation process.
Jobs, batches and scanner profiles on a Kofax Express Client/Server System
On a Kofax Express client-server system, jobs, batches and scanner profiles are only saved on the server. The paths are also different from the paths on a standalone system.
Job path on a client-server system (win7 or higher):
C:\ProgramData\Kofax\Kofax Express 3.3\Server\Jobs\
Scanner profiles path on a client-server system (win7 or higher):
C:\ProgramData\Kofax\Kofax Express 3.3\Server\Scanners\Profiles\
Batches path on a client-server system (win7 or higher):
C:\ProgramData\Kofax\Kofax Express 3.3\Server\Jobs\
NOTE: When you copy jobs, batches or scanner profiles from one client-server installation to another, you need to restart the service called Kofax Express Server on the PC acting as Kofax Express server to make them visible for the server and clients.
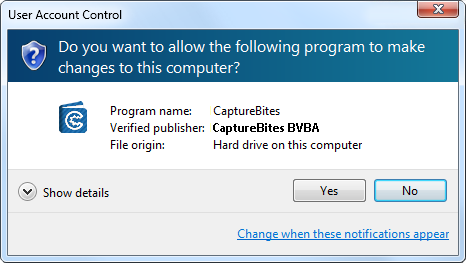
When you start the Create Installer Tool, below message comes up. The reason is that the Create Installer can update your system with the latest versions of installed CaptureBites products. This requires admin rights and therefore this message pops up.
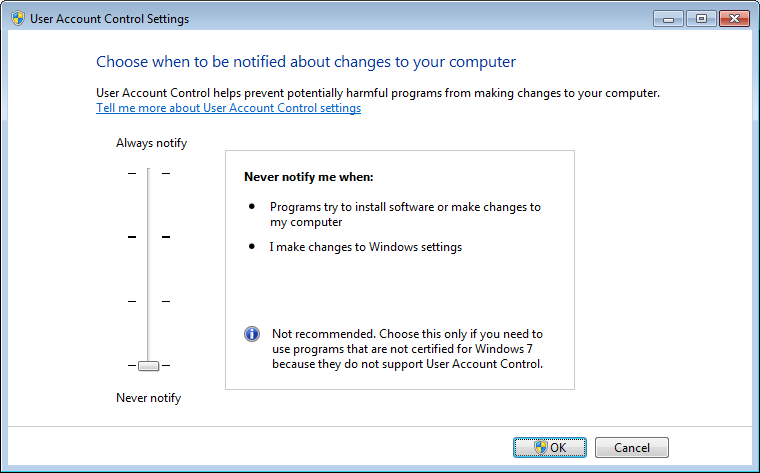
If you don’t want to see this message anymore, you need to press the blue link “Change when these notifications appear”. This will open the User Account Control Settings.
Put the slider to the lowest level to suppress these warnings.
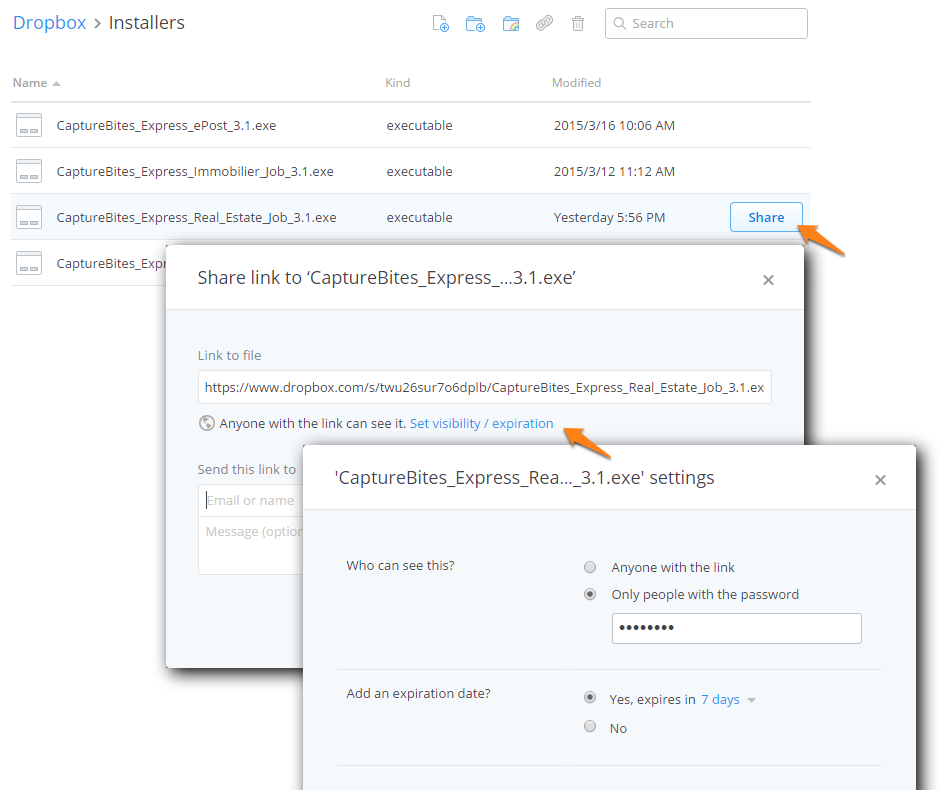
If you prefer to use another method to share your installer instead of the integrated Upload and Share link feature, you can consider DropBox. Files or folders in your Dropbox folder can be shared, instantly. All you have to do is select the file and then select Share link from the Dropbox menu.
Once you do, you can send the link to anyone over email.
You can create a public link or if you have a Pro or Business DropBox account password protect the link and even set an expiration time.
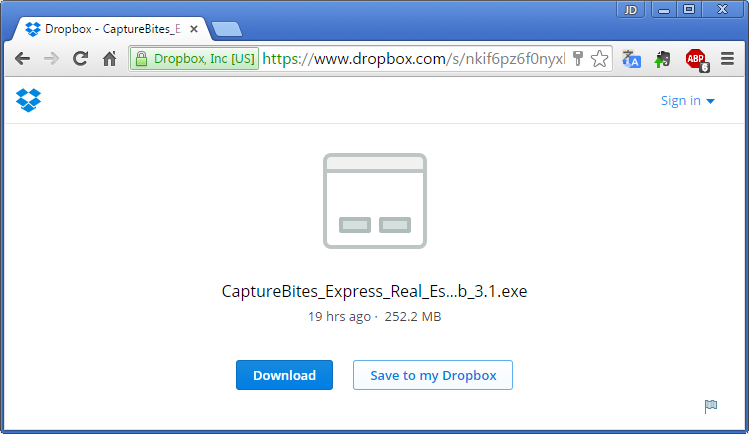
When the receiver of the email opens the link, it shows up like this in his browser. He simply needs to press download to download the installer.
If you prefer to use another method to share your installer instead of the integrated Upload and Share link feature, you can also consider WeTransfer.
WeTransfer is an online file-transferring platform, which you can use to upload your installer directly from your browser. Then you enter the email address of the receiver and your email address and the online service takes care of the transfer.
You don’t have to sign up for anything to make use of the service to send non-password protected links. The Plus version features password protection.
The receiver side will get an email message that looks like this. The link will automatically expire after 1 week.
If you have access to an FTP server, you can upload the installer to a secret folder on your web server and share a link via email.
FileZilla is a popular FTP client to make connecting to your FTP server and uploading files very easy.
The tool requires Microsoft .NET Framework 4.5 or higher on your system. If you have Windows Update in automatic update mode, it is normally already on your system.
Otherwise, you can download Microsoft .NET Framework 4.5 from here.
After installation of Microsoft .NET Framework 4.5, the Create Installer Tool will start correctly.