Multi-Export Connector > Help
Multi Export Help
Content
1. What is the Multi Export connector?
2. Installing the connector
3. Activating the connector, request for a trial code
4. Getting started with a basic multi export job
5. Document classification: Select exporter(s) from value of index field
6. Export method: Stream by stream or Document by document
7. Description and the Show progress option
8. Enabling or disabling export streams
9. Document selection
10. Page selection
11. Using image resolution to tag images for export
12. Convert to black & white
13. Export connector selection list
14. Copy & paste exporter settings
1. What is the Multi Export connector?
With the CaptureBites™ Multi Export connector you can export a single batch to up to ten different destinations. This is very useful if you want to export scanned documents to a variety of destinations such as a file server, an external drive for backup, to an FTP or SFTP server, to email, etc.
Per exporter, you can precisely define which documents and pages need to be exported and whether the images should be exported in color or black & white.
It can also be used for automatic document classification. Each document is exported to a specific export connector based on its document type.
The document type needs to be first determined by using a bar code label or separator or by using CaptureBites MetaTool to set the document type based on keywords on each document. An index field holding the document type can then be used to set the correct exporter.
2. Installing the Multi Export connector
Download and install the Multi Export connector from here.
After installation, you can select the Multi Export connector from the Kofax Express job tab to configure it. The installer also adds sample jobs and batches to your system. One sample job is called CaptureBites Multi Stream Color & BW and the other job is called CaptureBites Multi Export. You can immediately test the functionality with these two sample jobs.
3. Activating the connector, request for a trial code
The download installs a functional version of this CaptureBites connector. It also includes some demo images and a demo job to show the functionality.
In demo mode, a demo seal will be stamped in all exported images. You can switch the demo version to full production mode by entering an activation code which you can purchase from our partners. You can continue using any of the jobs you configured in demo mode after activation of the software.
If you want to try out the connector in full production mode for a short period of time, we can generate a trial code. Just send us a request for a trial activation code.
4. Getting started with a basic multi export job
After you have installed the Multi Export connector, you’ll find two sample jobs. One is called CaptureBites Multi Stream Color & BW and the other job is called CaptureBites Multi Export.
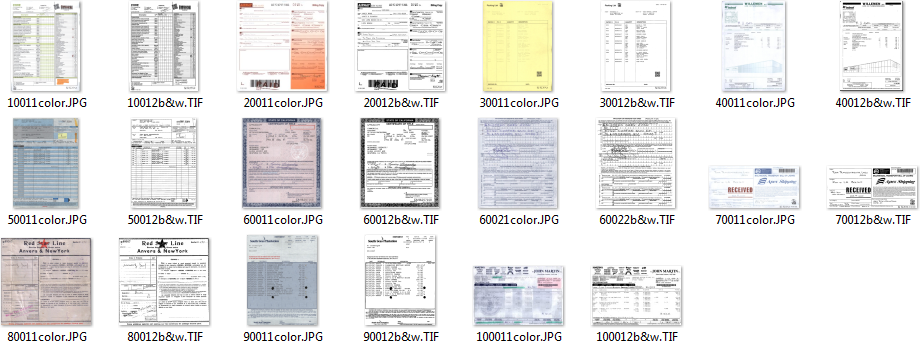
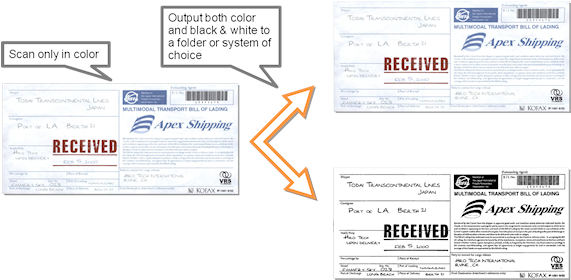
The CaptureBites Multi Stream Color & BW is a job that outputs scanned documents in both color and black & white. When you export the sample batch, you’ll find the result on your desktop in the folder …\Desktop\CaptureBites after Export\Multi Stream
Color images are output in JPG and black & white images in TIF. Obviously you need to scan your documents in color. We can then export the original color images through one export stream and also convert the images to black and white and export to another stream
This is the way you configure this job…
In the Job Setup tab, you select Multi Export as the export connector and press the Setup button.
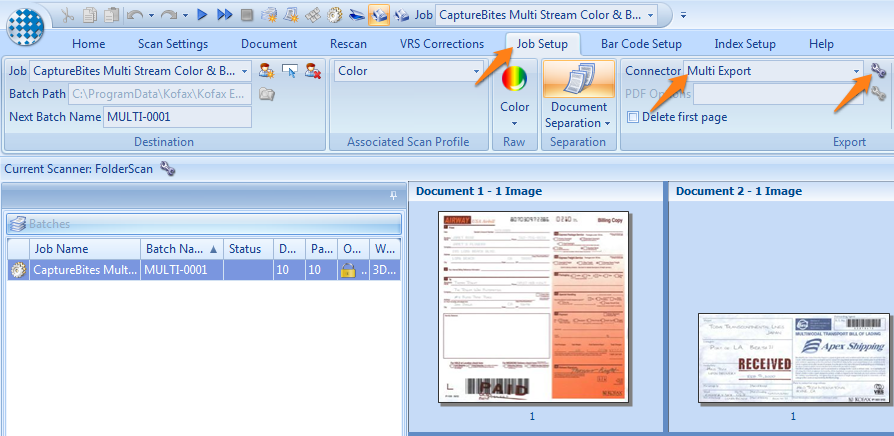
Now you can configure each export stream. The first exporter will be used to convert the images to black and white and save them as TIF files, the second export stream will be used for the color output.
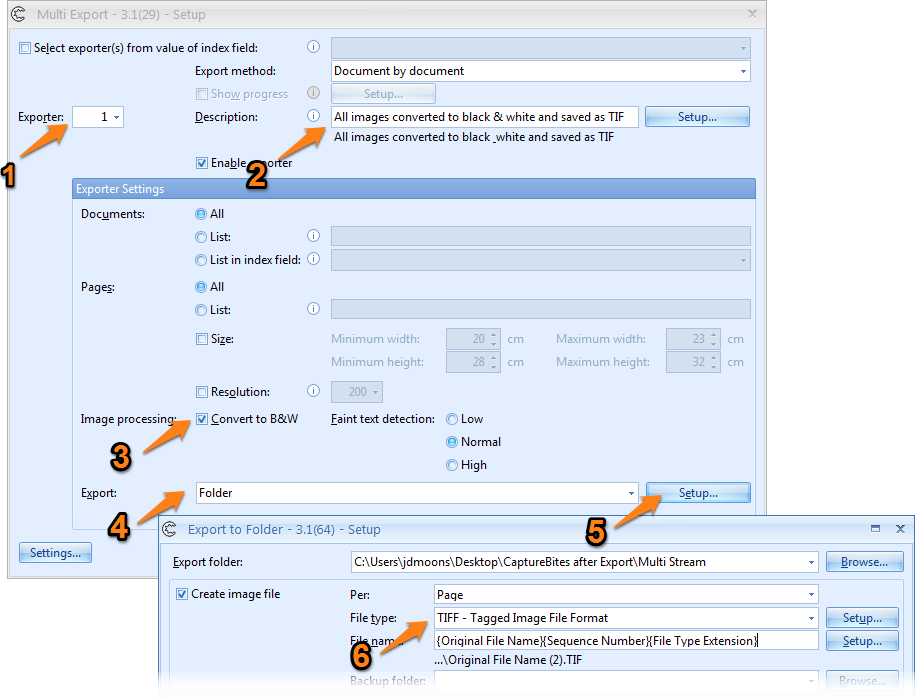
Configuring the first stream to export images in black and white.
- Select Exporter 1 from the Exporter list
- Optionally describe what this exporter will do in the Description field.
- Enable the Convert to B&W option
- Select the export connector you want to use to export the images. We use the CaptureBites Folder connector in our example.
- Press Setup… next to the selected export connector to configure it.
- Select TIFF as the output format
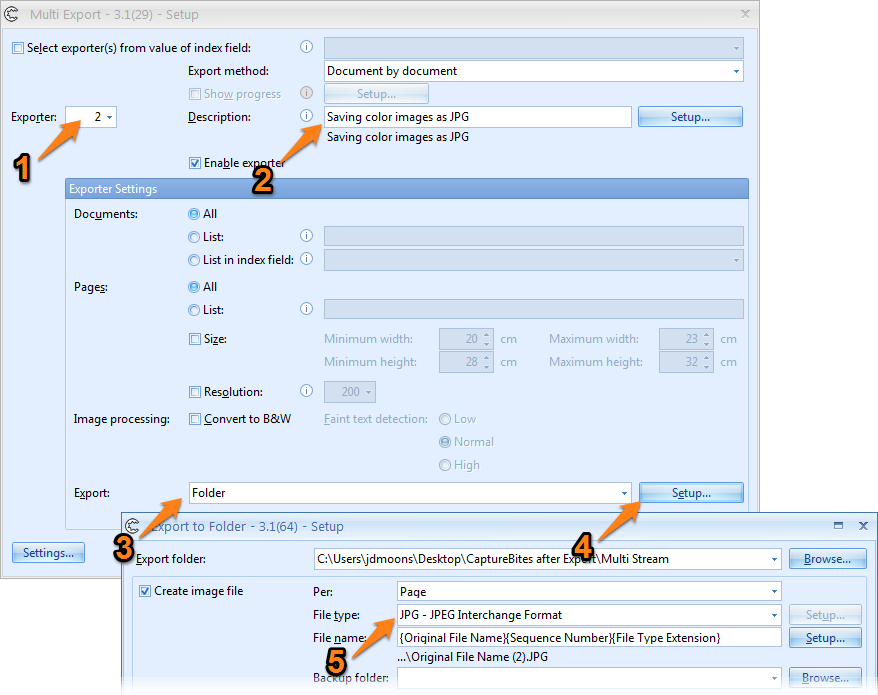
Configuring the second stream to export images in color
- Select Exporter 2 from the Exporter list
- Optionally describe what this exporter will do in the Description field.
- Select the export connector you want to use to export the images. We also use the CaptureBites Folder connector for our second exporter.
- Press Setup… next to the selected export connector to configure it.
- Select JPG as the output format. Note that we did not enable the conversion to black & white and images will be exported in their original color mode for this stream.
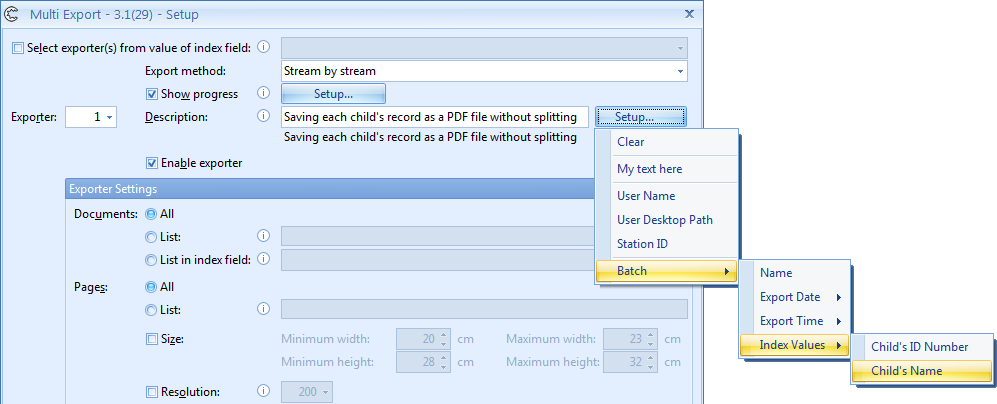
5. Document classification: Select exporter(s) from value of index field
You can use a document index field to automatically select the exporter with which a document should be exported. When you hover over the info icon a tool tip explains how it works.
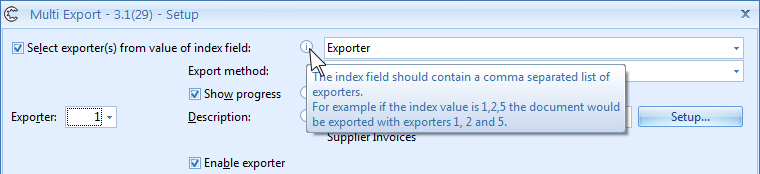
In other words, you can use the multi-export connector for automatic document classification based on a bar code value. Or, in combination with MetaTool, you can look for keywords on your documents and use those to set the correct exporter per document type.
For example, just stick a bar code label with the number 1 on invoices, 2 on purchase orders, 3 on contracts etc. Using the Kofax Express bar code recognition functionality, you place the bar code value in an index field called “Exporter”.
Then enable the Select exporter(s) from value of index field option and select the index field containing the bar code value. In our example that is the index field named “Exporter”.
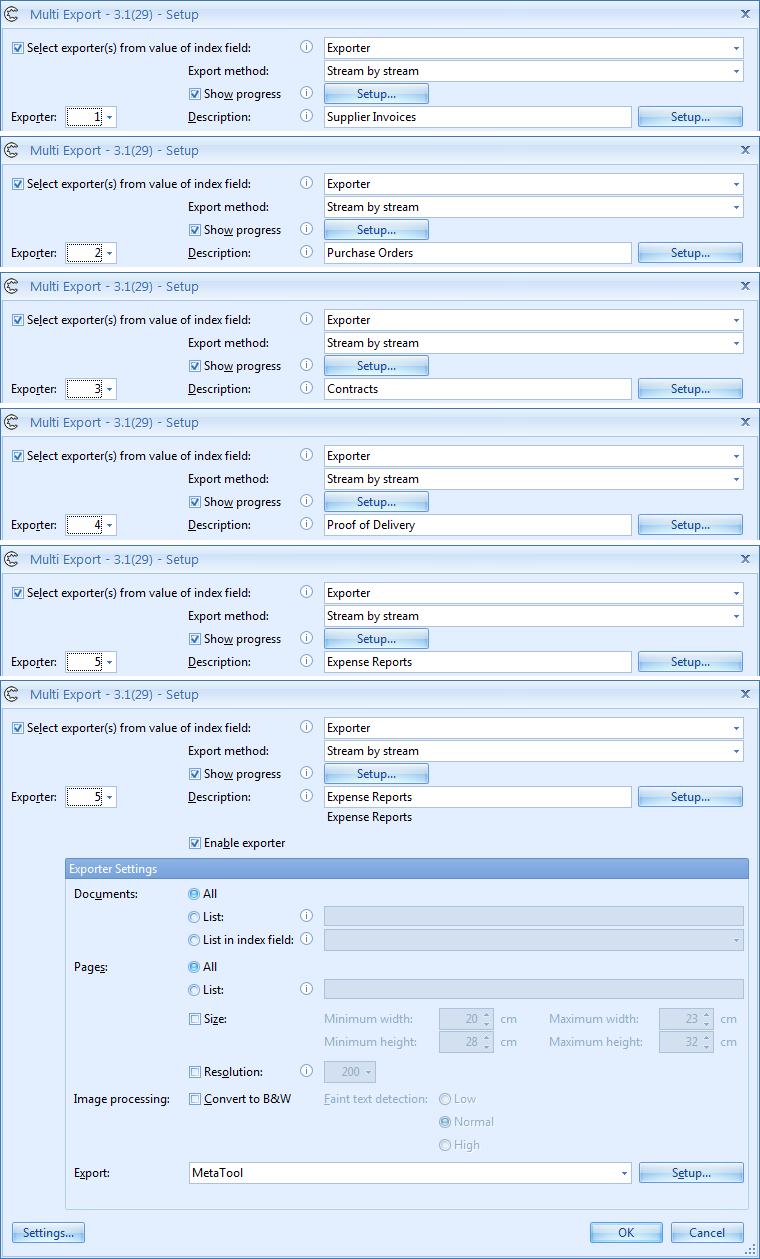
Each exporter can be configured individually for each of the document types:
6. Export method: Stream by stream or Document by document
The export method determines in what order documents are exported.

Document by document: Each document is exported to all active exporters document by document. In other words if you export your documents to SharePoint with exporter 1 and to Email with exporter 2 in document by document mode, then document 1 will be exported to SharePoint and to Email, then document 2 to SharePoint and Email, then document 3 to SharePoint and Email etc.
7. Description and the Show progress option
Use the description field to explain what each exporter does.
When you enable the Show progress option, which is only available in Stream by stream mode, a progress box will pop-up during export showing the description when an exporter starts. This is useful when you have a more complex multi-export configuration like, for example, the CaptureBites Multi Export demo job.
This demo job splits each document in several segments and exports each document in seven different ways. This is a case where the progress box can provide some feedback to the user about what is happening during export.
This is how the progress pop-up looks like when exporter 5 starts:
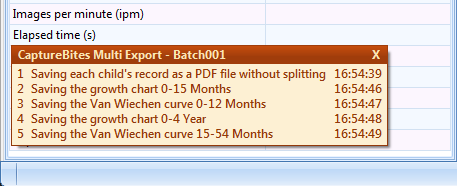
When all exporters have finished the pop-up automatically closes.
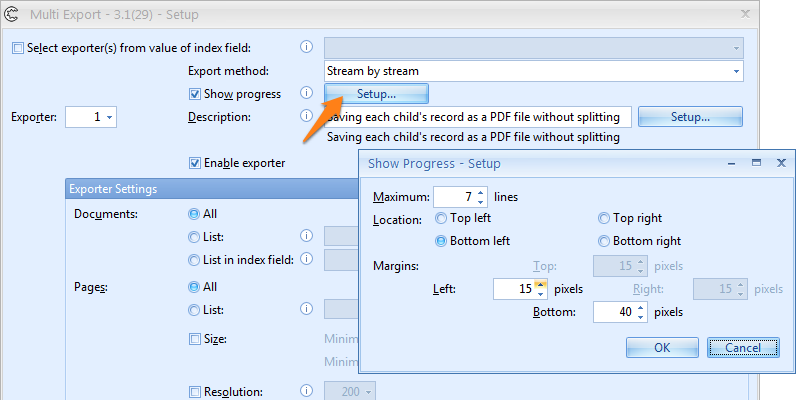
By default the progress box pops-up in the left bottom corner. But you can adjust that by means of the Show progress setup.
8. Enabling and disabling export streams
Check the “Enable exporter“ option to activate an exporter. You can disable individual exporters temporarily to speed up testing and focus on specific exporters.
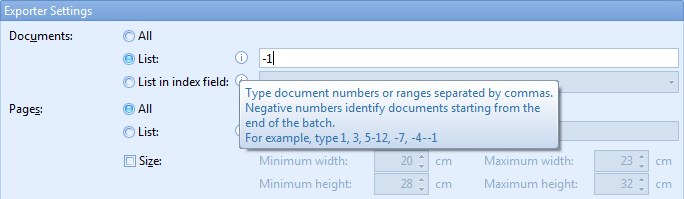
9. Document selection
For each exporter you can define which document should be exported. By default, all documents are exported but by defining a document list you can precisely define which documents in the batch to export.
The way you define a document selection list is explained in the tool tip. In our example below we only export the last document (-1) of the batch.
10. Page selection
For each exporter you can define which pages should be exported. By default, all pages are exported but by defining a pages list you can precisely define which pages of each document to export.
The way you define a page selection list is very similar to the way you define the document selection (see previous topic) and it is also explained in the tool tip next to the option.
Using an index field you can dynamically set which pages to export. Check the tool tip to learn more.
11. Using image resolution to tag images for export
The Resolution option makes it possible to only export images with the defined resolution. Images not matching the selected resolution will be skipped.
In that way, you can use the resolution of an image to tag it to export it to a specific exporter. Just create a scanner profile with the special resolution. The user just needs to select that scanner profile to tag an image to be exported.
12. Convert to black & white
Conversion a multi-stream color and black & white job is explained in detail in our previous section: 4. Getting started with a basic multi export job.
The result is an output stream in both color and black & white.
13. Export connector selection list
Any connector installed on your system can be selected as the export connector in each export stream. Even Multi-Export can be selected and in that way you actually can export to an infinite number of export destinations.
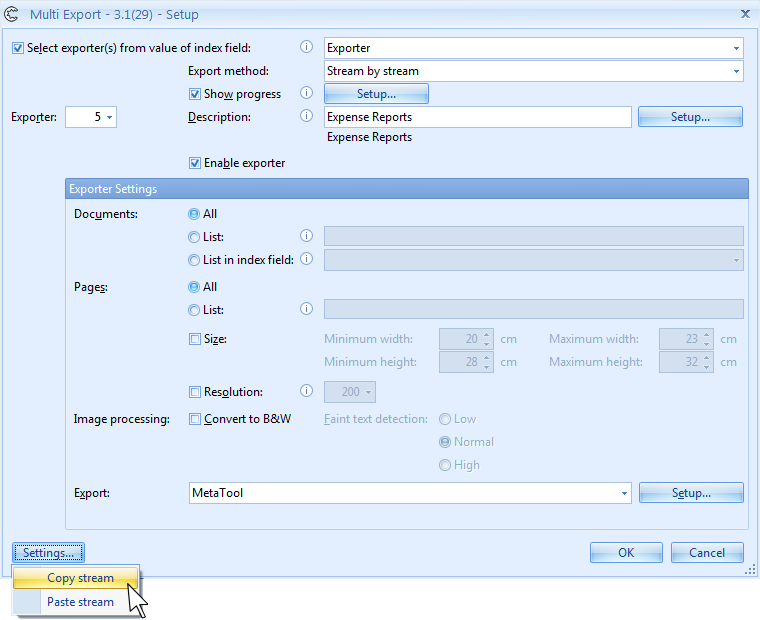
14. Copy & paste exporter settings
If you want to copy an exporter, you can simply copy all its settings via the Settings… button and paste it to another exporter. It’s a fast way to generate multiple exporter streams which are only slightly different.
For example, if you only change the output folder changes and all other settings stay the same, you can easily copy over the settings.
When the receiver of the email opens the link, it shows up like this in his browser. He simply needs to press download to download the installer.