MetaServer > Help > Export to Database
030-030 MetaServer Export – Export to Database
With the MetaServer Export to Database action, you can directly update a SQL Server database or any database that can be connected through ODBC. ODBC (Open DataBase Connectivity) is a standard to connect to databases. Windows comes with pre-installed ODBC drivers for MS SQL, Excel, MS-Access and more. If the ODBC driver for your database in not installed, it’s a matter of searching the internet to find and install the ODBC driver.
Some example use-cases:
– A small business or an office’s department stores their customer or supplier data in a Microsoft Access database or Excel table.
– A hospital stores patient information in a Microsoft SQL database.
– A lawyer’s office stores client data in an Oracle database.
If a record is not already present in the database, it will automatically enter a new record. Optionally you can also choose to always add new records and never overwrite existing ones.
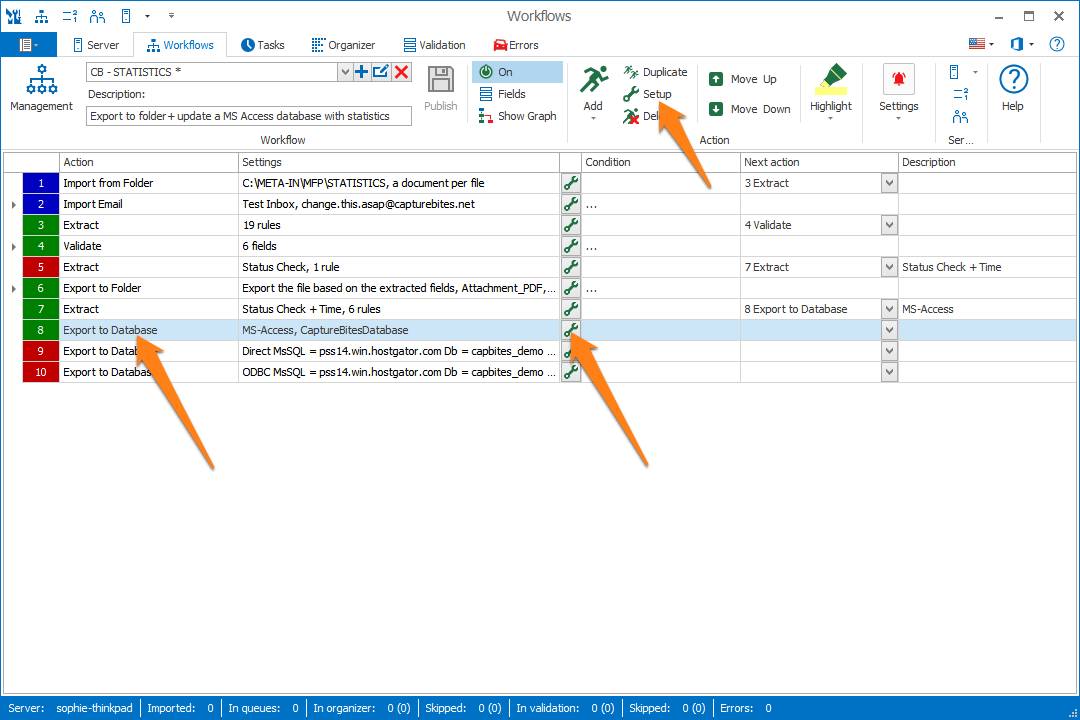
In our example, we will make use of the “CB – STATISTICS” workflow. This workflow is automatically installed with CaptureBites MetaServer.
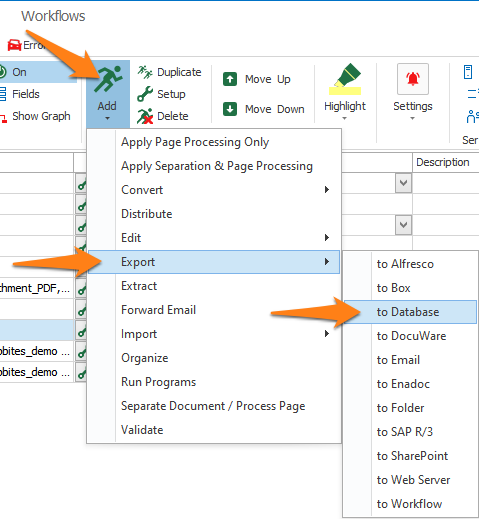
To add the Export to Database action, select the action after which you want to insert the Export to Database action and press Add -> Export -> to Database. The Setup window will automatically open.
You can also open the setup window of an existing Export to Database action by double-clicking the action or by pressing the setup button on the right side of the action or in the ribbon, as shown below.
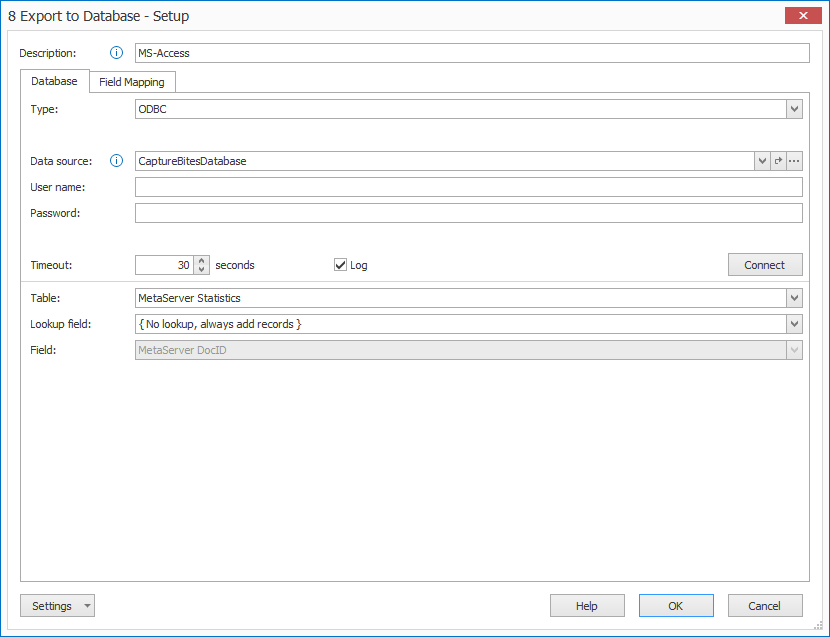
When the setup window opens, the Database tab is selected by default. Here, you connect with your database and select the required database table. You can also choose a database lookup field if you want to update existing records. Any changes you make in a database table are automatically applied.
TIP: The thumbnail on the right will follow you, so you can easily refer to the Setup window. Click on the thumbnail to zoom in.
Don’t forget to add a fitting description of your action.
01 – Type: the default database type is ODBC. You can also directly export to a SQL Server database.
1) Data source: select the data source you want to use. An ODBC data source needs to be defined first using the ODBC Data Source Administrator tool in Windows. For a step by step instructions on how to define an ODBC Data Source in Windows, have a look at this guide.
Select data source from field: you can use this option to switch databases dynamically using a field value.
To access this setup window, press the “…” button next to Data Source. You can select the field containing your database name by pressing the drop-down arrow.
Note: Selecting a data source from a field is an advanced function often used by BPO (Business Process Outsourcing) companies to dynamically switch database in the same workflow depending on the customer they are processing documents for.
2) User name: some databases require to login. If so, enter the User name in this field.
3) Password: some databases require to login. If so, enter the Password in this field.
4) Timeout: when the database does not respond in the specified time, the action will fail. A time-out is often an indication that the database server is down. If any issues occur, please contact your database administrator.
1) Server: enter the name of your SQL Server.
2) Database: specify the name of the SQL Server database you want to connect with.
3) User name: enter the user name in this field (if applicable). Please make sure that user has the proper access rights to the SQL Server database. If you’re not sure, please contact your database administrator.
4) Password: enter the user’s password in this field (if applicable). Please make sure that user has the proper access rights to the SQL Server database. If you’re not sure, please contact your database administrator.
3) Extra: directly connect through a SQL Connection string. If you’re not sure how to connect to your SQL Server database, please contact your database administrator.
02 – Table: a database typically stores data in one or more tables, such as a document types table, a suppliers table, a products table, etc. Specify the table that you want to update.
03 – Lookup field: press the drop-down arrow to choose between 2 options:
1) You can update existing records by selecting a specific database lookup field and MetaServer field holding the lookup value
2) If you don’t want to update existing records and only want to keep adding new records, you can choose to do no lookup, always add records.
TIP: If you want to update existing records and add new records, define a Lookup field. MetaServer will automatically add a new record if the Lookup does not match any existing records.
Press the Field Mapping tab to open its setup window. Here, you can map your database fields.
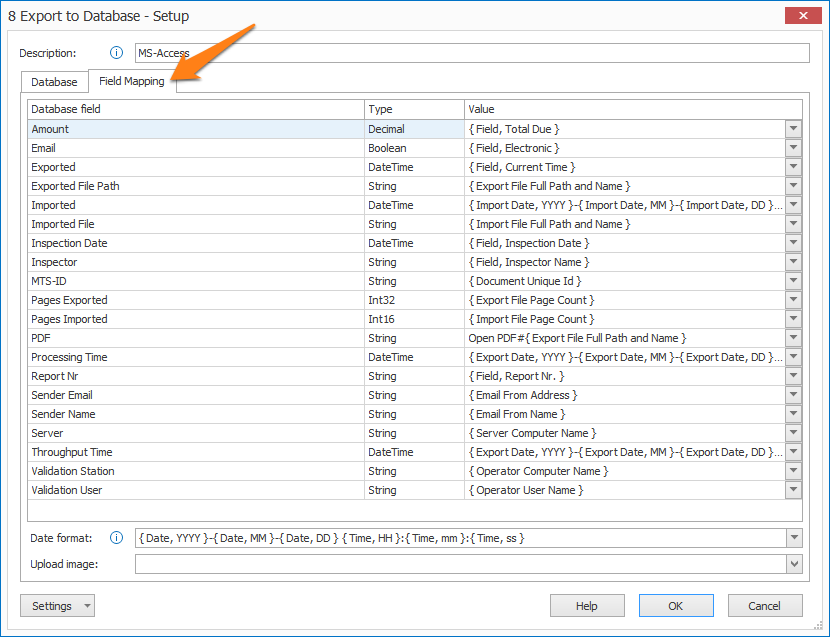
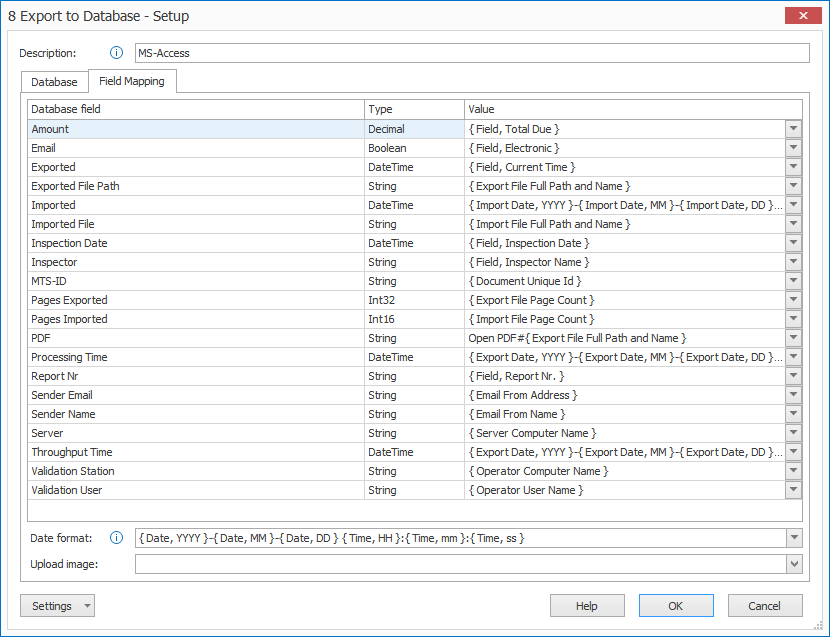
01 – Database field: this column shows all existing database fields in the currently connected database table.
02 – Type: this column shows what the database field type is. Strings can almost contain any value. But DateTime, Integer and Decimal fields can only be updated with very specific data. For example, trying to update a Decimal field with a value containing letters will return an error.
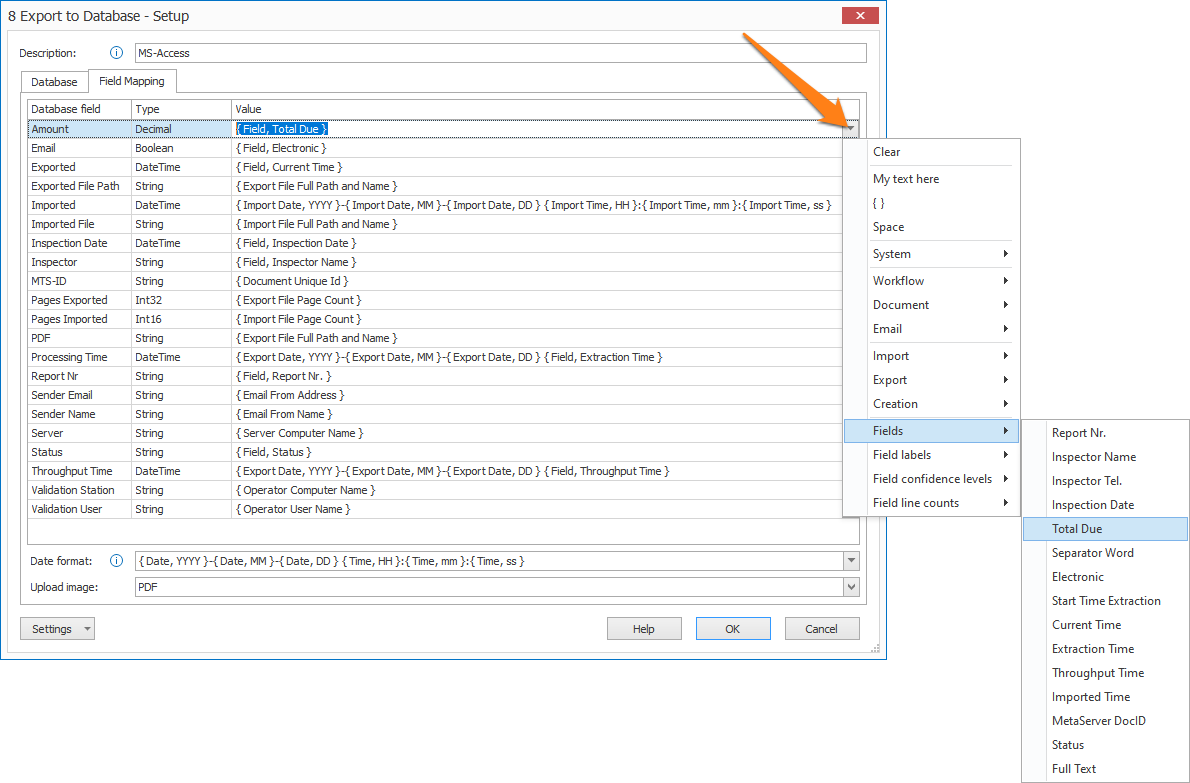
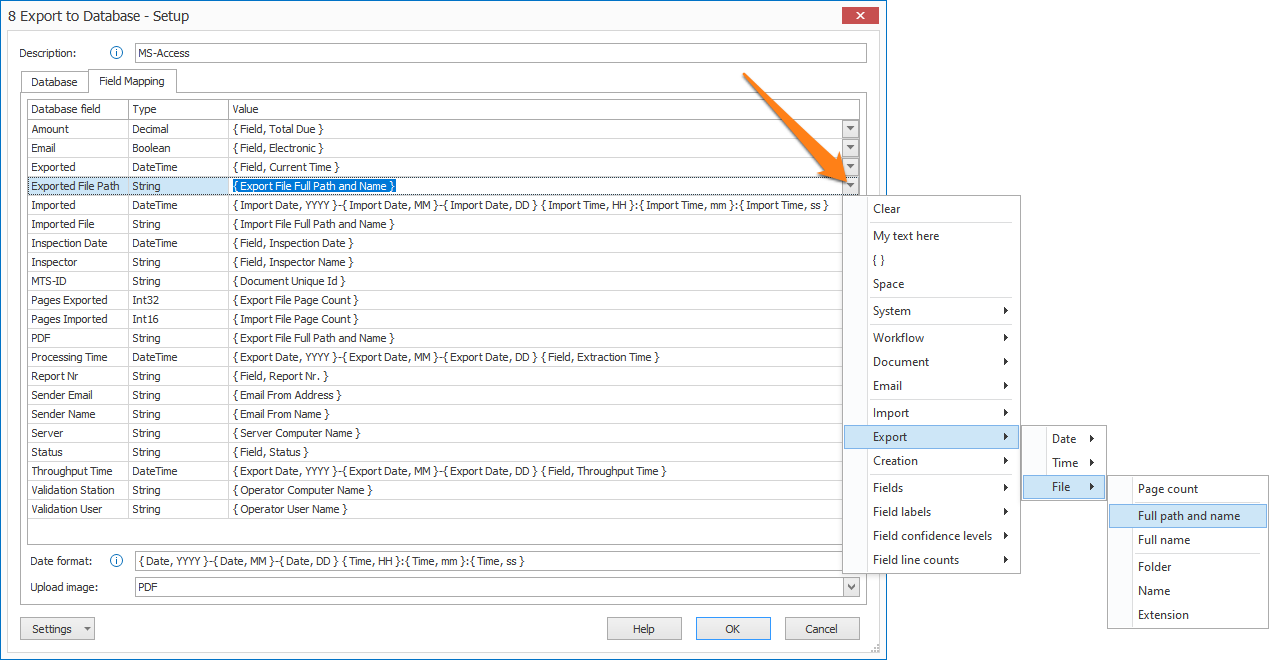
03 – Value: in the value column, you can enter fixed values or use the drop-down arrow to compose the value using MetaServer fields and metadata for each database field.
- Clear
- My text here
- {{}}
- { Space }
• Line:
-
- { Line Separator }
- { Line Number }
- { Line Count }
• System:
-
- Server:
- { Server User Name }
- { Server Computer Name }
- { Server Version }
- { Server Unit of Length }
- in
- cm
- Operator:
- { Operator User Name }
- { Operator Computer Name }
- { Operator Working Time }
- { Operator Total Working Time }
- Current Date:
- { Current Date, System }
- { Current Date, DDMMYYYY }
- { Current Date, DD }/{ Current Date, MM }/{ Current Date, YYYY }
- { Current Date, DD }-{ Current Date, MM }-{ Current Date, YYYY }
- { Current Date, MMDDYYY }
- { Current Date, MM }/{ Current Date, DD }/{ Current Date, YYYY }
- { Current Date, MM }-{ Current Date, DD }-{ Current Date, YYYY }
- { Current Date,YYYYMMDD }
- { Current Date, YYYY }/{ Current Date, MM }/{ Current Date, DD }
- { Current Date, YYYY }-{ Current Date, MM }-{ Current Date, DD }
- { Current Date, JJJ }
- { Current Date, YYJJJ }
- { Current Date, DD }
- { Current Date, DDD }
- { Current Date, MM }
- { Current Date, MMM }
- { Current Date, YY }
- { Current Date, YYYY }
- { Current Date, W }
- { Current Date, WW }
- Current Time:
- { Current Date, System }
- { Current Date, HHmmss }
- { Current Time, HH }:{ Current Time, mm }:{ Current Time, ss }
- { Current Date, HHmmsstt }
- { Current Time, HH }:{ Current Time, mm }:{ Current Time, ss }:{ Current Time, tt }
- { Current Time, HH }
- { Current Time, hh }
- { Current Time, ss }
- { Current Time, tt }
• Workflow:
-
- { Workflow Name }
• Document:
-
- { Document Unique Id }
- Reject:
- { Reject Reason Number }
- { Reject Reason }
- { Document Number }
- { Document Count }
- Page:
- { Document Page Number }
- { Document Page Count }
- { Document Page Width }
- { Document Page Height }
- { Document File Size }
- { Document Dominant Language }
- { Document Source }
- { Document File Type }
- { Document PDF Compliance }
• Email:
-
- Inbox:
- { Email Inbox Name }
- { Email Inbox Address }
- { Email Inbox SSL }
- { Email Inbox Port }
- { Email Inbox User Name }
- { Email Unique ID }
- { Email Import Condition }
- Date:
- { Email Date, System }
- { Email Date, DDMMYYYY }
- { Email Date, DD }/{ Email Date, MM }/{ Email Date, YYYY }
- { Email Date, DD }-{ Email Date, MM }-{ Email Date, YYYY }
- { Email Date, MMDDYYY }
- { Email Date, MM }/{ Email Date, DD }/{ Email Date, YYYY }
- { Email Date, MM }-{ Email Date, DD }-{ Email Date, YYYY }
- { Email Date,YYYYMMDD }
- { Email Date, YYYY }/{ Email Date, MM }/{ Email Date, DD }
- { Email Date, YYYY }-{ Email Date, MM }-{ Email Date, DD }
- { Email Date, JJJ }
- { Email Date, YYJJJ }
- { Email Date, DD }
- { Email Date, DDD }
- { Email Date, MM }
- { Email Date, MMM }
- { Email Date, YY }
- { Email Date, YYYY }
- { Email Date, W }
- { Email Date, WW }
- Time:
- { Email Date, System }
- { Email Date, HHmmss }
- { Email Time, HH }:{ Email Time, mm }:{ Email Time, ss }
- { Email Date, HHmmsstt }
- { Email Time, HH }:{ Email Time, mm }:{ Email Time, ss }:{ Email Time, tt }
- { Email Time, HH }
- { Email Time, hh }
- { Email Time, ss }
- { Email Time, tt }
- From:
- { Email From Name }
- { Email From Address }
- { Email From Full }
- To:
- { Email To Name }
- { Email To Address }
- { Email To Full }
- { Email To Name, 1 }
- { Email To Address, 1 }
- { Email To Full, 1 }
- Cc:
- { Email Cc Name }
- { Email Cc Address }
- { Email Cc Full }
- { Email Cc Name, 1 }
- { Email Cc Address, 1 }
- { Email Cc Full, 1 }
- { Email Subject }
- Attachment:
- { Email Attachment Name }
- { Email Extension }
- { Email Page Count }
- { Email Attachments List }
- { Email Body Text }
• Import:
-
- Date:
- { Import Date, System }
- { Import Date, DDMMYYYY }
- { Import Date, DD }/{ Import Date, MM }/{ Import Date, YYYY }
- { Import Date, DD }-{ Import Date, MM }-{ Import Date, YYYY }
- { Import Date, MMDDYYY }
- { Import Date, MM }/{ Import Date, DD }/{ Import Date, YYYY }
- { Import Date, MM }-{ Import Date, DD }-{ Import Date, YYYY }
- { Import Date,YYYYMMDD }
- { Import Date, YYYY }/{ Import Date, MM }/{ Import Date, DD }
- { Import Date, YYYY }-{ Import Date, MM }-{ Import Date, DD }
- { Import Date, JJJ }
- { Import Date, YYJJJ }
- { Import Date, DD }
- { Import Date, DDD }
- { Import Date, MM }
- { Import Date, MMM }
- { Import Date, YY }
- { Import Date, YYYY }
- { Import Date, W }
- { Import Date, WW }
- Time:
- { Import Date, System }
- { Import Date, HHmmss }
- { Import Time, HH }:{ Import Time, mm }:{ Import Time, ss }
- { Import Date, HHmmsstt }
- { Import Time, HH }:{ Import Time, mm }:{ Import Time, ss }:{ Import Time, tt }
- { Import Time, HH }
- { Import Time, hh }
- { Import Time, ss }
- { Import Time, tt }
- File:
- { Import File Page Count }
- { Import File Full Path and Name }
- { Import File Full Name }
- { Import File Name }
- { Import File Extension }
- { Import File Root }
- { Import File Full Path }
- { Import File Subfolder }
- Subfolder level (1-10):
- { Import File Subfolder, (1-10) }
- Date:
• Export:
-
- Date:
- { Export Date, System }
- { Export Date, DDMMYYYY }
- { Export Date, DD }/{ Export Date, MM }/{ Export Date, YYYY }
- { Export Date, DD }-{ Export Date, MM }-{ Export Date, YYYY }
- { Export Date, MMDDYYY }
- { Export Date, MM }/{ Export Date, DD }/{ Export Date, YYYY }
- { Export Date, MM }-{ Export Date, DD }-{ Export Date, YYYY }
- { Export Date,YYYYMMDD }
- { Export Date, YYYY }/{ Export Date, MM }/{ Export Date, DD }
- { Export Date, YYYY }-{ Export Date, MM }-{ Export Date, DD }
- { Export Date, JJJ }
- { Export Date, YYJJJ }
- { Export Date, DD }
- { Export Date, DDD }
- { Export Date, MM }
- { Export Date, MMM }
- { Export Date, YY }
- { Export Date, YYYY }
- { Export Date, W }
- { Export Date, WW }
- Time:
- { Export Date, System }
- { Export Date, HHmmss }
- { Export Time, HH }:{ Export Time, mm }:{ Export Time, ss }
- { Export Date, HHmmsstt }
- { Export Time, HH }:{ Export Time, mm }:{ Export Time, ss }:{ Export Time, tt }
- { Export Time, HH }
- { Export Time, hh }
- { Export Time, ss }
- { Export Time, tt }
- File:
- { Export File Page Count }
- { Export File Full Path and Name }
- { Export File Full Name }
- { Export File Name }
- { Export File Extension }
- SHA256
- Content - base64
• Creation:
-
- Date:
- { Creation Date, System }
- { Creation Date, DDMMYYYY }
- { Creation Date, DD }/{ Creation Date, MM }/{ Creation Date, YYYY }
- { Creation Date, DD }-{ Creation Date, MM }-{ Creation Date, YYYY }
- { Creation Date, MMDDYYY }
- { Creation Date, MM }/{ Creation Date, DD }/{ Creation Date, YYYY }
- { Creation Date, MM }-{ Creation Date, DD }-{ Creation Date, YYYY }
- { Creation Date,YYYYMMDD }
- { Creation Date, YYYY }/{ Creation Date, MM }/{ Creation Date, DD }
- { Creation Date, YYYY }-{ Creation Date, MM }-{ Creation Date, DD }
- { Creation Date, JJJ }
- { Creation Date, YYJJJ }
- { Creation Date, DD }
- { Creation Date, DDD }
- { Creation Date, MM }
- { Creation Date, MMM }
- { Creation Date, YY }
- { Creation Date, YYYY }
- { Creation Date, W }
- { Creation Date, WW }
- Time:
- { Creation Date, System }
- { Creation Date, HHmmss }
- { Creation Time, HH }:{ Creation Time, mm }:{ Creation Time, ss }
- { Creation Date, HHmmsstt }
- { Creation Time, HH }:{ Creation Time, mm }:{ Creation Time, ss }:{ Creation Time, tt }
- { Creation Time, HH }
- { Creation Time, hh }
- { Creation Time, ss }
- { Creation Time, tt }
- Fields
- Field labels
- Field confidence levels
- Field line counts
- Field page number
04 – Date format: the “Date format” is relevant when you map a DateTime field type.
DateTime type fields will only accept valid dates and times in a consistent format. It’s very important to enter the correct input DateTime format as it was extracted by MetaServer. This way, the Export to Database action can automatically convert the DateTime values and correctly update the database.
For example:
You want to export the extracted Inspection Date that has a “MM/DD/YYYY” format to a Date type field in a Microsoft SQL database.
You specify the following input format in the Date format input field:
{ Date, MM }/{ Date, DD }/{ Date, YYYY }
Result: knowing the input format, the database export action will automatically convert a date like 07/04/2018 to a database compliant DateTime format like: “2018-07-04 00:00:00”.
05 – Upload image: you can upload your processed PDF to your database if your table includes a BLOB field (Binary Large Object). This is also known as a “VARBINARY(MAX)” or “IMAGE” field in MsSQL.
If you want to upload your processed PDF, press the dropdown button to select an available BLOB field from your table.
06 – How to update a field with the location of the PDF File: if you want to update a field with the path to the exported PDF file, use an Export to Folder action followed by an Export to Database action.
Map the export path with any of your fields in the DB. Then, use the { Export File Full Path and Name } variable as the value to update your field with the path to the exported PDF file.
You can have multiple Export to Folder actions in your workflow that each will update the export paths, and every one of them can be followed by their own Export to Database action.
TIP: Microsoft Access features a Hyperlink field type. We use it for the “Exported File Link” in our sample MS-Access Statistics table. With this type of field, you can generate hyperlinks that directly open the exported PDF file.
The value you need to pass to the field has a simple syntax: LINK_NAME#PATH
In our case, we pass it the following value: Open PDF#{ Export File Full Path and Name }
TIP: you can copy the current settings and paste them in another setup window of the same type. Do this by pressing the Settings button in the bottom left of the Setup window and by selecting Copy. Then open another setup window of the same type and select Paste.


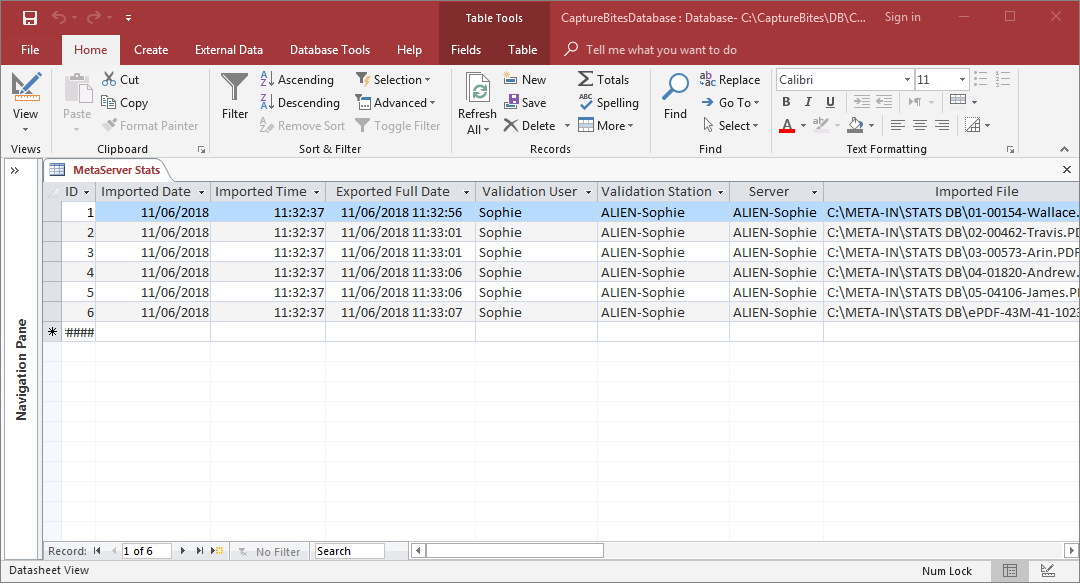
After export in our CB – STATISTICS workflow, the Microsoft Access database located in C:\CaptureBites\DB\CaptureBitesDatabase.mdb has been updated with new records:
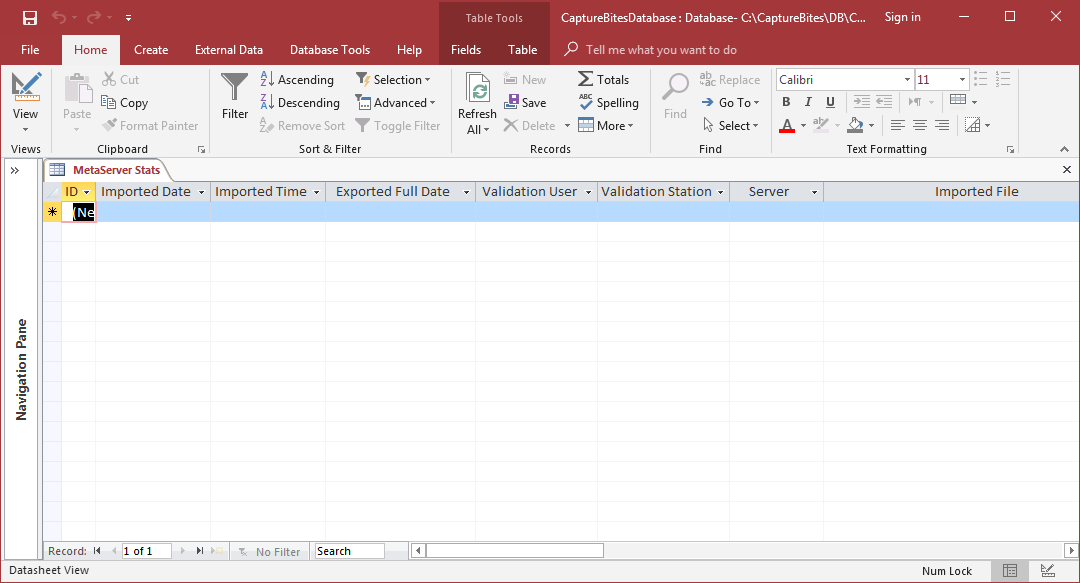
Before export
After export