ERP Document Export Connector – Help
For use with SAP R/3 & SAP S/4 HANA
If you want to know how to activate your product, please go to this page. The CaptureBites ERP Document Export supports following archiving scenario’s:
1. Download and Install Kofax Express: If you haven’t done so yet, please download and install Kofax Express.
Without a license, Kofax Express will automatically switch to demo mode. To download and install Kofax Express, please follow these instructions.
After installation and initial start up of Kofax Express, you will be able to use it without a license and start it in Demo mode. Demo mode will apply a demo stamp to any scanned or imported image. Besides that, the software is fully functional.
If you already bought a license and Kofax supplied you a serial number and product code, you can activate the software and work in full production mode. Any jobs you defined in demo mode remain available after activation, so you don’t have to redo the job definition after you switch the software to production mode.
2. Download and install the CaptureBites ERP Document Export connector: You can download and install the ERP Document Export Connector from here.
Without a license, the connector automatically switches to demo mode and will apply demo seals on all exported images. You can switch the demo version to full production mode by entering an activation code which you can purchase through our partners or by requesting a trial code.
You can continue using any of the jobs you configured in demo mode after activation of the software. You can find more details about how to activate the connector here. If your windows security settings don’t allow to download or run the installer, please contact us and we will email a zipped version of the installer.
After installing the CaptureBites ERP Document export connector, you need to prepare your SAP system for the transport. This section contains step by step instructions on how to do so.
You can also download the instructions as a PDF file from here. You will find the required files on your desktop in:
“…\Desktop\CaptureBites\ERP Document Export\SAP Transport\SAP47_V1_30_KGSActivatorL”
- Copy the file that you find in “\SAP47_V1_30_KGSActivatorL\cofiles” to the transport directory of the SAP Application Server (\sapmnt\trans\cofiles\)
- Copy the file that you find in “\SAP47_V1_30_KGSActivatorL\data” to the transport directory of the SAP Application Server (\sapmnt\trans\data\)
- You should now find the files “Kxxxxxx.XXX” and “Rxxxxxx.XXX” in your “\sapmnt\trans\cofiles\” and “\sapmnt\trans\data\” folders.
- To add this transport to the SAP’s Transport Management System, please start transaction “STMS” , press “F5” for Import Overview and select the import queue for your target system by double clicking it’s queue name.
Now choose from the menu “Extras -> Other requests -> Add” and type specify the transport name as shown:
![]()
Continue (Enter) and confirm the following screen to add this transport to the desired import queue.
![]()
The transport should now appear in the import queue.

To start the import select the queue entry and press Ctrl+F11 to import the request. Fill in the target client in the subsequent dialog (e. g. 800) and use default settings for the other options (“Start date” should be set to “Immediate”).
![]()
Continue (Enter) to start the import procedure and confirm this by pressing “Yes” in the subsequent dialog. The progress of the import procedure is shown in the status bar of the SAP GUI window. To finish the import may take several minutes, depending on the SAP environment.
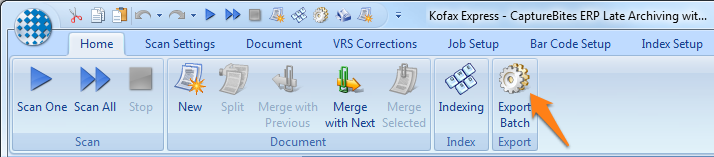
A good way to see the ERP Document Export connector in action is by trying it out with the included demo jobs. For each of the three archiving scenario’s, you’ll find a job with a pre-scanned batch. Open the Job Setup tab and press the setup button next the ERP Documents export connector to configure your SAP connection.
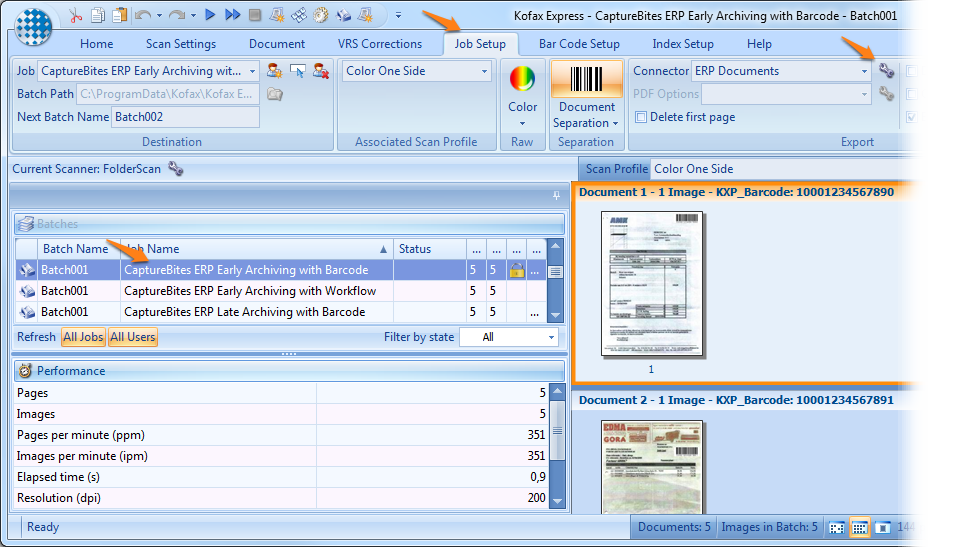
Find more details about the connector’s setup in the SAP connection and Archive scenario setup sections on this page. Once you have configured the connector correctly, press Export to see the result in your SAP system.
The first step that happens when a user exports a batch, is that the barcodes in the batch are checked.
If any of the barcodes do not match the open barcode table in SAP, the whole batch fails and none of the documents are exported. A pop-up will show up, listing the unmatched barcodes:

Solution
The user can fix the documents with the unmatched barcodes by deleting them or rescanning them with an open barcode or by fixing the barcode in SAP.
After addressing the documents with barcode issues, the user can export the batch again.
Important
 Information Quick Tips
When you see a blue information icon next to an option, just hover over it to see additional information.
To access the CaptureBites ERP Document Export connector’s setup
- Select the job you want to configure
- Open the Job Setup tab
- Press the setup button next to the ERP Documents export connector to open the setup dialogue
 Configure your SAP connection parameters in the SAP Connection tab. All entries are mandatory except for the Gateway Host and Gateway Service.
To check whether the settings are correct, press Test Connection.
Important
Information Quick Tips
When you see a blue information icon next to an option, just hover over it to see additional information.
The setup button next to the File type provides access to additional settings to configure the PDF format. You can generate regular PDF, PDF/A in searchable and super compressed format.
By default, PDF files are stored as image only PDF files.

Content repository ID: Enter here the SAP Content Repository id where the images are stored.
- Late archiving with barcode: With this scenario, the barcode value is already assigned to a business object in SAP. The exported document will be linked to that business object.
- Check for open internal barcode: Late archiving with barcode requires that an SAP business object with a matching barcode already exists. When this option is checked, if any barcode does not match a business object in SAP, the export will fail and no documents will be exported. For testing purposes, you can uncheck this option.
- Early archiving with barcode: This scenario should be used when there is no SAP business object assigned to the barcode yet. The document will be linked when a SAP business object with a matching barcode value is created.
- Check for open external barcode: In Early archiving with barcode, all documents waiting to be linked to a SAP business object should have a unique bar code value. When this option is checked, and if there is already a document with the same bar code waiting to be linked with a SAP business object, the export will fail and no documents will be exported.
- Early archiving with workflow: Export documents directly to the workflow associated with the selected document type. The scanned documents will arrive in the SAP user responsible for the workflow.
- Workflow document type: Specify the SAP workflow document type. Enter a fixed value if you pre-sort all documents per document type before scanning. Otherwise select the Kofax Express index field containing the document type. If you use an index field to define the document type, it is recommended to create an index field of the Choice list type and make it a required index field. This forces the Kofax Express user to select a value from a list that only contains valid document types.
Enable PDF Color Super Compression to reduce the PDF file size with 90% and more.
If you scan multi-page documents in color, the size of your PDF files can become very large. One page scanned in 300 DPI can be between 300KB (very clean documents) and 1MB (very busy or damaged noisy documents). A multi page PDF of 50 pages can become as large as 40MB.
Not only does this take a lot of space in your archive but export speed slows down and with very large documents may time-out. Also download speed when looking up the document in SAP is slower with large multi page PDF documents.
We recommend to enable PDF super compression when scanning large multi page PDF documents. This is how you configure this.
- Select a batch with some sample color images to help configure the PDF color super compression
- Select the job you want to configure
- Open the Job Setup tab
- Press the setup button next to the ERP Documents export connector to open the setup dialogue
- Make sure PDF or PDF/A is selected as the File Type and press setup

- Enable super compression. On the left side you see the image before super compression. On the right side, you see the super compressed image. The color is preserved but file size is 10 or more times smaller. The “Snap to White” option snaps gray and dirty backgrounds to white further reducing the file size and improving readability.

You can output searchable PDF or PDF/A by enabling OCR.
- Select the Job tab
- Select the ERP Documents connector and press the setup button
- Select PDF or PDF/A as the file type and press Setup
- Select the OCR tab and set desired OCR options. Options are self-explanatory

When you open the resulting PDF or PDF/A file in a PDF reader, you can search for any word and select, copy or highlight text. The image looks exactly like the original, the text is contained in a hidden searchable text layer.

In demo mode, a demo seal will be stamped in all exported images.
If you want to try out the product in full production mode without any limitation, please follow the instructions of our online request form.
Share with us your ideas about how to use the CaptureBites ERP Document Export connector or let us know how to improve it by sending feedback through our online feedback form.