MetaServer > Help > Extract > Extract Barcode
120-110 MetaServer Extract – Extract Barcode
MetaServer’s Extract Barcode action makes it possible to read different types of barcodes.
Some typical use cases:
– Barcodes as document separators to indicate the start or end of a document, which can be used to automatically separate your documents.
– To extract the value stored in the barcode like, for example, a product code, container number, ticket number, etc.
It’s also possible to only return the value of certain types of barcodes with specific properties so it ignores any other barcodes that might appear on the page.
In our example, we will make use of the “CB – SHIPPING” workflow. This workflow is automatically installed with CaptureBites MetaServer.
Extract Barcode rules are defined in a MetaServer Extract or Separate Document / Process Page action.
To add this rule, press the Add button and select Extract -> Barcode.
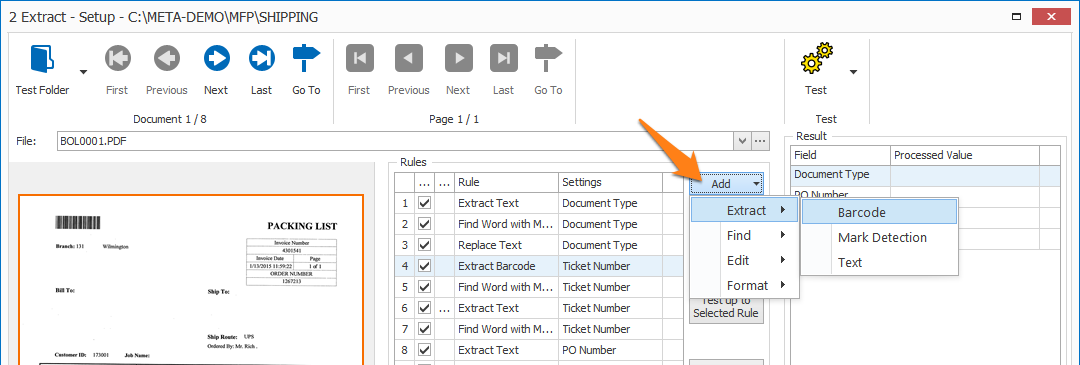
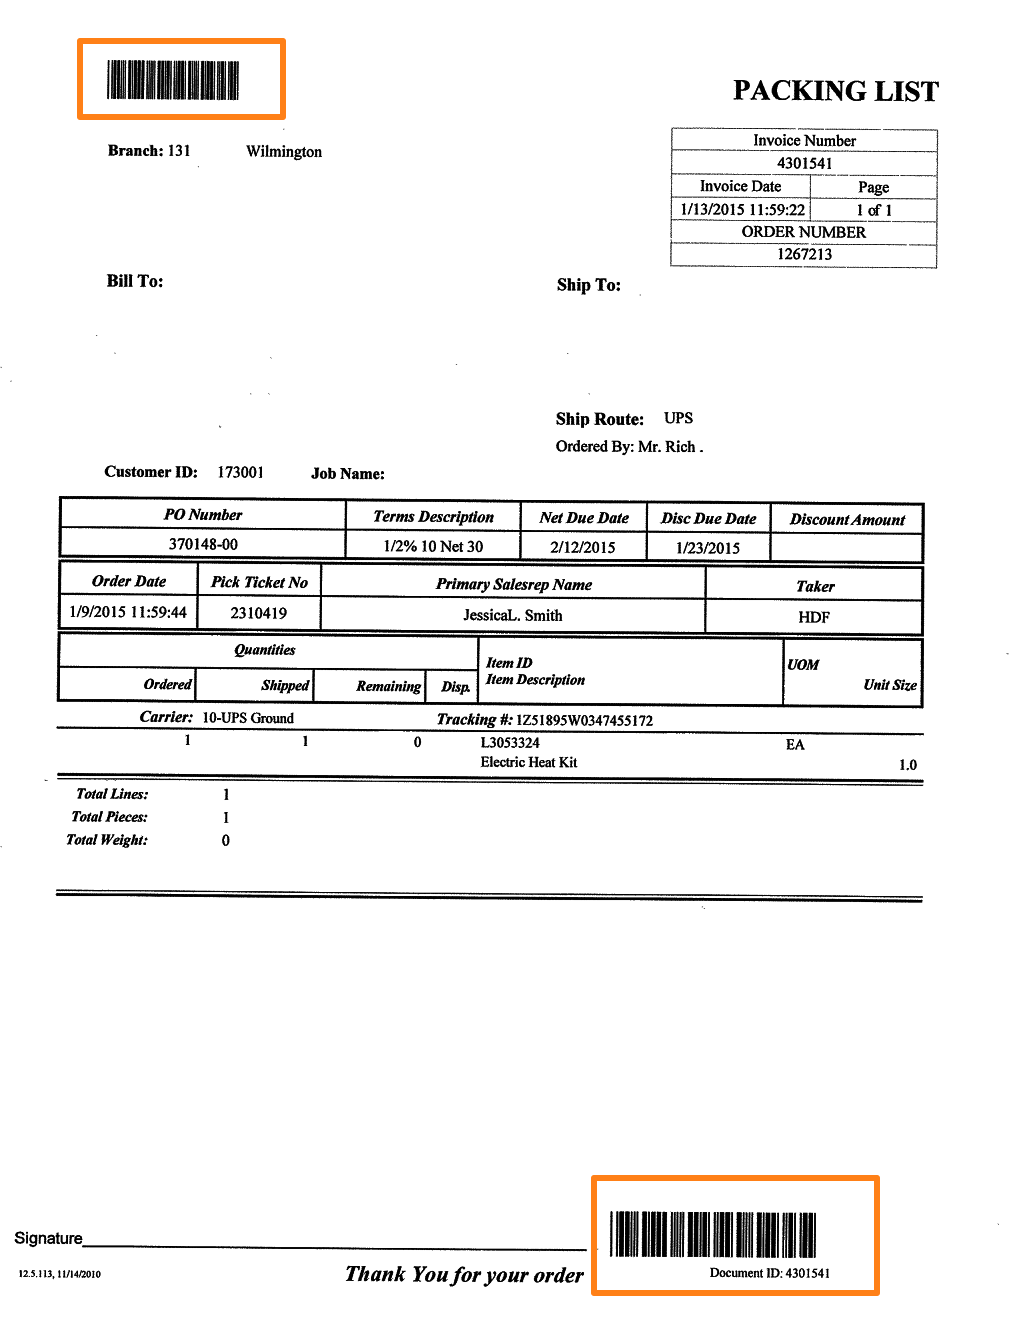
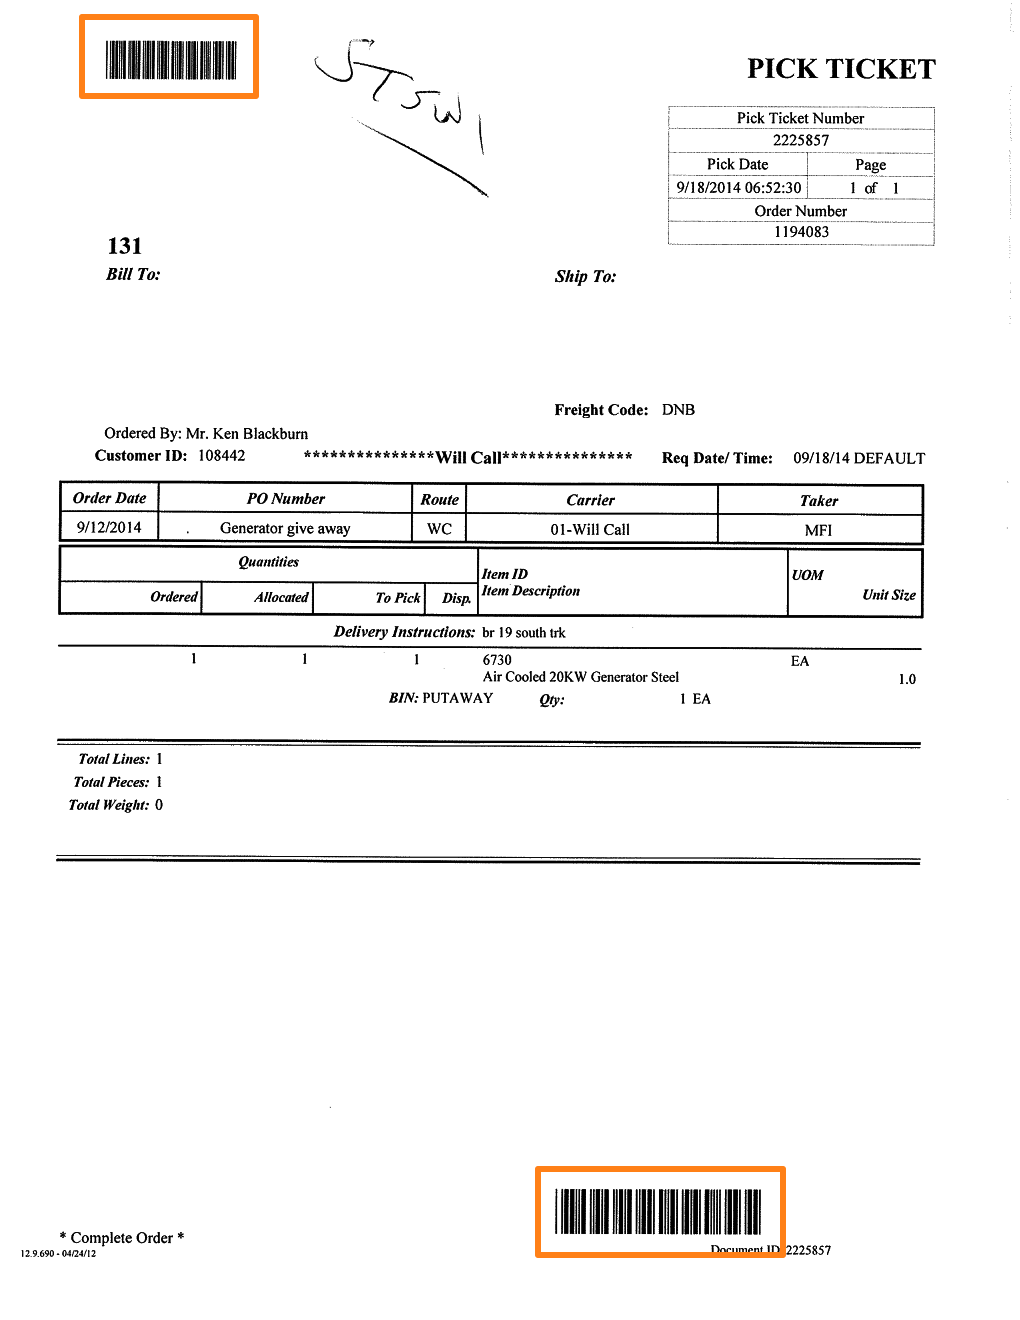
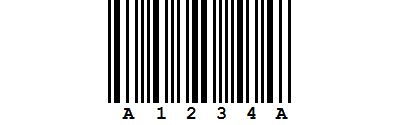
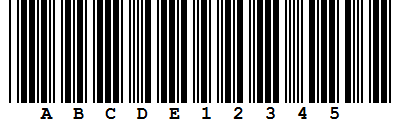
We want to extract the Ticket Number value found in the barcode on the image samples below. As you can see, the barcode can float around the document, is printed twice on the page and is always a Code 39 type barcode.
TIP: The thumbnail on the right will follow you, so you can easily refer to the Setup window. Click on the thumbnail to zoom in.

First, add a description to your rule. Then, select a field to hold the extracted data. In this case, we select the field “Ticket Number”.
01 – Apply: choose when to apply the rule. The default option is Always, which means that the rule is always applied. Press the drop-down arrow to see all other available conditions.
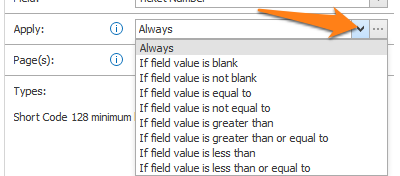
Press the “…” next to the drop-down arrow to open the setup window of the selected condition.
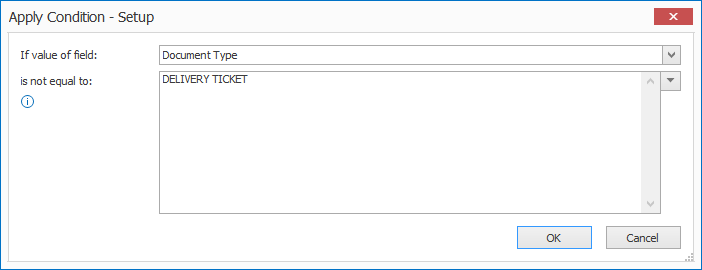
1) If value of field: press the drop-down arrow to select the field value that needs to be evaluated.
2) is equal to / is not equal to / is greater than /…: enter the other value your field value needs to be compared with. You can also press the drop-down button to select different system and index values to compose your value.

In our example, we don’t use any condition, so we select “Always”.
02 – Page: set the page number to where the barcode(s) are located. The default is page 1.
For example:
– Enter 1 for the 1st page
– Enter -1 for the last page
– Enter -2 for the page before the last page
– Etc.
01 – Types: in document management, the most common barcode types used are (in sequence of preference):
MetaServer supports the following barcode types:
Codabar: mostly used for applications that require serial numbers, such as airway bills and member cards. Codabar barcodes can be smaller in size compared to Code 39 barcodes.
Code 2 of 5 interleaved: a very simple and compact numeric code that can display digits from 0 to 9. It is used commercially on 135 film and on cartons of some products. The code always contains an even number of digits. Uneven number of digits are prefixed with a 0 to make them even.
Code 2 of 5 non-interleaved: mostly used for the airline industry, distribution systems and warehouse sorting systems.
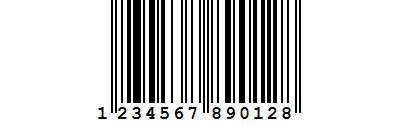
Code 39: mostly used for document management and in non-retail environments like the US Department of Defense, the health industry and postal services. It's unique by the fact that it can be generated using a font. Any software, like Word or Excel can be used to generate a Code 39 using a font like, for example, the free3of9 font. A Modulo 43 check-digit is optional.
It can contain upper case letters and digits and following special characters: -, ., $, /, +, %, and space
Because it is very easy to generate, Code 39 is popular. However, barcode 128 is preferred because it is much more compact and features a full character set.
Extended Code 39: looks identical to a standard Code 39, but it supports the full ASCII character set by combining two standard code 39 characters to represent a single extended code 39 character. For example, “+A” in extended mode is decoded as “a”. A Modulo 43 check-digit is optional.
Code 93: similar to Code 39, but it can fit more characters in the same space. A Modulo 47 check-digit is optional.

Code 128: can encode the complete ASCII-character set and has an internal check digit that won’t be displayed in the text below the code. It is the most widely used linear barcode used across industries and is often used for document management and mail tracking codes because it does not take a lot of space on the documents.
There is an even more compact variation of the Code 128 format without start/stop characters called Short Code 128.
Databar: designed for point of sales scanning and very small item identification. It’s mainly used in the healthcare and retail industry (for example: coupons).
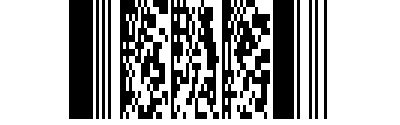
Datamatrix: a 2D barcode consisting of black and white "cells" or modules arranged in either a square or rectangular pattern, also known as a matrix. The length of the encoded data depends on the number of cells in the matrix. Thanks to a feature called “redundancy” a damaged datamatrix code can still be decoded using error correction and recovering all data.
A Data Matrix symbol can store up to 2,335 alphanumeric characters. It’s mostly used to mark small items.

EAN 13: contains 13 digits and is designed for point of sales scanning and product identification. It’s mainly used in the retail industry. Contains a check digit that is calculated according to modulo 10.
EAN 8: the short (less common) form of EAN 13, contains only 8 digits. This code is used if the article is too small for an EAN 13 barcodes.

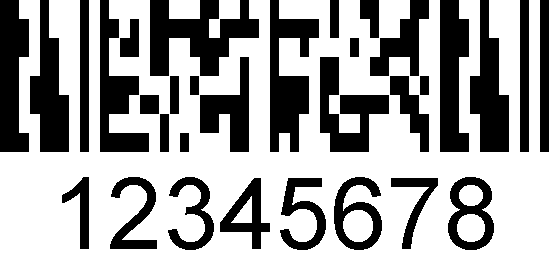
PDF417: a 2D barcode based on stacked barcodes. It also applies error correction based on the code length. It’s mostly used for airline boarding passes, ID cards, inventory management and document management. Like most 2D barcodes, it features “redundancy” to make it possible to decode damaged barcodes using error correction.
Micro PDF417: Micro PDF417 was designed for situations where a full PDF417 barcode would be too large. It has the same functions as PDF417 barcodes.
QR Code: a modern 2D barcode with marks indicating the orientation. Mostly used for mobile tagging for cell phones. Contains a check digit that is calculated according to Reed-Solomon-Error correction. This makes it possible to decode damaged QR-Codes. Because it is such an efficient and compact barcode type, it is very popular in document management applications and across most industries.
CaptureBites developed a barcode generator software optimized for document management to easily generate your own QR labels.

UPC-A: very similar to the EAN barcode used in the US for product coding. It contains 12 digits. Contains a check digit that is calculated according to modulo 10.

UPC-E: the short version of the UPC-A barcode with 8 digits, always starting with a zero. Has the same functions as UPC-A.

Patch Codes: there are 6 different types of patch codes. They are mostly used on separator sheets. They are often printed along all four edges of the separator sheet. It’s common that separator sheets are discarded after separation has been applied to the document.
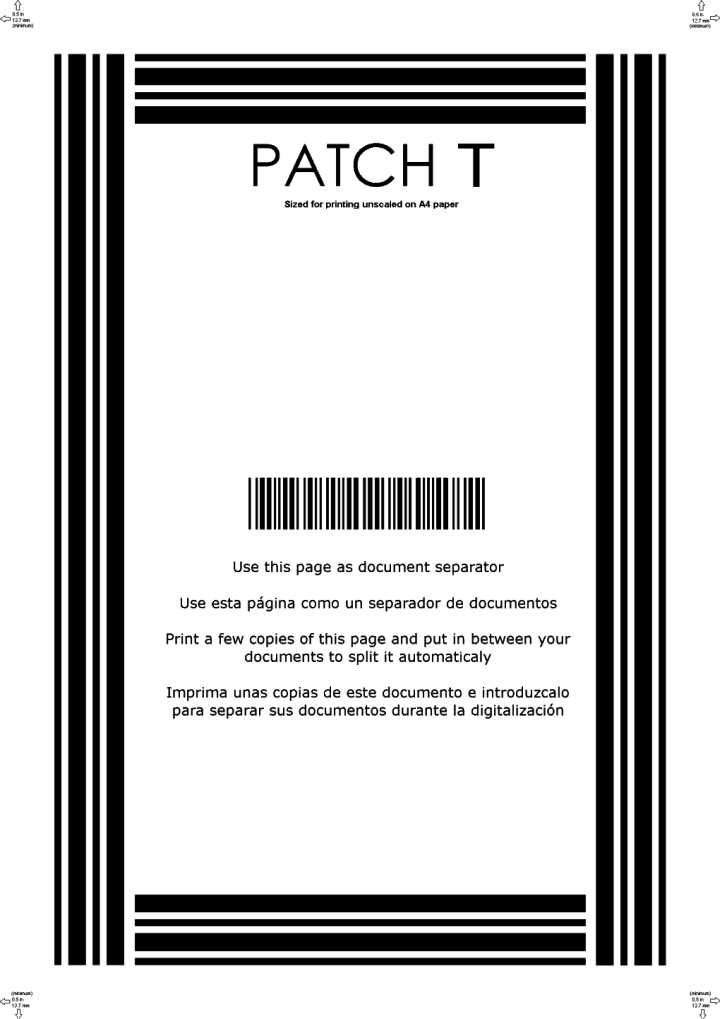
Separator sheet with Patch T type
Separator sheet with Patch T type
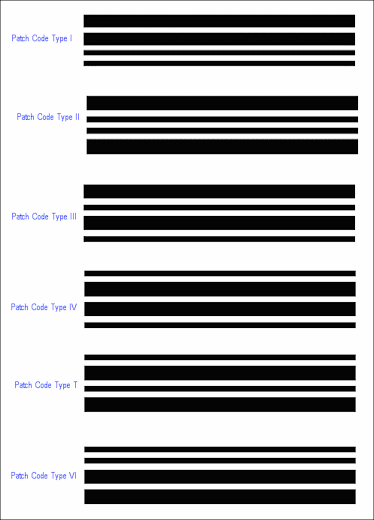
6 different Patch Code types
6 different Patch Codes
02 – Short Code 128 minimum length: defines the minimum length of a Short Code 128 barcode value, including the checksum characters.
03 – Checksum options: enable one of these options if your barcodes contain a checksum in Code 2 of 5 or Code 39 type of barcodes. The checksum feature is especially useful with Code 2 of 5 which does not feature start and stop characters. This could cause partial reads if part of the Code 2 of 5 is damaged. Adding a checksum to the Code 2 of 5 value would reject partially read barcodes.
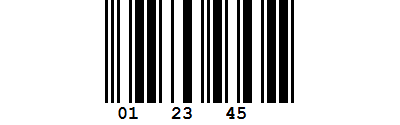
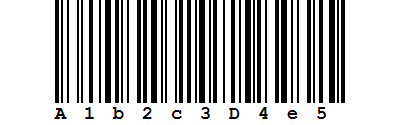
04 – Code 39 includes start/stop: Code 39 can be generated using a font and can therefore be easily created using any text-editor. Often, the start and stop * characters are forgotten making the code 39 unreadable.
In other words, if you want to encode 12345, you need to encode *12345*.
In the example below, you can see that the first 5 bars perfectly match the last 5 bars. These bars represent the “*” start/stop characters.
If the Code 39 barcode doesn’t contain start/stop characters, it is considered out of specification. However, it can still be recognized with MetaServer by disabling the Code 39 includes start/stop option.
05 – Multiple read: enable this option if you want to read more than one barcode.
If you know the maximum number of barcodes on a page is only 1 barcode, it’s highly recommended to set the maximum barcodes to 1. This can increase the performance significantly because, once the barcode is found, it won’t look for anymore barcodes.
If you set the value to 0, it will read an unlimited number of barcodes.
06 – Confidence level: any barcode with a score that’s higher or the same as the Preferred value will be recognized. When no barcode meets this standard, the barcode with the highest score that’s higher or the same as the Minimum value will be recognized.
To access the Advanced Barcode Settings, press the Advanced button.

The Advanced Barcode Settings windows will open.
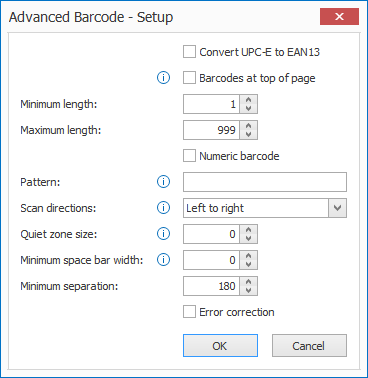
01 – Convert UPC-E to EAN13: a UPC-E barcode is actually an EAN13 barcode reduced to an 8 digit number. Enabling this option will let the engine restore the original EAN13 value of the UPC-E barcode. This can be useful when working with US-exclusive UPC-E barcodes that need to be used in the rest of the world where EAN13 is the standard barcode format.
02 – Barcodes at top of page: this option will process the image from the top of the page downwards and will speed up barcode detection when barcodes are mostly located on the top of the page. It should only be enabled if either Multiple read is disabled or if the Maximum number of barcodes is not equal to 0. For other cases, it is recommended to leave this option disabled.
NOTE: this is different to Scan directions, which sets the orientations of barcodes that the barcode reader will recognize.
03 – Minimum and Maximum length: here you can define the minimum and maximum length of a barcode value, including the checksum characters. Barcodes with a value shorter or longer than the set length will be ignored.
04 – Numeric barcode: enable this to only recognize barcodes with a numeric value.
05 – Pattern: enter a regular expression to compare the barcode value with.
NOTE: the RegEx syntax used, is POSIX extended.
A common use-case where you can use a pattern, is if you only want to extract barcodes with a certain mask. It’s faster to use a pattern during barcode extraction than a Find Word with Mask / Words rule.
For example:
You only want to extract barcode values with a minimum length of 8 and maximum length of 10 characters.
The value should start with 3 or 4 alphabetic characters, always followed by 4 to 6 digits.
You can use the following pattern:
\b[A-Z]{3}[A-Z,0-9]\d{4,6}\b
This would allow for values like:
ABC12345
ABCD123456
ABCD12345
And reject values like:
AB123456 (3rd character should be alphabetic)
ABCD1234567 (value is too long)
ABCDE12345 (5th character should be numeric)
If the value should start with a specific alphabetic character (e.g. R or S), you can use the following pattern:
\b[R,S][A-Z]{2}[A-Z,0-9]\d{4,6}\b
\b = word boundary (there should not be anything before the word)
[R,S] = R or S
[A-Z]{2} = 2 alphabetic characters between A and Z
[A-Z,0-9] = One alphabetic or numeric character
\d{4,6} = between 4 and 6 digits (numeric characters)
\b = word boundary (there should not be anything before the word)
If you want to experiment with the pattern, the pattern is actually a posix regular expression and you can test the expression here.

06 – Scan directions: you can specify the directions in which the barcode reader will look for barcodes in the image. Barcodes in other directions will be ignored. The default is set to all directions.
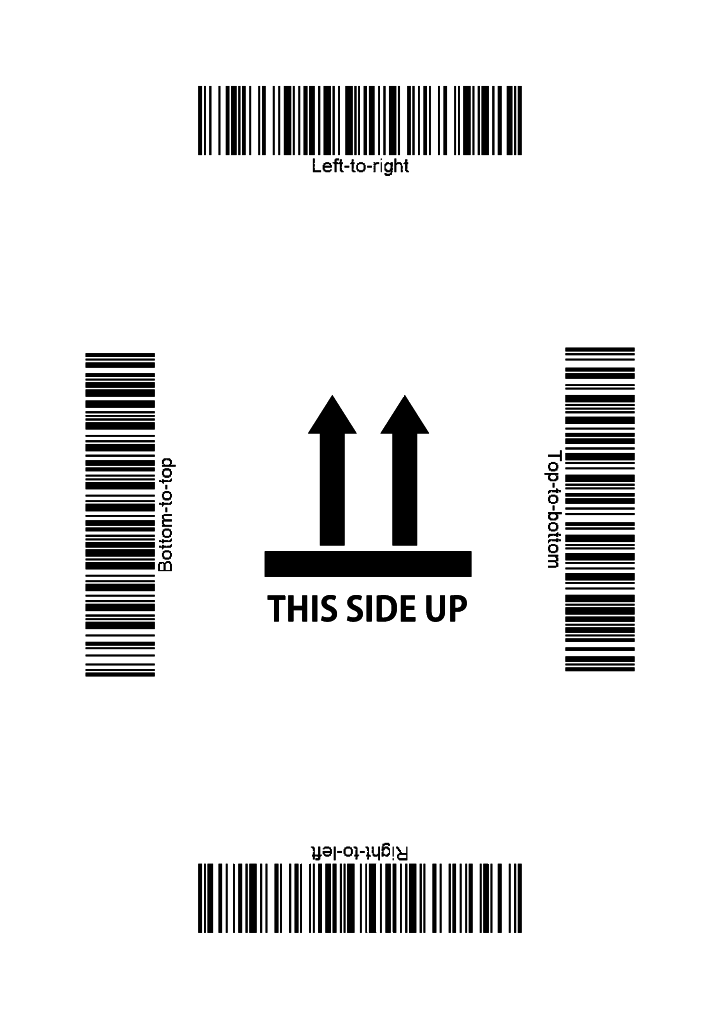
Different barcode orientations
Different barcode orientations
07 – Quiet zone size: this specifies the size, in pixels, of the blank space around a barcode. 0, the default value, implies a quiet zone equal to 10% of the image resolution. For example, when you have an image with a resolution of 300 dpi, the quiet zone size would be 30 pixels (0.1 inch or 2.54 mm).
08 – Minimum space bar width: the minimum size for a space between bars. 0, the default value, automatically selects the best value.
09 – Minimum separation: defines the minimum distance between barcodes with the same value and height. When the distance between 2 barcodes is less than the Minimum separation value, the barcode engine will assume it’s a single barcode that was mistakenly split in 2 parts.
10 – Error correction: if enabled, the engine will make a best guess at damaged linear barcodes to decode them.
01 – Deskew & Auto rotate: if your documents are skewed or rotated incorrectly, you can enable the Deskew and/or Auto rotate option to optimize Barcode extraction. It will also result in a corrected version of the document.
02 – Text to image: the specified resolution (in dpi) is used when converting text based PDF pages to an image before extracting the barcode(s).
03 – Color threshold: this value is the color level used to decide whether a pixel should be considered black or white. Any value other than 0 disables the Color processing. It’s recommended to keep the default value, 0, and us the Color processing level instead.
04 – Color processing level: the default value, 0, will do automatic color processing. A higher values result in higher accuracy and read-rate levels, but the process will be slower.
05 – Deskew mode: you can specify which method the barcode engine should use to detect skewed barcodes:
Legacy deskew method: this is the default method to detect skewed barcodes. You need to set the maximum skew angle in the Skew tolerance setting. Higher skew tolerance means slower performance.
Deskew OFF: disable skew detection. This will achieve the fastest performance.
Pre-printed barcodes: the barcodes are pre-printed and not skewed on the page but the whole page can be skewed.
1 barcode label: a barcode label is applied and can be skewed on the page.
3 barcode labels: multiple barcode labels are applied on a single page and the labels can be skewed at up to 3 different angles.
4 barcode labels: multiple barcode labels are applied on a single page and the labels can be skewed at up to 4 different angles.
More than 4 barcode labels: multiple barcode labels are applied on a single page and the labels can be skewed at up to 5 or more different angles.
06 – Skew tolerance: the maximum skew angle at which the barcode will still be read. When using barcode labels, they are not always applied perfectly straight on the document. In this case, we recommend setting the value higher, like 29°. However, when bar codes are pre-printed on the documents, it is recommended to keep the default value of 5° to increase speed.
07 – Skew line jump: this is the frequency with which scan lines are sampled when searching for skewed barcodes. Increasing the value will increase the speed at which an image is processed but may decrease the read-rate level. The default value is set to 1.
To access the Advanced Image Processing Settings, press the Advanced button.
The Advanced Image Processing Settings windows will open.
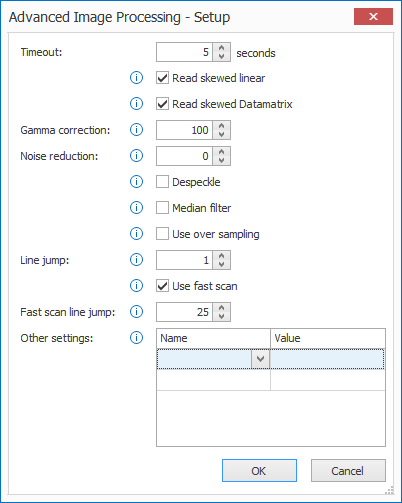
01 – Timeout: here you can specify the maximum time in seconds that the engine will allow for scanning a page in a document. The default value is 5 seconds.
02 – Read skewed linear: when enabled, skewed linear barcodes are read without the need to set Skew tolerance. This setting only relates to Codabar, Code 2 of 5, Code 39 and Code 128 type barcodes.
03 – Read skewed Datamatrix: if enabled, skewed Datamatrix barcodes are read without the need to set Skew tolerance.
04 – Gamma correction: if the value differs from the default value, 100, the set gamma correction is applied to color images.
05 – Noise reduction: if the value is larger than the default value, 0, it will filter marks from bitonal images. Larger values remove larger marks and vice versa, but it can also destroy vital barcode information if you’re not careful. A typical value is 10.
06 – Despeckle: if Noise reduction is not 0, this filter removes white speckles inside the black bars of a barcode before removing black marks from the spaces between the bars.
07 – Median filter: this filter is useful for cleaning high resolution images that contain speckles of black and white. It’s not recommended to enable this option if the black bars or white spaces are less than 2 pixels wide.
08 – Use over sampling: this will force the barcode engine to sample 3 lines at a time and use the average pixel value. This can be useful for images containing both black and white speckles.
09 – Line jump: the frequency with which scan lines are sampled when searching for barcodes. Increasing this value will increase the speed at which an image is processed, but it may decrease the read rate.
10 – Use fast scan: if enabled, a fast scan of the image is performed before conducting the normal scan. It’s only applied when only 1 barcode is required on a page. In that case, either Multiple read should be disabled or Maximum barcodes should be set to 1.
11 – Fast scan line jump: this is the frequency with which scan lines are sampled for a fast scan. The default value is 25, this allows a quick capture of any easy-to-read barcodes. Decreasing the value may decrease the overall speed.
12 – Other settings: here you can set other parameters, like the Median Filter Bias and Level. This is an exotic feature you can contact us for to configure it correctly.
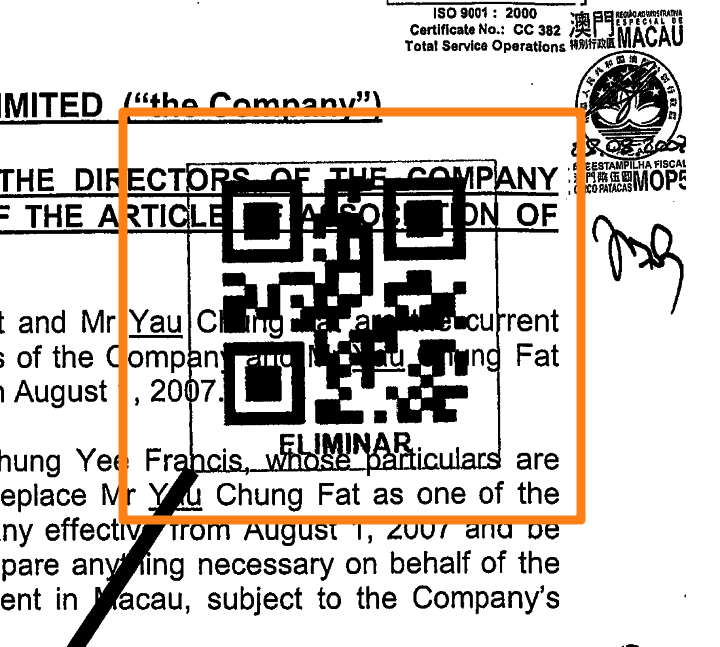
An interesting use case that required the use of other settings, was related to transparent QR code labels to indicate pages that needed to be deleted. Because of the label’s transparency, the text below the label interfered with the QR code. Using the filters, the text was suppressed and QR codes could be detected reliably.
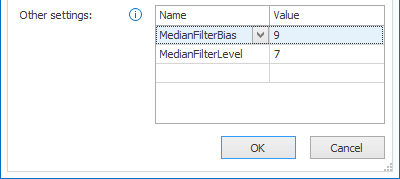
In order to read the QR codes correctly, the Median Filter Bias and Level values were configured like this:
01 – Encoding: you can experiment with this option if you use extended ASCII mapping. This applies to barcode types that use full character sets, such as QR codes, PDF417, etc… Please select the correct encoding type for your application.
02 – Allow duplicates: if enabled, multiple barcodes with identical values on the same page will all be returned.
03 – Return check digit: if enabled, it returns the barcode check digit. This only applies to barcode types with built in check digits, like Code 128.
04 – Unread barcodes: the barcode engine first looks in the document for objects that look like a barcode, then it tries to detect the barcode type and finally it decodes its value. When the value cannot be decoded, it will still return the type of barcode it detected with a value “UNREAD”. You can choose which barcode types to detect by selecting them from the drop-down menu.
05 – Codabar start/stop: Codabar barcode values are always returned with a start/stop character pair, which can be either a/t, b/n, c/* or d/n. This option includes the start and stop characters when returning the value of a codabar barcode. It can also be configured to return these start and stop characters:
1) Blank: doesn’t return any start/stop characters.
2) a, b, c, d / t, n, *,e: returns a, b, c or d as the start character and t, n, * or e as the end character.
3) A, B, C, D / T, N, *, E: returns A, B, C or D as the start character and T, N, * or E as the end character.
4) A, B, C, D / A, B, C, D: returns A, B, C or D as the start and the end character.
06 – Overwrite: if enabled, the result will overwrite the previous field value. Otherwise, the result will be added to the value that is already in the field.
07 – Clear field if result is blank: if the result is blank, any values already in the index field are cleared.
You can test your Extract Barcode rule by pressing the Test button. Press the drop-down arrow next to the Test button to auto-test each document while going through them using the blue document navigation buttons.
When selecting one of the returned barcode values, the preview image on the left shows the barcode in pink.

01 – Value: the value of the barcode(s) found in the current test document.
02 – Type: this indicates the barcode type found on the current test document.
TIP: you can copy the current settings and paste them in another setup window of the same type. Do this by pressing the Settings button in the bottom left of the Setup window and by selecting Copy. Then open another setup window of the same type and select Paste.

