MetaServer > Help > Extract > Mark Detection
120-120 MetaServer Extract – Mark Detection
MetaServer’s Mark Detection rule makes it possible to detect the presence of check marks or signatures.
Examples:
– Legal documents, contracts, agreement forms, etc. need to contain one or multiple signatures, otherwise they are not valid
– Forms, surveys, questionnaires, etc. very often contain checkboxes to indicate a choice or opinion.
To explain how mark detection works, we will use parking violation tickets as our example case.
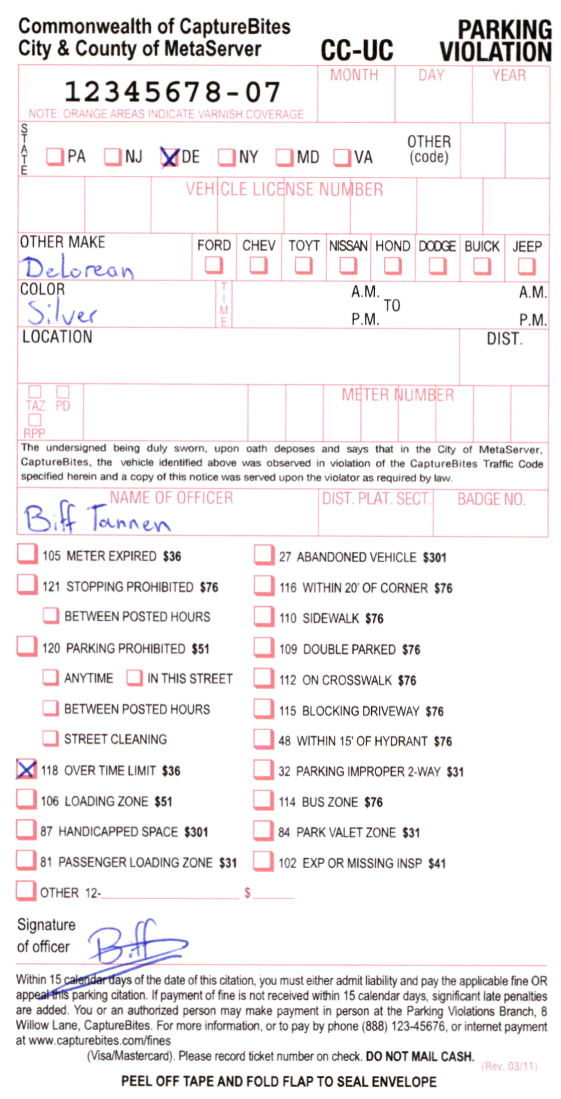
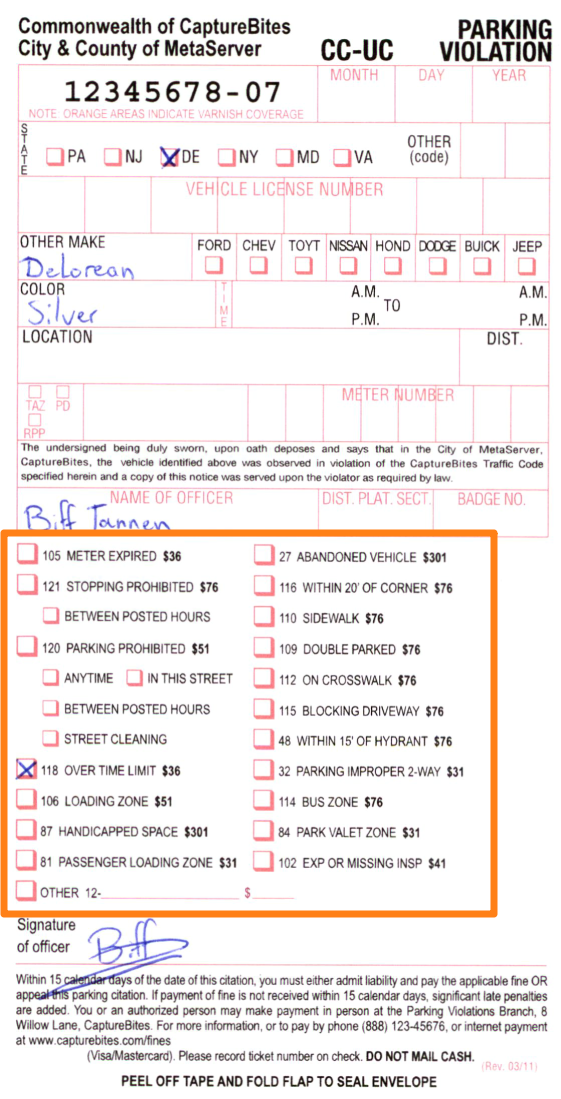
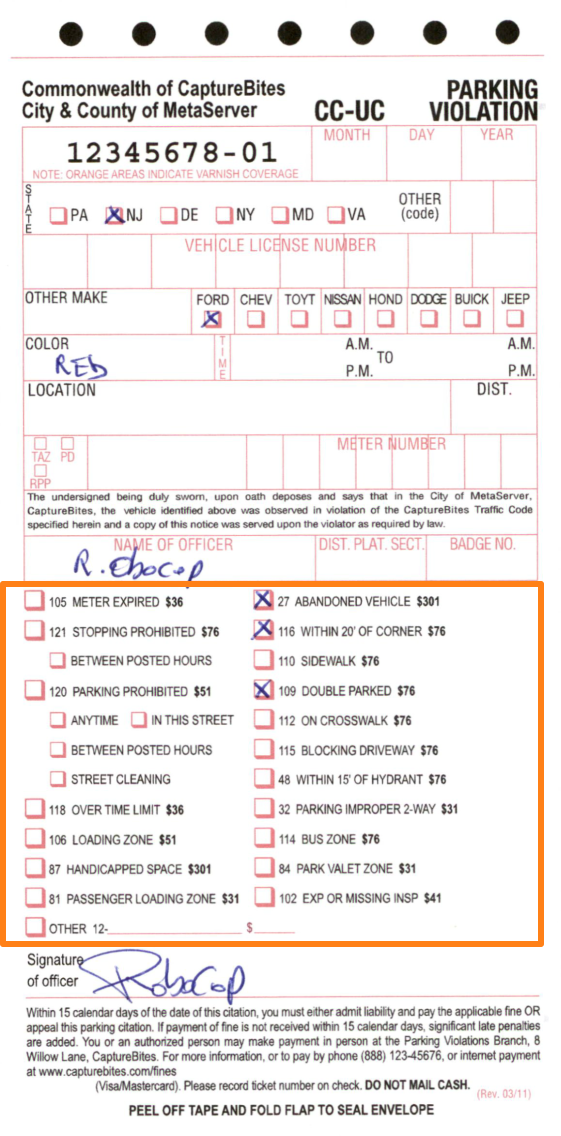
A parking violation ticket contains information about the vehicle, the different types of parking violations and a signature of the police officer. Using the Mark Detection rule, you can extract the types of parking violations, vehicle information and check if the ticket is signed or not.
Because any shift in the form can affect the result of mark detection, registering the form correctly and consistently is critical to obtain accurate results. To do this, we scale and register each form using anchors. Anchors are words or sentences that are always in the same position on the documents.
To make use of anchors, you typically define an Extract Text or Barcode rule first to hold the text containing the anchor sentences or words. We will call the field we use to store this text in “ANCHOR TEXT”. In most cases, this is the full text of the document. We will cover the concept of anchors in more detail later.
In our example, we will make use of the “CB – PARKING VIOLATIONS” workflow. This workflow is automatically installed with CaptureBites MetaServer.
Mark Detection rules are defined in a MetaServer Extract or Separate Document action.
To add this rule, press the Add button and select Extract -> Mark Detection.

We want to extract the marked parking violations on the image samples below. As you can see, these can range from 1 to multiple violations.
Also, notice that the images can shift with each ticket depending on the presence of the perforation strip on top of the ticket. With the perforation strip removed, the image shifts more than 1 cm or about ½ inch, we will handle this using the Register Page(s) option.
TIP: The thumbnail on the right will follow you, so you can easily refer to the Setup window. Click on the thumbnail to zoom in.
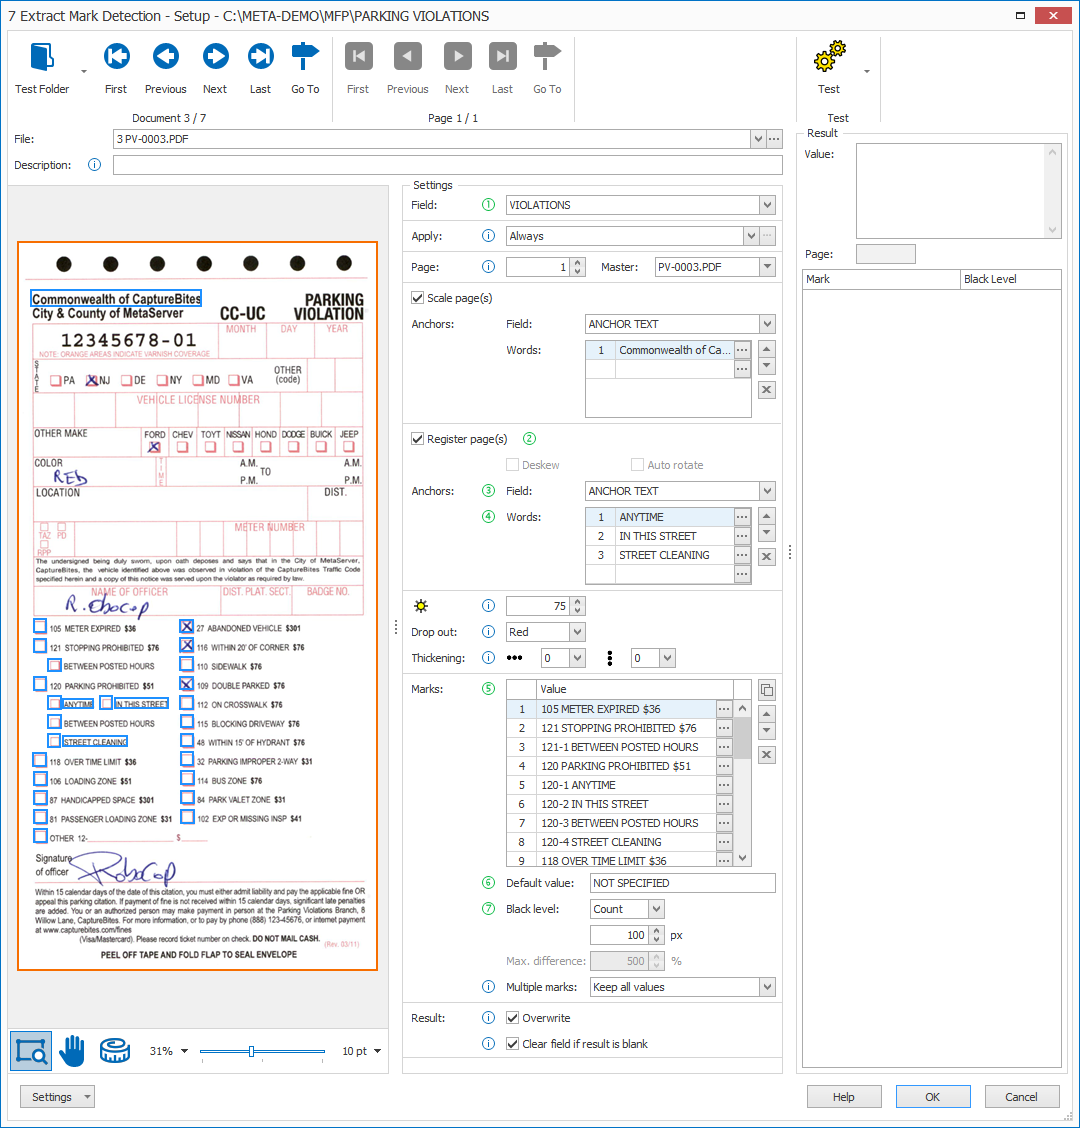
First, add a description to your rule. Then, select a field to hold the extracted data. In this case, we select the field “VIOLATIONS”.
TIP: you can find info tips in front of each option to help you set up your Mark Detection rule in the correct order. Hover your cursor over the blue or green info tip icons to see additional information.
We recommend configuring the mark detection rule in the sequence of the green info tips.
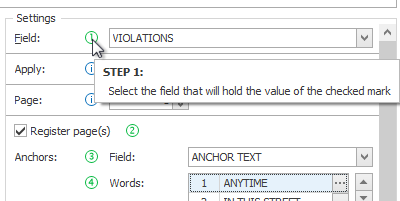
01 – Apply: choose when to apply the rule. The default option is Always, which means that the rule is always applied. Press the drop-down arrow to see all other available conditions.
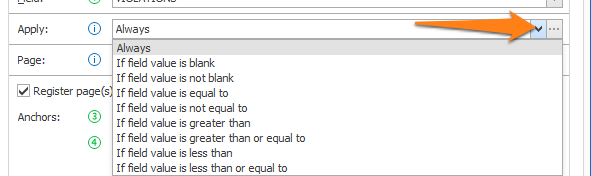
Press the “…” next to the drop-down arrow to open the setup window of the selected condition.
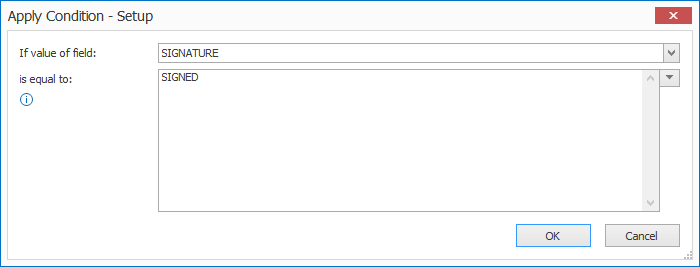
1) If value of field: press the drop-down arrow to select the field value that needs to be evaluated.
2) is equal to / is not equal to / is greater than /…: enter the value your field value needs to be compared with. You can also press the drop-down button to select different system and index values to compose your value.

In our example, we don’t use any condition, so we select “Always”.
02 – Page: set the page number to where the mark(s) are located. The default is page 1.
For example:
– Enter 1 for the 1st page
– Enter -1 for the last page
– Enter -2 for the page before the last page
– Etc.
03 – Master: when setting up your Mark Detection rule, you will need to select a Master. To do this, browse to a good quality document (no or minimal skewing, good resolution (300 DPI), color (if available), no or minimal noise, etc.) using the document buttons.
1) Set current file as master: when you have chosen your Master, press the “Set current file as master” option.

2) Load master: when you are testing other documents and you need to quickly get back to the Master document to change some settings, you can use the “Load master” option.

Enable the Scale Page(s) option to compensate for image scaling caused by the printer or scanner. This can happen when you receive documents from different sources that don’t respect the scale of the original document (= the Master Document)
The scaling feature uses one or more sentences (longer sentences are better) on the master document as reference points. If a form returns the reference sentence smaller, then the check box selections will be scaled up proportionally and vice versa.
Only disable this option if your forms are always printed and scanned from the same source with the exact same margins. You can also disable it if your forms are electronic, meaning that they never went through a printer or scanner, and all have the same scale.
Scanned documents that were printed from different sources are prone to scale. For example, if the user prints a PDF with the “fit to margins’ option enabled, the original will be slightly zoomed out. This effect could be even worse if the form is first printed and then photographed with a smart phone using a scan app. Depending on the distance of the lens and the margins, the distances between the objects can be completely different as compared to the master document.
For scaling, we use Anchor sentences. These are sentences (longer sentences are preferred) that are always in the same position on the document. The Mark Detection rule will detect the sentence and check if it is smaller or bigger than the sentence on the Master Document. It will then be scaled up or down, depending on the sentence’s size.
Some examples used as anchors:
– A unique title
– A unique sentence in standard text
In our example, we use part of the title “Commonwealth of CaptureBites” as our anchor sentence.
01 – Field: press the drop-down arrow to select the field that holds the text containing the anchor sentence(s).
In our case, we select ANCHOR TEXT which holds the full text of the ticket.
02 – Words: enter 1 or more anchor sentences and press the “…” button to open its setup window.

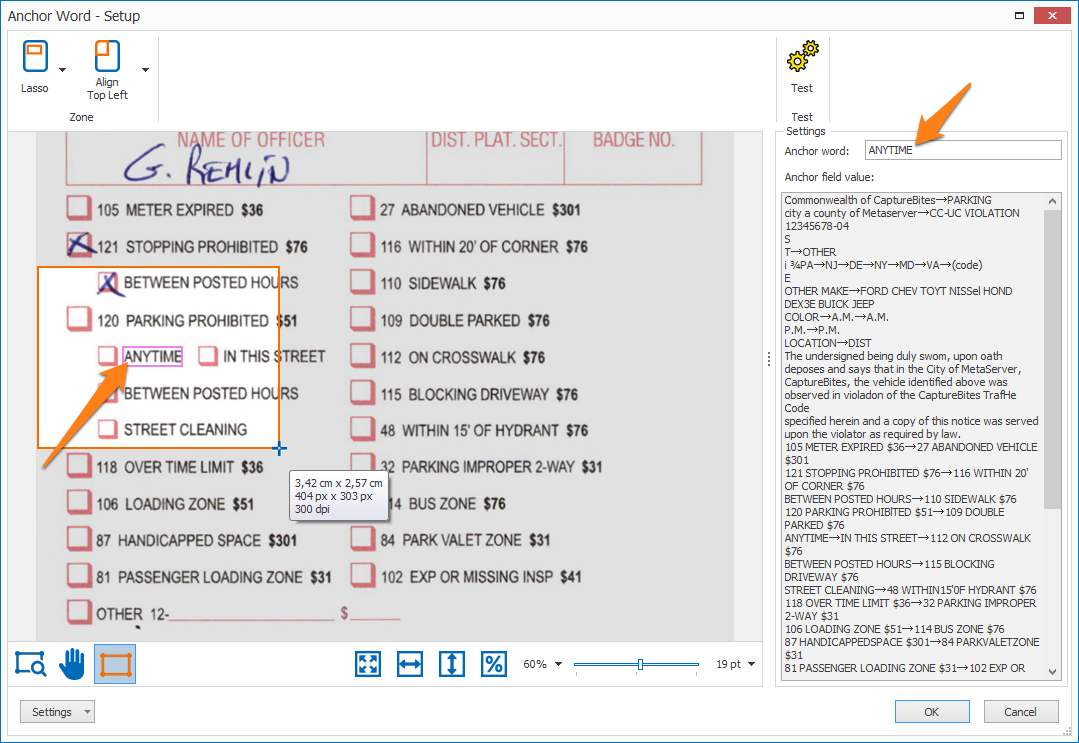
1) Drawing the anchor zone: draw the zone where the anchor sentence is located. Make sure the zone is large enough centering the anchor word. This is to avoid that the anchor word moves out of the zone if the image shifts.

2) Anchor word: If you change your anchor sentence in the settings, press the Test button to search for it in the current anchor zone.
Make sure that your defined anchor sentence is found within the anchor zone. If not, adjust your zone, change the anchor sentence or select another sample document that contains the anchor sentence.
NOTE: anchor words are case sensitive and use a “match whole word” approach to find the anchor word group. For example, the anchor word “TIME” will find “OVER TIME LIMIT” but will not find “ANYTIME because TIME is not a whole word in “ANYTIME”.
3) When you’re done setting up, press OK.
NOTE: defining multiple anchor sentences is a good practice. When the first anchor sentence is not detected, the second anchor sentence will be used for scaling and so on.
NOTE: the search for the defined anchor sentences will occur in the sequence of the anchor sentences. You can use the up and down arrow buttons on the right to change the sequence of the selected anchor sentence. You can press the X button to delete the selected anchor sentence.

Enable the Register Page(s) option to make sure the marks are aligned and detected correctly to compensate for image shift caused by the printer or scanner.
Only disable this option if your forms are always printed with the exact same margins and your scanner does not produce any image shift. You can also disable it if your forms are electronic, meaning that they never went through a printer or scanner, and all have the same margins.
Deskew & Rotate: if your documents are skewed or rotated incorrectly, you can enable the Deskew and/or Rotate option to optimize OMR results. It will also result in a corrected version of the document.
NOTE: these options are only available if you disable the Register Page(s) option.
Scanned documents are prone to shift when going through a document feeder or when placed on a flatbed. They are never aligned exactly the same.
Anchor words are words that are always in the same position relative to the checkboxes or signature boxes. The Mark Detection rule will detect the location of the checkboxes or signature boxes relative to the location of the anchor words, compensating for any image shift
Some examples used as anchors:
– A barcode/QR code
– A unique word or text
In our example, we use unique words like “ANYTIME”, “IN THIS STREET” and “STREET CLEANING” as our anchors.
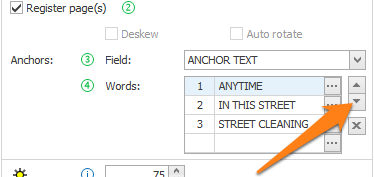
01 – Field: press the drop-down arrow to select the field that holds the text containing the anchor word(s).
In our case, we select ANCHOR TEXT which holds the full text of the ticket.
02 – Words: enter 1 or more anchor words and press the “…” button to open its setup window.
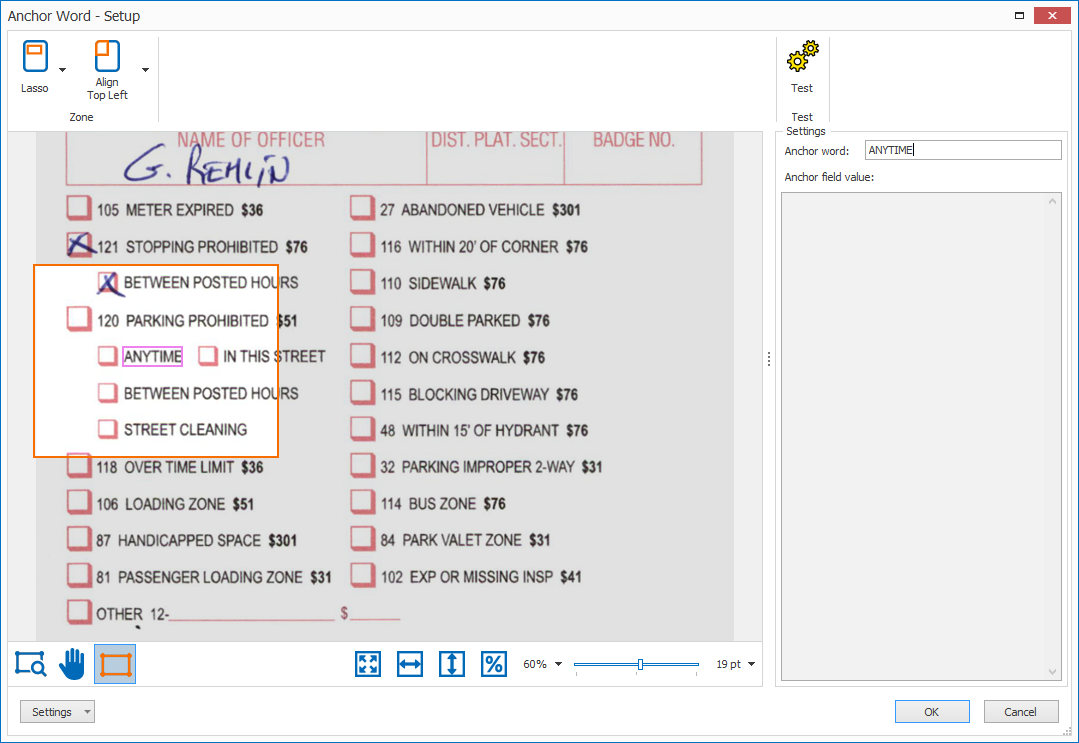
1) Drawing the anchor zone: draw the zone where the anchor word is located. Make sure the zone is large enough centering the anchor word. This is to avoid that the anchor word moves out of the zone if the image shifts.
2) Anchor word: If you change your anchor word in the settings, press the Test button to search for it in the current anchor zone.
Make sure that your defined anchor word is found within the anchor zone. If not, adjust your zone, change the anchor word or select another sample document that contains the anchor word.
NOTE: anchor words are case sensitive and use a “match whole word” approach to find the anchor word group. For example, on this form, the anchor word “TIME” will find “OVER TIME LIMIT” but will not find “ANYTIME because TIME is not a whole word in “ANYTIME”.
3) When you’re done setting up, press OK.
NOTE: defining multiple anchor words is a good practice. When the first anchor word is not detected, the second anchor word will be used for registration and so on.
NOTE: the search for the defined anchor words will occur in the sequence of the anchor words. You can use the up and down arrow buttons on the right to change the sequence of the selected anchor word. You can press the X button to delete the selected anchor word.
01 – Brightness: mark detection is based on counting pixels inside the mark zone. Noisy images can affect this process, so, if needed, adjust the brightness value to suppress any background noise.
02 – Drop out: when designing your forms, we recommended using colored checkboxes with a preference for red. If you use the corresponding color drop-out, only the marks inside the checkboxes will stay visible. This makes it very clear to check what is and isn’t marked.
03 – Thickening: use this option to make the text bolder in the selected direction(s).
Here you define the values for each mark.
There are 4 types of marks:
1) YES/NO options
For example:
☐ I agree with the general terms of the agreement
In this case, you only have to define 1 mark and the value of the check box. If it’s marked, it would be YES. When it’s not checked, it would be NO, the default value.

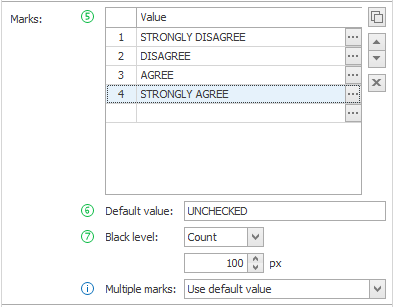
2) One of multiple choices
For example:
This guide helped me get a better understanding of the Mark Detection rule
☐ Strongly disagree ☐ Disagree ☐ Agree ☒ Strongly agree
In this case, you need to define 1 mark per possible option and the value of each mark, which is typically the text next to its box. The mark that is checked will set the value of the field. If none of the marks are checked, the default value will be used (e.g. UNKNOWN, INVALID, UNCHECKED, …).
The Multiple marks setting needs to be set to “Use default value”. Consequently, if more than 1 value is checked, the value will also be considered as unchecked and the default value will be used.
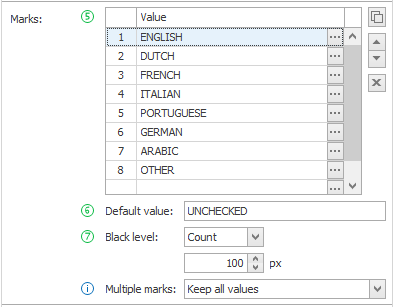
3) Many of multiple choices
For example:
What languages do you speak?
☒ English
☒ Dutch
☒ French
☐ Italian
☐ Portuguese
☐ German
☐ Arabic
☐ Other
In this case, you need to define 1 mark per possible option and the value of each mark, which is typically the text next to its box.
The Multiple marks setting needs to be set to “Keep all values”. All the marks that are checked will be stored in the field. If none of the marks are checked, the default value will be used (e.g. UNKNOWN, INVALID, UNCHECKED, …).
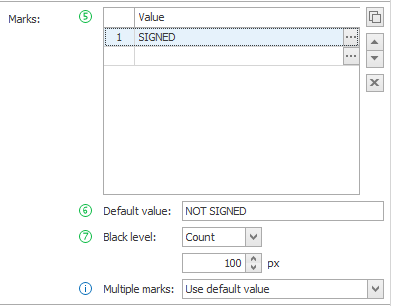
4) Signature detection
Signatures can be detected by drawing a large zone around the signature in the mark setup window.

If the pixel level is above the defined black level, the signature is present, if it’s below the value, the default applies (NOT SIGNED). You can consider this as a variant of the YES/NO option.
Enter 1 or more mark values, depending on the type of marks, and press the “…” button to open the selected mark’s setup window.

1) Drawing the mark zone: draw the zone around the mark. It doesn’t need a lot of margin but make sure to include the box itself in the mark zone.
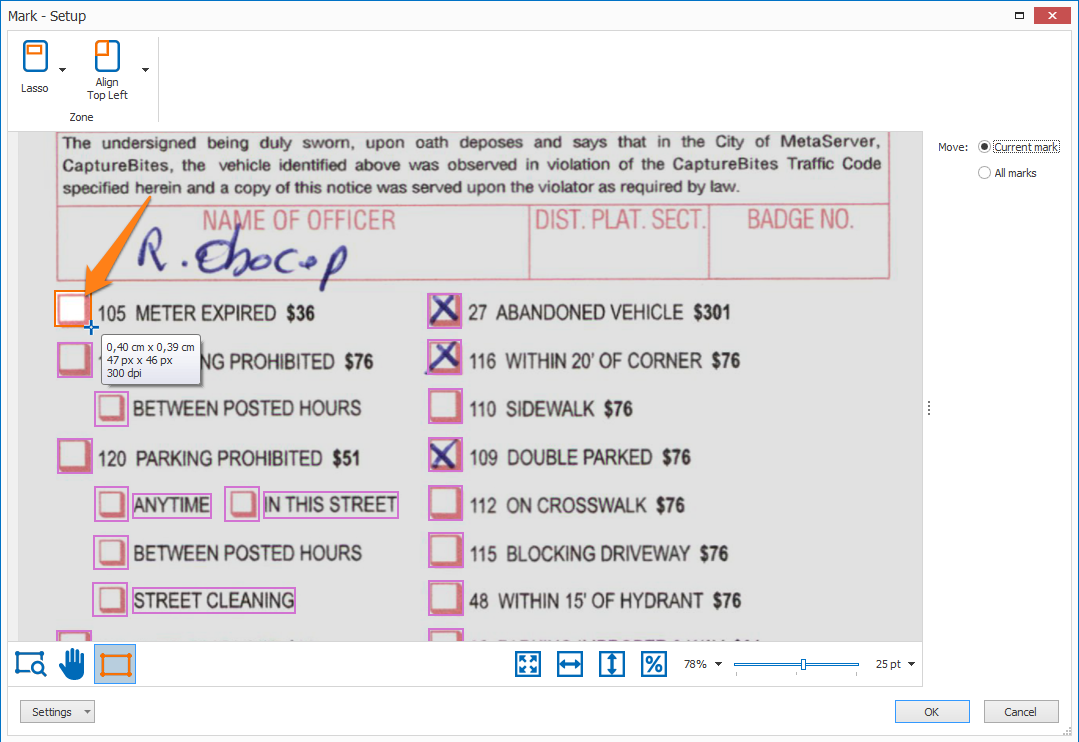
NOTE: when you define an additional mark, the mark zone size will be automatically set to the size of the last defined mark. You just need to move it by clicking inside the mark. This helps you drawing consistently sized mark zones.
We’ll discuss this in more detail in the next topic.
2) Move: you can move the current mark zone or all defined mark zones by selecting the Current mark or All marks After selecting the desired move option, you click and drag inside the mark zone with the draw rectangle tool.
Moving all marks is very useful for defining marks on feedback forms. You just define the marks for one question. Duplicate the rule and move all defined marks to the checkboxes of the next question.
3) When you’re done setting up, press OK.
02 – Default value: here you can define the default value if none of the marks are checked or if more than 1 mark is checked.
03 – Black level: after you have defined your first mark, select a sample with an unchecked mark and press the Test button. This will display the black level of an empty mark in the result list.
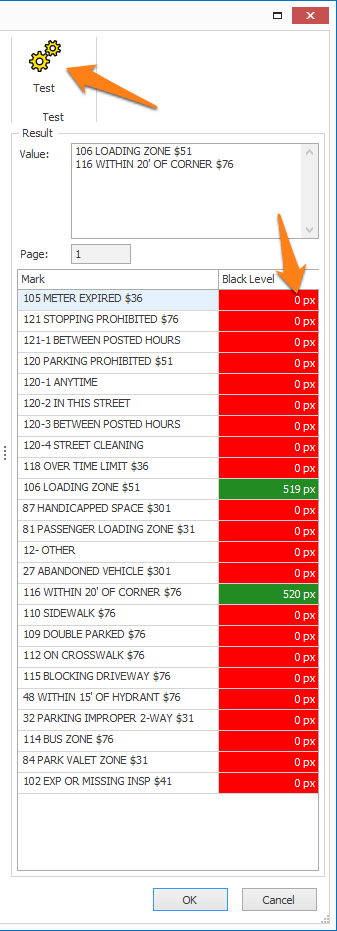
You use this value + some margin to set the black level value.
Anything equal or above that black level will be considered as “checked” or “signed”, this will be indicated as green in the test result’s mark list.
Anything below that level will be considered as “unchecked” or “unsigned”, this will be indicated as red.
You can also find the value of the checked/signed marks in the test result’s Value box.
1) Count: select this option if you want to use a fixed pixel count to set the black level. If the number of pixels is higher than your pixel threshold, the mark is considered as checked.
This is the most frequently used option because it’s unaffected by changes to the mark check zone.
2) Percentage: select this option if you want to use percentage to set the black level. We calculate the percentage of black pixels as compared to the total number of pixels (black + white) in the selection. If the percentage is higher than the % threshold, the mark is considered as checked.
3) Peak: select this option if the scan quality of your documents varies a lot. Unchecked boxes will have a very different number of black pixels depending of the scan being a bit fuzzy, good quality or dithered.
For example:
Good quality, resulting in an empty box with a normal level of black pixels:

Fuzzy, typically resulting in an empty box with a higher level of black pixels:

Dithered, typically resulting in an empty box with a lower level of black pixels:

NOTE: the Peak method only works with a minimum of 2 check boxes.
This is because the check box with the least black pixels will be set as the reference empty check box at 0% black level. Other check boxes are then compared with the reference to determine if it is checked or not.
04 – Multiple marks: select one of the following options to choose what will happen if more than 1 mark is present:
1) Use default value: multiple marks are considered as unchecked and the default value is used.
For example, the following is considered as unchecked:
What is your sex?
☒ Male
☒ Female
☒ Intersex
2) Keep least black value: on some forms, you can correct your choice by completely filling the wrong box and checking the correct one. By selecting “Keep least black value”, the box with a with the least black pixels, but above the black level threshold, will be considered as the correct answer.
In the example below, “Strongly disagree” will be considered as the answer to the last question.

3) Keep blackest value: By selecting “Keep blackest value”, the box(es) with the most black pixels / highest black percentage will be considered as checked.
The blackest value is determined differently for each method:
1) Count mode: The blackest mark is the mark with highest black pixel count, which is also higher than the min. pixel count.
2) Percentage mode: The blackest mark is the mark with the highest percentage, which is also higher than the set percentage threshold.
3) Peak mode: The blackest mark is the mark with the highest percentage, which is higher than the min. percentage and below the max. percentage.
3) Keep all values: all selected values will be stored as multiple lines.
NOTE: you can replace the line separators with any other symbol using a Set Field Value rule following the Mark Detection rule.
05 – Overwrite: if enabled, the result will overwrite the previous field value. Otherwise, the result will be added to the value that is already in the field.
06 – Clear field if result is blank: if the result is blank, any values already in the selected field are cleared.
You can test your Mark Detection rule by pressing the Test button. Press the drop-down arrow next to the Test button to auto-test each document while going through them using the blue document navigation buttons.
The preview image on the left will outline all the defined marks in blue to show the registered marks on the image.
01 – Value: the value(s) of the checked marks found in the current test document.
02 – Page: this indicates the page of the current test document where the marks were found.
03 – Mark & Black Level list: every defined mark is listed here. The Black Level column shows the marks that are checked or signed as green. Those that or not checked or signed are shown as red.
TIP: you can copy the current settings and paste them in another setup window of the same type. Do this by pressing the Settings button in the bottom left of the Setup window and by selecting Copy. Then open another setup window of the same type and select Paste.

