MetaServer > Help > Export to SAP R/3
030-050 MetaServer Export – Export to SAP R/3 & SAP S/4 HANA
With the MetaServer Export to SAP R/3 action, you can export your documents to SAP R/3 using an archiving with barcode method or you can export documents to a specific workflow.
When scanning large, multi-page color PDFs, you can use the Scale Page(s) action first to save space and improve export speed and download speed when looking up documents.
If you want to archive searchable PDFs, you can also combine it with a Convert to Searchable PDF action.
If you want to export the documents as TIF files and/or you want to convert the document to black & white, you can combine it with the Convert to Multipage TIF and Convert to Black and White action.
The Export to SAP R/3 action supports three archiving scenarios to image-enable your SAP system. Going from archiving the document image after processing the paper documents to scanning up front and image-enabling the workflow.
We support the following scenarios:
1) Late archiving with barcode: Image-enable your SAP system with minimum impact on traditional working methods.
You can download an installer that includes the MetaServer server, Operator and Admin Client + a demo workflow showcasing the Late Archiving with Barcode scenario by pressing the download button below:
2) Early archiving with barcode: Eliminate paper at the point of entry. SAP system users work directly from the image when entering the application document in the SAP system.
3) Early archiving with workflow: A document type is assigned to each document during scanning and then routed to the inbox of the SAP system users who are responsible for the workflow associated with the document type.
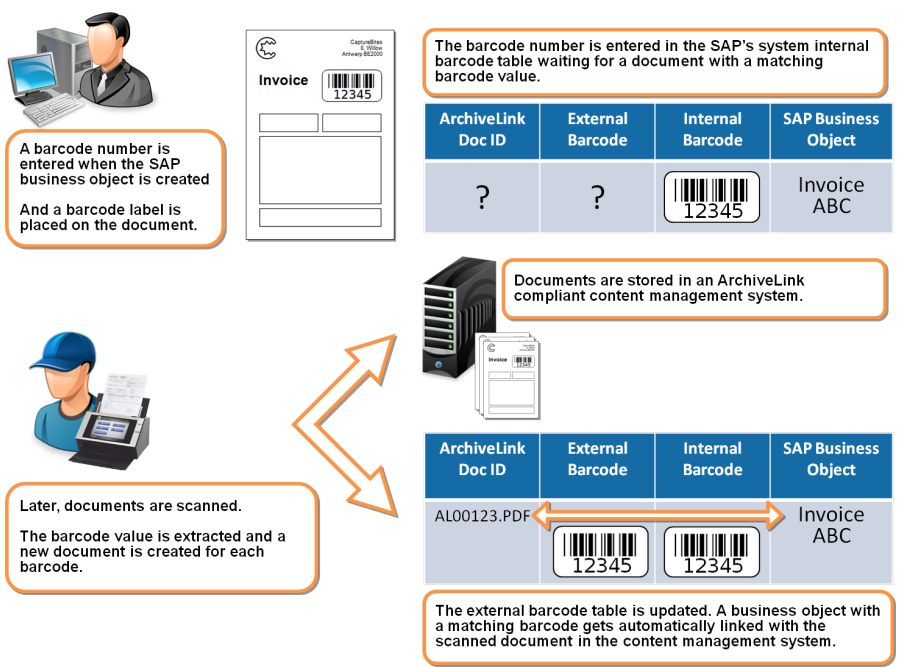
Late Archiving with Barcode:
Since SAP R/3 Version 4.6C, “Late archiving with barcode” is referred to as “Assign then store”. This scenario is very popular to image enable a SAP system with minimum impact on traditional working methods and is easy to implement. This is how it works with incoming invoices for example:
- When an invoice arrives, a barcode label is attached to the first page.
- The invoice is circulated in paper form as usual.
- The person responsible for entering the SAP accounting document also enters the ID of the barcode label on the invoice.
- When the invoice data is entered, the SAP system creates a business object and allocates a business object ID.
- The SAP accounting component then informs ArchiveLink of the business object ID, and the ID of the barcode.
- The invoices are then scanned with an MFP or network scanner.
- MetaServer automatically identifies the value of the barcode attached to the invoice.
- The barcode is also used to identify the first page of each invoice and serves as automatic document separator.
- The scanned invoices are exported as PDF files making use of the Export to SAP R/3 action.
- During export, the scanned invoices are registered in ArchiveLink with a unique document ID along with the barcode ID.
- Because the barcode identified during scanning matches the barcode of the previously created business object, the system can link the scanned invoice with the business object.
- The scanned invoice is now considered as an attachment to the SAP’s accounting document and can directly be viewed in SAP.
Early Archiving with Barcode:
“Early archiving with barcode”, also known as, “Storing for subsequent assignment” is used to eliminate paper at the point of entry. In this scenario, SAP users work directly from the image when entering the application document in the SAP system and the documents are circulated electronically. This is how it works with incoming invoices for example:
- When invoices arrive, a barcode label is immediately attached to the first page of each invoice.
- The invoices are then scanned with an MFP or network scanner.
- MetaServer automatically identifies the value of the barcode and also uses the barcode as automatic document separator.
- The scanned invoices are exported as PDF files making use of the Export to SAP R/3 action.
- During export, the scanned invoices are registered in ArchiveLink with a unique document ID along with the barcode ID.
- The person responsible for entering the SAP accounting document, enters the ID of the barcode label and instantly a match is found in the content management system.
- Data can now directly be entered from the image displayed in the image viewer. This works very comfortably when using a system with dual monitors.

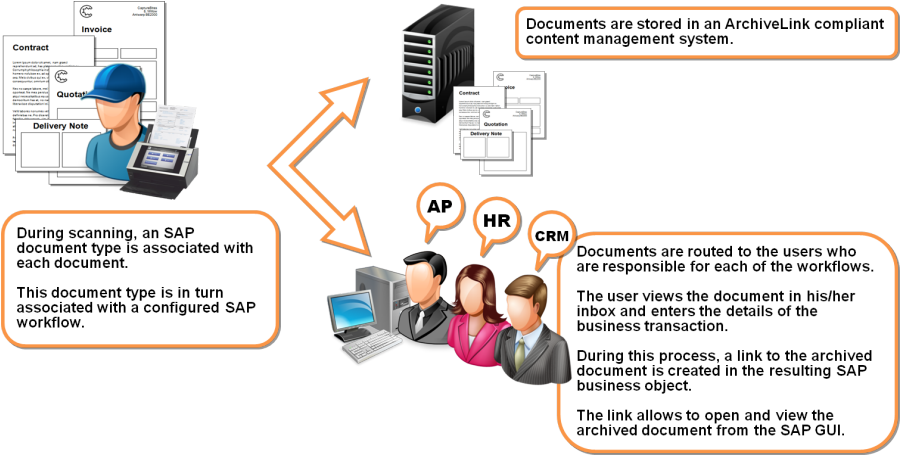
Early Archiving with Workflow:
“Early archiving with workflow” also known as “Storing for subsequent entry”, is used to eliminate paper at the point of entry. In this scenario, SAP users receive electronic documents in their inbox for further processing.
- When documents arrive, they are immediately scanned with an MFP or network scanner.
- You can sort the documents per document type before scanning or scan them mixed together and then extract the document type with MetaServer automatically or assign a document type from a drop-down list in MetaServer Validation.
- The scanned documents are exported PDF files making use of the Export to SAP R/3 action.
- During export, the scanned documents are registered in ArchiveLink with a unique document ID and are routed to the inbox of the users who are responsible for the workflow associated with the document type.
- For each of the workflows, documents are processed directly from the electronic image and paper is eliminated.
To add an Export to SAP R/3 action, select the action after which you want to insert the Export to SAP R/3 action and press Add -> Export -> to SAP R/3. The Setup window will automatically open.
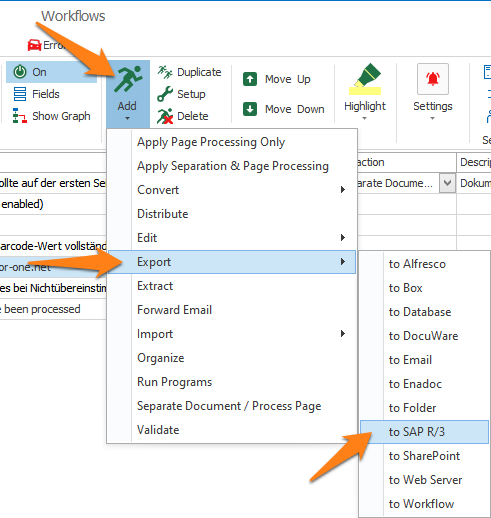
You can also open the setup window of an existing Export to SAP R/3 action by double clicking the action or by pressing the setup button on the right side of the action or in the ribbon, as shown below.
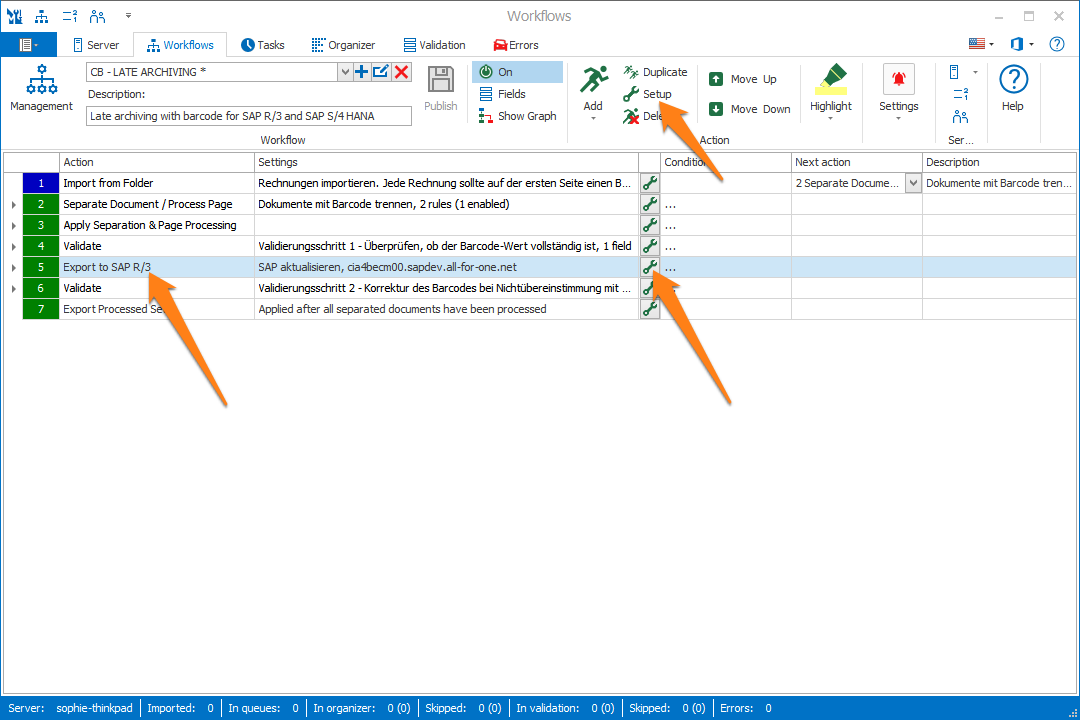
In our example, we will make use of a “CB – LATE ARCHIVING” workflow, a popular scenario used in SAP R/3.
TIP: The thumbnail on the right will follow you, so you can easily refer to the Setup window. Click on the thumbnail to make the image larger.

Don’t forget to add a description to your action.
01 – File Source: press the dropdown button to specify the file type of your exported files. By default, PDF is selected. If you have imported TIF documents or converted your documents to TIF using the Convert to Multipage TIF action, select TIF.
NOTE: if you want to separate an imported multipage TIF file and export the separated TIF files, you need to add a Convert to Multipage TIF action before exporting. In the export action, select “Processed TIF” as the File Source.
01 – Server: enter the name or IP address of your SAP Server.
02 – User name & Password: to establish an SAP connection, you are required to log in using the proper credentials.
03 – Gateway Host & Service: here you can enter the name or IP address of your SAP Gateway. These are not mandatory fields.
04 – Client: if required, change the default (800) to your custom client number.
05 – System Number: enter your system’s system number.
06 – Language: you can specify what language will be used for SAP-related error messages. The default is set to English.
After setting up your connection, you can check your settings by pressing the “Test” button.
01 – Repository: before exporting anything to SAP with MetaServer, you need to link the Export to SAP action to the content repository through a certificate.
If you haven’t done this already, please follow the instructions below.
01 – ArchiveLink document class: press the dropdown button to specify the SAP document class for your exported files. Typically, this would be TIF for TIFF or FAX files, and PDF for PDF and PDF/A files. When in doubt, select PDF.
02 – Content repository ID: enter the SAP content repository ID where the images are stored (2 characters).
03 – Archiving scenario: select one of the following archiving scenarios:
1) Assign the store (Late archiving with barcode): with this scenario, the barcode value is already assigned to a business object in SAP. The exported document will be linked to that business object.
– Check for open internal barcode: Late archiving with barcode requires that an SAP business object with a matching barcode already exists.
When this option is checked, any document with a barcode that does not match a business object in SAP, will be sent to the action defined in the “Barcode mismatch” condition. Such documents are typically sent to validation or Export to Email.
2) Store for subsequent assignment (Early archiving with barcode): this scenario should be used when there is no SAP business object assigned to the barcode yet. The document will be linked when a SAP business object with a matching barcode value is created.
– Check for open external barcode: In Early archiving with barcode, all documents waiting to be linked to a SAP business object should have a unique barcode value.
When this option is checked, and if there is already a document with the same barcode waiting to be linked with a SAP business object, will be sent to the action defined in the “Barcode mismatch” condition. Such documents are typically sent to validation or Export to Email.
3) Store for subsequent entry (Early archiving with workflow): export documents directly to the workflow associated with the selected document type. The scanned documents will arrive in the SAP user responsible for the workflow.
– Workflow document type: specify the SAP workflow document type. Enter a fixed value if you pre-sort all documents per document type before scanning. Otherwise, select the field containing the document type.
If you use a field to define the document type, it is recommended to use DB lookup with set document types and make it a required index field. This forces the user to select a value from a list that only contains valid document types.
TIP: you can copy the current settings and paste them in another setup window of the same type. Do this by pressing the Settings button in the bottom left of the Setup window and by selecting Copy. Then open another setup window of the same type and select Paste.


Before exporting anything to SAP with MetaServer, you need to link the Export to SAP action to the content repository through a certificate.
1) Enter the SAP server link, username and password. Press “Connect”.
2) As soon as you have a successful connection select the repository you want to export to. For example, content repository “Z1”.
NOTE: Custom repositories in SAP often start with “Y” or “Z” followed by a sequential number.
3) Press “Send certificate”. This will create a certificate to connect directly with your selected content repository.
4) You will now need to activate this certificate on the SAP side through SAP GUI. Without an active certificate, you won’t be able to export documents to the selected content repository.
5) In SAP GUI, search for “Transaction OAC0” to list all the Content Repositories.
Look for your content repository in this list and double-click the correct content repository to open its settings. The below example shows the settings of the content repository named “ED”.
NOTE: “SAP transaction OAC0” is used for Content Repositories, which are settings that define where and how documents and other content are stored by the SAP system. This can be in a database or on an external content server. In this transaction, you can create, change, and view the details of a content repository, including specifying details like the HTTP server, port number, and the script for an HTTP connection to an external content server.

6) If you want to communicate with the content server though HTTPS, set the SSL Port Number (typically 443) if you want to communicate with the content server though HTTPS.
7) Press the “CS Admin (SAP Content Server Admin)” button to find the Arcana certificate and activate it. You only have to activate the certificate once.
NOTE: Some Content Servers do not support the “CSAdmin” transaction and you have to activate the certificate directly in the Content Server using their UI.

8) Log in as a Content Server Admin.

9) In the Content Server Administration screen, select the “Certificates” tab.
- Press the “Edit” button
- Select the Arcana certificate
- Press the “Activate” button

10) Switch off “Edit” mode.
The certificate is now active.

The Export to SAP action can now directly communicate with the content server and export documents. With this approach, you don’t need to define a transport anymore.
Legacy (For MetaServer versions older than 3.1.32):
Preparing your SAP system by importing the transport files
The SAP Modules are available as an SAP Transport and can be imported using the SAP Transport Management System.
Before exporting anything to SAP with MetaServer, you need to import the SAP Modules.
If you would like a more in-depth guide about the SAP Transport, you can download the instructions as a PDF.
After installing MetaServer, you can find the required transport files on your system under:
C:\CaptureBites\MetaServer\SAP Transport
1) Copy the file that you find in “\SAP47_V1_30_KGSActivatorL\cofiles” to the transport directory of the SAP Application Server (\sapmnt\trans\cofiles\)
2) Copy the file that you find in \SAP47_V1_30_KGSActivatorL\data to the transport directory of the SAP Application Server (\sapmnt\trans\data\)
3) You should now find the files “Kxxxxxx.XXX” and “Rxxxxxx.XXX” in your \sapmnt\trans\cofiles\ and \sapmnt\trans\data\) folders.
4) To add this transport to the SAP’s Transport Management System:
– Start transaction “STMS”
– Press “F5” for Import Overview
– Select the import queue for your target system by double clicking its queue name
5) Choose from the menu “Extras -> Other requests -> Add” and specify the transport name as shown:
![]()
6) Continue (Enter) and confirm the following screen to add this transport to the desired import queue.
![]()
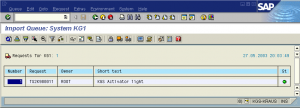
7) The transport should now appear in the import queue.
8) To start the import:
– Select the queue entry and press Ctrl+F11 to import the request
– Fill in the target client in the subsequent dialog (e. g. 800) and use default settings for the other options (“Start date” should be set to “Immediate”)
![]()
9) Continue (Enter) to start the import procedure and confirm this by pressing “Yes” in the subsequent dialog.
The progress of the import procedure is shown in the status bar of the SAP GUI window. Finishing the import may take several minutes, depending on the SAP environment.