MetaServer > Help > Extract > Find Line with Line Number
120-200 MetaServer Extract – Find Line with Line Number
01 What is a Line, Word Group and Word?
A line of text is all the text on the same horizontal line. All the text in the green box below is located on the same line.
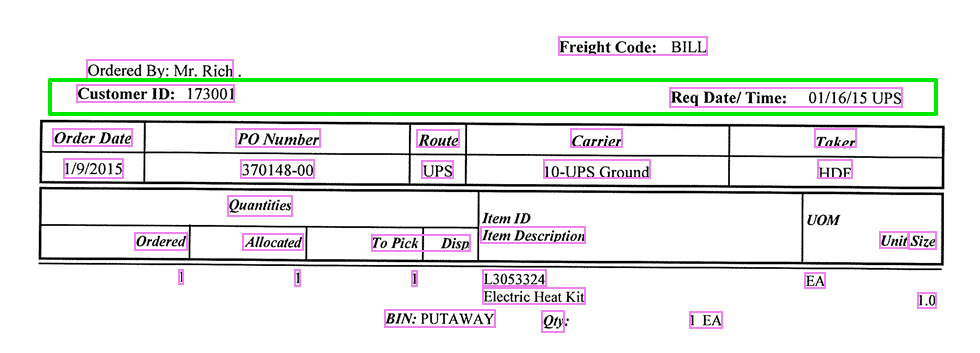
Word Groups are clusters of words separated by large spaces or TABs. As you can see in the example image, the word groups are marked in pink. The TABS are represented with a → character in MetaServer.
The line of text marked in green contains two word groups and is extracted by MetaServer as follows:
Customer ID: 173002→Req Date/ Time: 01/16/15 UPS
Words are separated with spaces. In our example, we marked some words in blue.
In conclusion, a line consists of 1 or more word groups, and a word group consists of 1 or more words.
With MetaServer’s Find Line with Line number rule, you can find a specific line or a range of lines in a multi-line text block. It’s frequently combined with a Find Line with Mask / Words, Find Word or Find Word Group rule.
You typically define an Extract Text rule first to hold the full text of the document in an index field we call Text Block or Full Text. Next, you define a Find Word or Word Group rule to filter the full text, followed by a Find Line with Line Number rule to only keep the line containing the data you are interested in.
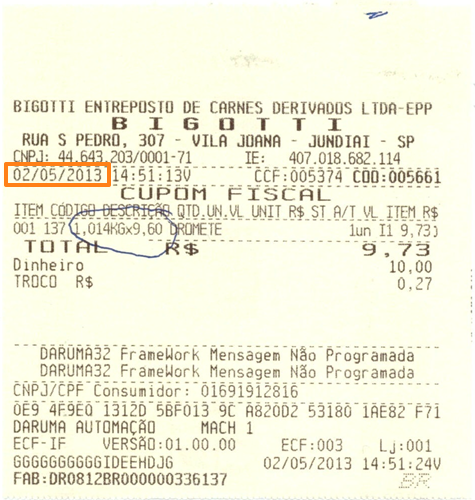
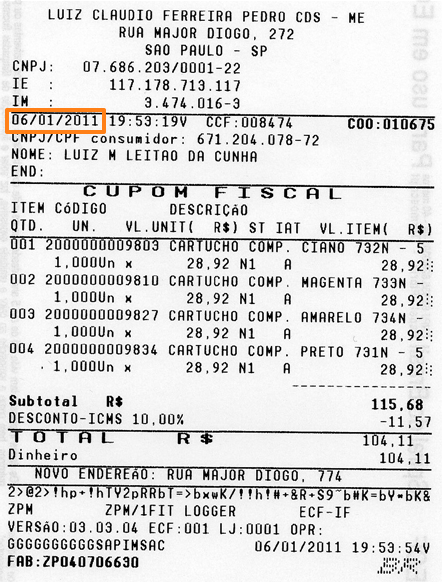
In our example, we will make us of the “CB – CUPOM FISCAL” workflow. This workflow is automatically installed with CaptureBites MetaServer.
Find Line with Line Number rules are defined in a MetaServer Extract or Separate Document / Process Page action.
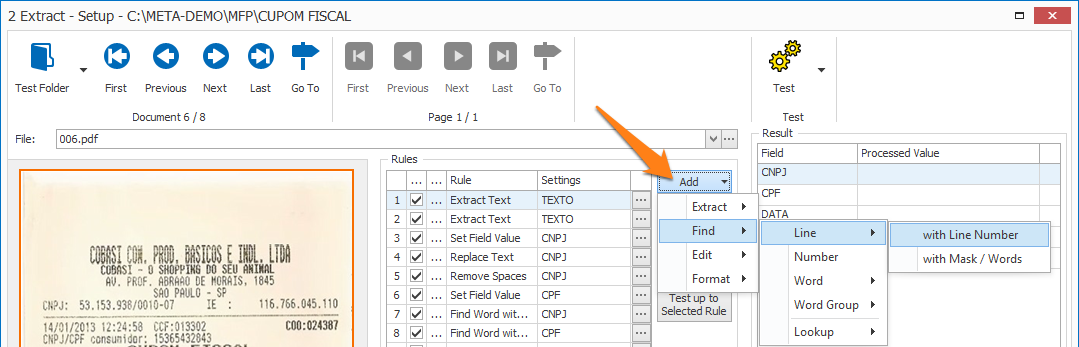
To add this rule, press the Add button and select Find –> Line –> With Line Number.
In our example, we would like to extract the purchase date from receipts. The date format and location can vary with each vendor. So, first, you would search for anything looking like a date. This would reduce the full text to one or more date-like lines of data. Next, you use the Format Date and Time rule to only keep the real dates and change them to a consistent format.
After that, you use the Find Line with Line Number rule to keep the first line, because the purchase date is always the first date mentioned on a receipt.
We will only explain the final Find Line with Line Number. For the full logic, please have a look at the “CB – CUPOM FISCAL” workflow setup.
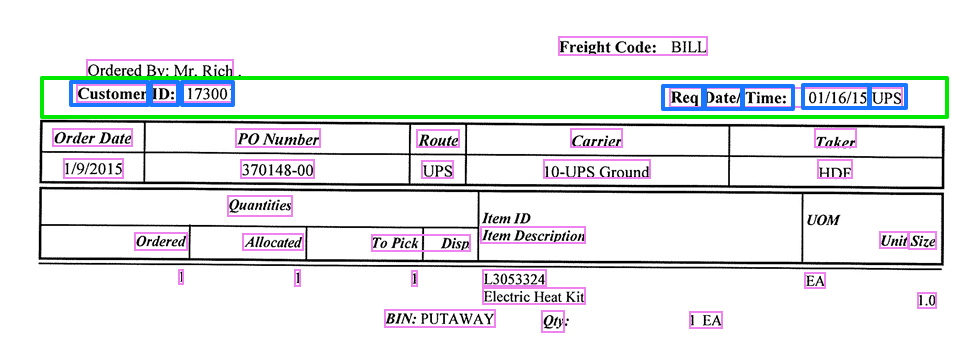
TIP: The thumbnail on the right will follow you, so you can easily refer to the Setup window. Click on the thumbnail to zoom in.
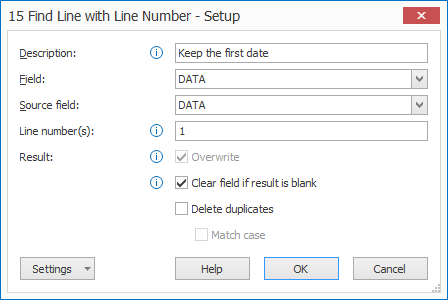
First, add a description to your rule. Then, select a field to hold the extracted data. In this case, we select the field “DATA”.
01 – Source field: press the drop-down arrow to select the source field. This is the field containing the text you want to parse to find the line containing the required data.
02 – Line number(s): specify the line number or ranges separated by commas.
Some examples:
1,2,3 = keep 1st, 2nd and 3rd line
-1 = keep the last line
2–1 = keep the 2nd line to the last line
1-5 = keep the 1st to the 5th line
1, 2-3, -2 = keep the first line, 2nd to 3rd line and the 2nd last line
NOTE: You cannot change the original sequence of the lines with the Find Line with Line Number rule. In other words, “1,2,3” generates the same output than “3,2,1” or “1,3,2”.
03 – Overwrite: if enabled, the result will overwrite the previous field value. Otherwise, the result will be appended to the value that is already in the field.
04 – Clear field if result is blank: if the result is blank, any values already in the selected field are cleared.
05 – Delete duplicates: enable this option to delete duplicate values and only return unique values.
1) Match case: when you enable this option, duplicate values need to have the exact same case to be considered duplicates. For example, when enabled, “Mrs. Fields” and “MRS. FIELDS” would be considered as 2 unique values.
TIP: you can copy the current settings and paste them in another setup window of the same type. Do this by pressing the Settings button in the bottom left of the Setup window and by selecting Copy. Then open another setup window of the same type and select Paste.

