MetaServer > Help > Extract > Find Database Lookup
120-270 MetaServer Extract – Find Database Lookup
With MetaServer’s Find Database Lookup rule, you can look up additional data in a database table via a lookup value found on the document. For example find the PO amount in the ERP database via the PO# printed on the invoice.
It’s frequently combined with Find Word Group with Mask / Words, Find Word with Mask / Word(s) and Replace Text rules.
If you can uniquely identify the lookup value with MetaServer’s Extract and other Find rules, then you use the “Find Database Lookup” rule to find additional data in a database.
If a document can contain one of multiple keywords to identify its document type and you don’t know in advance which of these multiple keywords will occur on the document, then you use the Find Word With Mask / Word(s) rule with the Accept words from database option.
Examples
Find Database Lookup
1) Find the TAX ID of the supplier on a an invoice, then look up the name in a DB via TAX ID.
2) Read the Case ID from a barcode on a legal document, then lookup the case status, claimant and defendant in a database via Case ID.
3) Find the VIN number on the car registration, then find the car brand and build year in the VIN database via VIN Nr.
Find Word with Mask / Words – Accept words from database
The Find Word with Mask / Words rule parses the document’s full text to locate one of the keywords matching the keyword column in the database. Once there is a match, the rule will return the document type corresponding with the detected keyword.
For example, you want to detect the “BUILDING INSPECTION REPORTS” document type. Some of them have a special code, identifying the Report type BIR-FORM, others don’t have such code but have a title saying “BUILDING INSPECTION” and others have a keyword “BUILDING CHECK LIST”.
The keyword database would look like:
| KEYWORD | DOCUMENT TYPE |
| BIR-FORM | BUILDING INSPECTION REPORT |
| BUILDING INSPECTION | BUILDING INSPECTION REPORT |
| BUILDING CHECK LIST | BUILDING INSPECTION REPORT |
| BUILDING CHECKLIST | BUILDING INSPECTION REPORT |
The Accept words from database option serves two purposes:
1) It compares the Keyword column with the text in the document and returns the first match.
2) Now we know which keyword is present in the text of the document. This keyword is then used to return the document type.
In our example, we will make use of the “CB – FLOATING DATA” workflow. This workflow is automatically installed with CaptureBites MetaServer.
We want to know the “Borrower” for each mortgage redemption letter. The borrower is not always mentioned on each letter, so we need to use the account number, which is always present on each letter, to map the corresponding borrower through a database lookup.


You typically define a large Extract Text rule first to focus on the region where the account number appears. In this case, we extract the full page.
Next, you define a Find Word with Mask / Words rule to filter out anything that is not formatted like an account number.
Then, since we use the account number in our output’s file name, you add a Replace text rule to replace any illegal characters.
After this, you add a Find Database Lookup rule.
Find Database Lookup rules are defined in a MetaServer Extract or Separate Document / Process Page action.
To add this rule, press the Add button and select Find -> Database Lookup.

TIP: The thumbnail on the right will follow you, so you can easily refer to the Setup window. Click on the thumbnail to zoom in.

First, add a description to your rule.
NOTE: Any changes you make in the selected database table are automatically applied.
01 – Type: select your database type:
ODBC
ODBC is a standard to connect to a wide range of databases. Configuring an ODBC data source is straightforward. For detailed instructions on how to define an ODBC data source, please have a look at this guide.
IMPORTANT: It is not possible to connect to a “single-access” database type (e.g. Excel). This technical limitation applies for both database lookup during extraction and validation. This limitation does not apply for exporting to a database.
This is an overview of the ODBC settings:
1) Data source: select the data source you want to use. An ODBC data source needs to be defined first using the ODBC Data Source Administrator tool in Windows. To find step by step instructions how to define an ODBC Data Source in Windows, have a look here.
Select data source from field: you can use this option to switch databases dynamically using a field value.
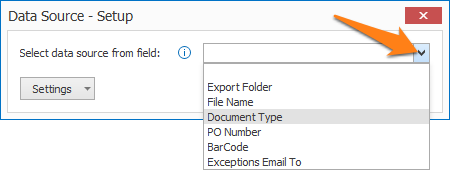
To access this setup window, press the “…” button next to Data Source. You can select the field containing your database name by pressing the drop-down arrow.
Be aware that when you use this feature, all possible databases that can be loaded, must share the same table name and schema.
2) User name & Password: some databases require to login. If so, enter the user name and password in these fields.
3) Timeout: when the database does not respond in the specified time, the action will fail.
Log: enable this option to create a log file each time the database is called. This option is typically used during testing.
On the client side, you can find the information in the following folder:
C:\ProgramData\CaptureBites\Programs\Admin\Data\Log
On the server side, you can find the information in the following folder:
C:\ProgramData\CaptureBites\Programs\MetaServer\Data\Log
SQL Server
When you use a direct connection, it’s not required to set up an ODBC data source. Because the communication with the SQL server is direct, searching and updating SQL tables is more efficient.
NOTE: If you change the connection type from ODBC or a MetaServer Database to Direct SQL and you connect to the same table with identical field names, the mappings are preserved.
MetaServer
A MetaServer database is a shared CSV database. It doesn’t require any ODBC sources on any of the clients and is very easy to deploy. The MetaServer DB settings are very similar to the MS-SQL and ODBC settings.
For help on how to create a MetaServer database, you can refer to this guide.
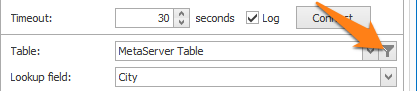
02 – Table: a database typically stores data in one or more tables, such as a table holding Tax IDs, suppliers, account numbers, etc. Specify the correct table containing the data you want to use to look up information.
1) Filter Table: with the filter option, you can reduce the number of records to search in. This makes it possible to do drill down lookups, also known as cascading lookups.
Press the funnel icon next to the table field to open the Filter Table Setup.
Drill down look-ups are used to search large database of employees, customers or products. Every step filters the number of possible matches.
In the example below, when looking for a city, you can filter the results to only show cities from a certain zip code.
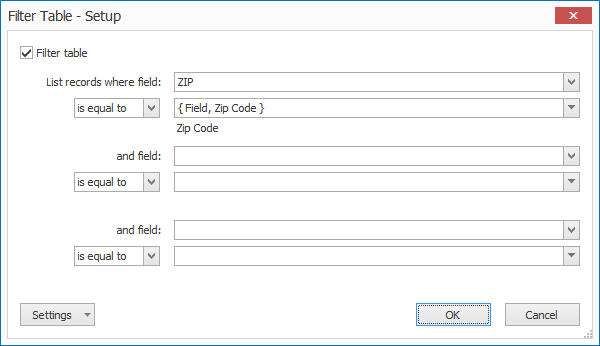
Another example would be for employee names. You first search for the state, then for a company in that state, then for the employee name in that company.
03 – Lookup field: select the column that contains the corresponding field value. For our example, you want to look for the “Borrower” through the “Account Nr.”, so you select the column “ACC_NR”.
04 – Value: specify the field with the extracted value you want to look up in your database. You can choose an existing field or you can construct your value by selecting the elements you need.
By pressing the dropdown button, you can select different metadata and workflow fields to compose your value.

For our example, we want to find the “Borrower” through the “Account Nr.”, so you select your “Account Nr.” field.
05 – Search method: by default, MetaServer always searches for a record starting with the value.
Press the drop-down button to change this so it searches for a record that doesn’t necessarily start with your value, but only needs to contain the value. If the record needs to be the exact same value as the extracted value, you can choose to only return the record that is equal to the value.
06 – If multiple hits: when your database table contains more than 1 matching record, you can choose between the following options:
1) Keep all matches: return every matching value.
2) Keep first match: only return the first matching value.
3) Keep last match: only return the last matching value.
4) Keep unique matches: only return unique, matching values and ignore duplicates.
5) Skip mapping: if there are multiple matches, don’t return any matches and keep the field value blank.
07 – Hide digits after decimal: in Oracle databases through ODBC, NUMBER(14) are integers but they are reported as DECIMAL. To avoid that, for example, an order number like 123456 is returned as 123456.00, you can enable this “Hide digits after decimal” option.
This can also be useful if ID numbers are stored as a NUMERIC or DECIMAL data type in MsSQL.
NOTE: thousand separators are never displayed in looked up decimal values, regardless whether the option is enabled or not.
This only applies to the lookup field, not the mapped fields.
In the Field Mapping tab, you can map MetaServer fields with database fields.

On the left side, all the fields of your current workflow are listed.
In our example, we map our workflow’s “Borrower” field with the “BORROWER” database value that corresponds with the extracted “Account Nr.”.
01 – Overwrite: if enabled, the result will overwrite the previous field value. Otherwise, the result will be added to the value that is already in the field.
02 – Clear field if result is blank: if the result is blank, any values already in the selected field are cleared.
03 – Digits after decimal: the precision of decimals can be changed between 0 and 9 digits after the decimal.
By default, MetaServer uses the decimal precision as set in the Windows regional settings, which is typically 2 digits after decimal. This setting affects the precision of the following database field types: Choice, Decimal, Numeric, Number, Real and Float.
TIP: you can copy the current settings and paste them in another setup window of the same type. Do this by pressing the Settings button in the bottom left of the Setup window and by selecting Copy. Then open another setup window of the same type and select Paste.


After setting up our Find Database Lookup, we get the following result:

Before

After