MetaServer > Help > Tasks > Sync MetaServer Database
250-140 MetaServer Tasks – Sync MetaServer Database
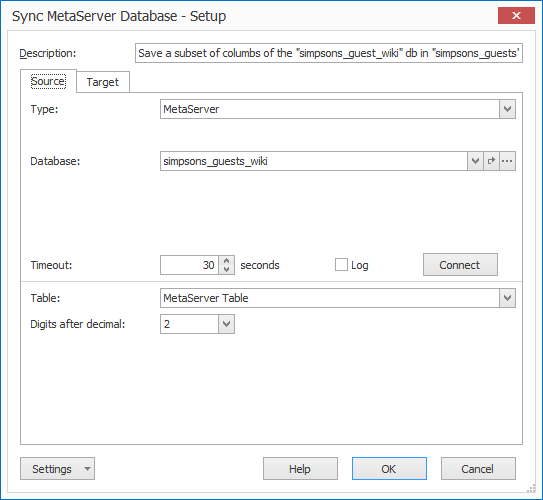
The Sync MetaServer Database action allows to sync all or a selection of columns of a table between a source database and a target database.
In our example, we will make use of the “CB – SIMPSONS” task. This task is automatically installed with CaptureBites MetaServer.
To add a Sync MetaServer Database action, select the action after which you want to insert the Sync MetaServer Database action and press Add -> MetaServer -> Database -> Sync . The Setup window will automatically open.

You can also open the setup window of an existing Sync MetaServer Database by double-clicking the action or by pressing the setup button on the right side of the Sync MetaServer Database or in the ribbon, as shown below.
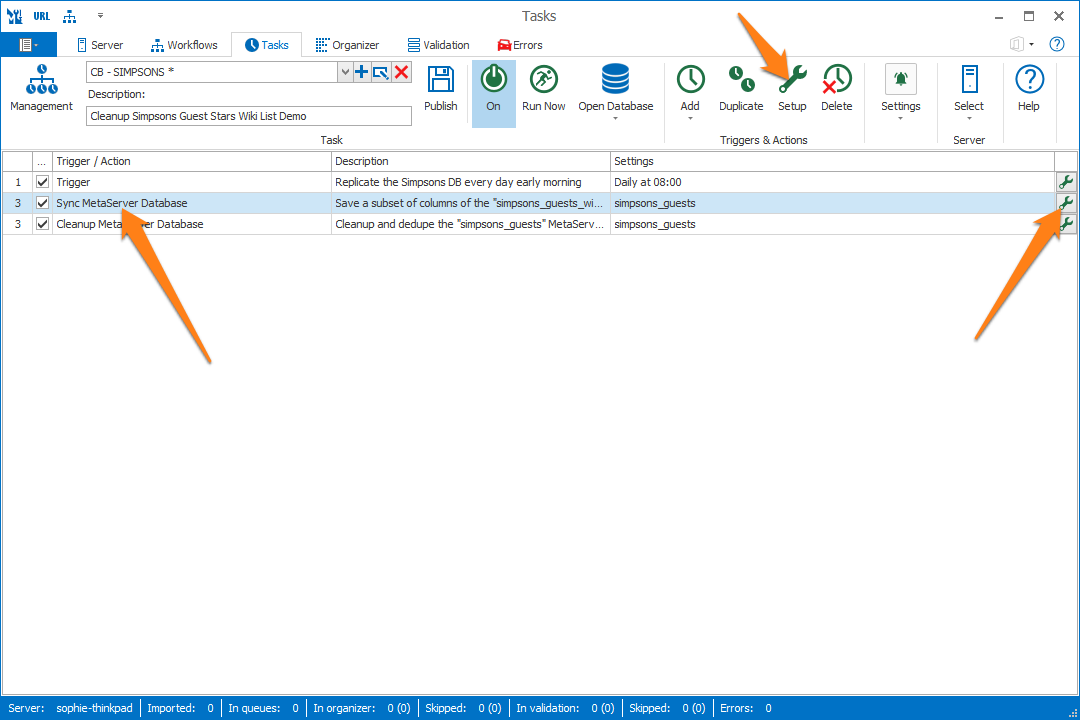
In our example case, we want to sync a database with only a selection of columns every day using a Trigger. Immediately after that, we use a Cleanup MetaServer Database action to clean up the database by deleting any empty records, duplicates, etc.
Don’t forget to add a fitting description of your action.
01 – Type: select your database type:
Azure AI Document Intelligence: synchronize a MetaServer database with the document types of an Azure AI Document Intelligence Custom Classification model. It is typically used in combination with the Organizer’s Classify mode.
This is an overview of the Azure AI Document Intelligence settings:
1) Resource: from the drop-down list, select your Azure AI Document Intelligence resource. If you don’t find it in the list, please make sure the resource is defined in the Azure Resources setup in the Admin Client’s Server tab.
2) Endpoint: the endpoint will be automatically populated by your selected resource.
3) Model: from the drop-down list, select the available Azure AI Document Intelligence model you would like to sync with your MetaServer database.
DocuWare: DocuWare stores documents in “File Cabinets”, where each document is categorized using multiple index fields.
This is an overview of the DocuWare settings:
1) Address: enter your DocuWare server address. The address typically looks like:
https://[SERVER_NAME].docuware.cloud/DocuWare/Platform
2) User name & Password: please enter the user name and password of your DocuWare account. When in doubt, contact your IT department.
3) Timeout: when the DocuWare cabinet does not respond in the specified time, the action will fail.
4) Cabinet: select your destination cabinet by pressing the dropdown button.
JSON: to retrieve the JSON data, please specify the URL of the JSON database.
MetaServer: a MetaServer database is a shared CSV database. It doesn’t require any definition of ODBC sources on any of the clients and is very easy to deploy. The MetaServer DB settings are very similar to the ODBC settings.
ODBC: ODBC is a standard to connect to a wide range of databases. Configuring an ODBC data source is straightforward. For detailed instructions on how to define an ODBC data source, please have a look at this guide.
This is an overview of the ODBC settings:
1) Data source: select the data source you want to use. An ODBC data source needs to be defined first using the ODBC Data Source Administrator tool in Windows. To find step by step instructions how to define an ODBC Data Source in Windows, have a look here.
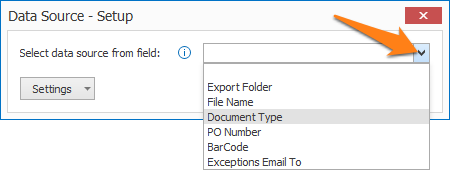
Select data source from field: you can use this option to switch databases dynamically using a field value.
To access this setup window, press the “…” button next to Data Source. You can select the field containing your database name by pressing the drop-down arrow.
Be aware that when you use this feature, all possible databases that can be loaded, must share the same table name and schema.
2) User name & Password: some databases require to login. If so, enter the user name and password in these fields.
3) Timeout: when the database does not respond in the specified time, the action will fail.
4) Table: a database typically stores data in one or more tables, such as a document types table, a suppliers table, a products table, etc.
SQL Server: when you use a direct connection, you don’t require the setup of an ODBC data source. Because the communication with the SQL server is direct, searching and updating SQL tables becomes more efficient.
Note: If you change the connection type from ODBC to Direct SQL and you connect to the same table, the mappings are preserved.
1) Server: enter the SQL server you want to connect to.
2) Database: enter the name of the database you want to access.
3) User name & Password: most SQL databases require to log in. If so, enter the user name and password in these fields.
4) Extra: allows you to add custom connection string parameters. If you don’t need to use any special options, you can leave that field blank.
5) Timeout: when the database does not respond in the specified time, the action will fail.
6) Table: a database typically stores data in one or more tables, such as a document types table, a suppliers table, a products table, etc.
7) Digits after decimal: the precision of decimals can be changed between 0 and 9 digits after the decimal.
By default, MetaServer uses the decimal precision as set in the Windows regional settings, which is typically 2 digits after decimal. This setting affects the precision of the following database field types: Choice, Decimal, Numeric, Number, Real and Float.
Press the Target tab to open its setup window. Here, you can set your target database and table.
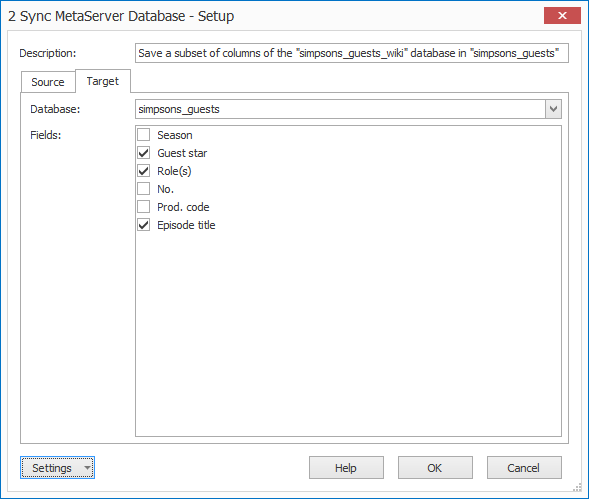
Don’t forget to add a fitting description of your action.
01 – Database: select one of the available target MetaServer databases as your target database OR create a new target database by entering a name manually.
02 – Fields: select one or more columns of the source database’s table that will be synced to your source database table.
TIP: you can copy the current settings and paste them in another setup window of the same type. Do this by pressing the Settings button in the bottom left of the Setup window and by selecting Copy. Then open another setup window of the same type and select Paste.

