MetaTool > Help > Validation > Database Lookup
080-160 MetaTool Validation – Database Lookup
- Automatic lookup using extracted OCR data: For example, extract the Tax ID (VAT Nr. ABN Nr,…) by means of MetaTool’s OCR and extraction rules and look up the matching supplier name and email using database lookup.
- Multi Search Field lookup: Search a record through multiple lookup fields. For example, search for a supplier by Tax ID, Name or City
- Drill down search: This is similar to searching for an address in a GPS – Sat / Nav device by drilling down from country to city to street. In business applications, drill down searches are used to search large database of employees, customers or products. Every search step filters the number of possible matches. For example, search first for the state, then for a company in that state, then for an employee name in that company.
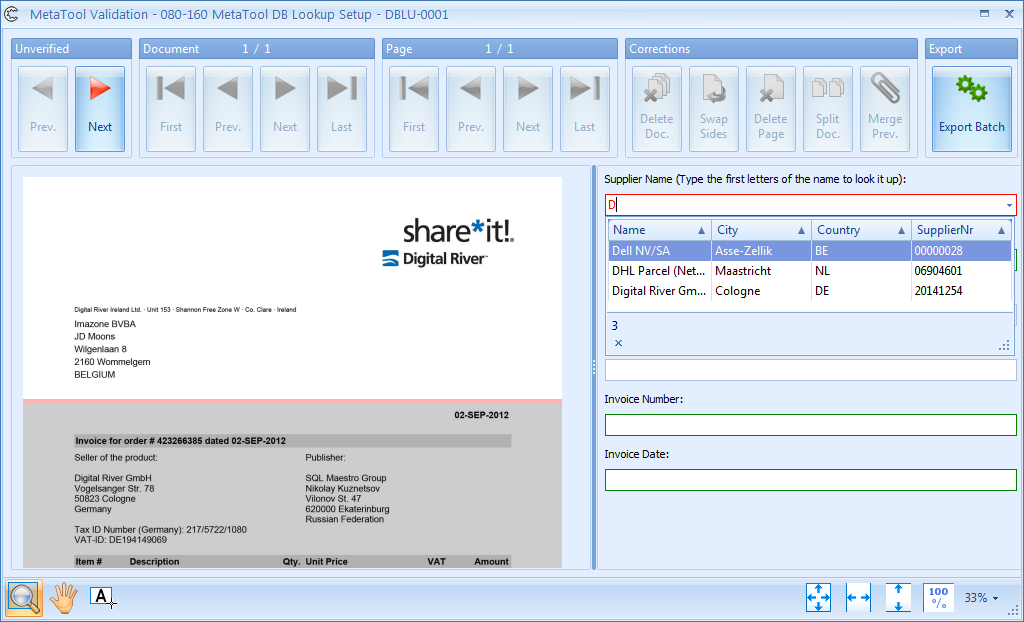
Typically, database lookup is automatic and uses the result of extraction rules to trigger the lookup. If the automatic lookup fails, the user can then manually enter the first few letters of, for example, a Supplier Name to look it up in a supplier database. The user can also use the rubber band OCR tool to trigger the lookup.
01 Database Lookup – Add Rule
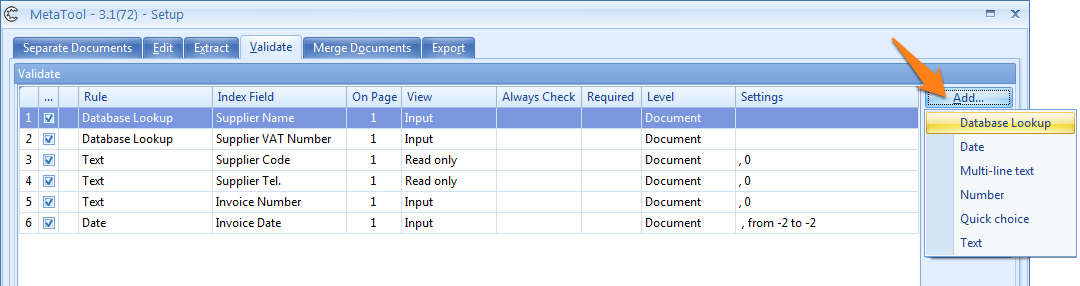
Database Lookup is defined in the MetaTool Validation tab.
Press the Add button and select Database Lookup to add the validation rule.
02 Database Lookup Setup – Index Field Tab
In the Index Field tab, you define everything related to the index field, such as on what page the data is expected and if a value is required or not.
TIP: The thumbnail on the right will follow you, so you can easily refer to the Setup window. Click on the thumbnail to make the image larger.

01 - Navigation Tool Bar:
1) Document buttons: use the green buttons to navigate through the documents in the current batch.
2) Page buttons: use the blue buttons to page through the current document if it has more than one page.
3) Zone menu: use the Zone menu to select the highlight zone during validation. This is the portion of the image that will be highlighted during validation when the user selects the index field. It is used to draw the attention to the zone on the page where the data is expected.
In this setup, you have the following requirements for the Supplier Name:
- The validation window will pop up if it’s blank or if the automatically extracted search value occurs multiple times in the database (multiple hits).
- The field is not required and the validation user is allowed to leave the field blank.
- During validation, the rubber band OCR tool is available to enter a value.
- The entered value needs to exist in the database.
03 - Label: here you enter the label that will appear above the input box during export in the Validation window. By default, this is the same as the selected index field name. But you can also enter something more meaningful. Like, in this example, add some hints about how to enter the data.

04 - View: there are 4 possible View options. Press the drop-down arrow to choose an option.
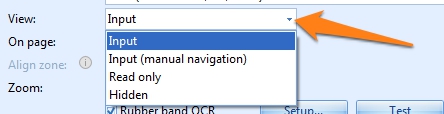
1) Input: the user can enter information in the index field. When he navigates in the field during validation, the page specified in the On page setting will be selected, the green selection in the viewer, as defined in the Zone menu, will be highlighted and the zoom setting defined in the Zoom option will be applied.
In other words, input fields automatically draw the attention to the place where the information is expected on the page.
2) Input (manual navigation): the user can enter information in the field when he navigates in the field. The displayed page, the image zoom and highlight will not change and will be whatever was last selected. This is useful when the expected location of the information on the documents is unknown and can be potentially anywhere on any of the pages on the document.
3) Read only: the field value cannot be changed. This is typically used for automatically extracted or looked up data that should not be modified by the user. The data is for display only.
4) Hidden: this is typically used for automatically extracted or looked up data that should not be viewed or modified by the user.
05 - On Page: sometimes the information for the index field is on another page than page 1. With this option, you can exactly define on which page the data is expected. When the user selects the field during validation, the viewer will automatically display the correct page.
You can also enter negative page numbers. Page -1 is the last page, -2 is the page before the last page, etc.
06 - Align zone: when you select a highlight zone in the viewer with the Lasso tool in the Zone menu, by default it is aligned with the Top Left of the page.
For information located in the bottom of the page, like a Total Amount on an invoice, it is better to align the highlight zone with the Bottom Right of the page. Especially when the format of the documents switches from landscape to portrait like in below example.


07 - Zoom: here you can choose the zoom option that should be automatically applied when the user navigates in the selected index field. The automatic zooming is only active when the selected View option is set to Input. Automatic zooming is disabled when the selected View mode is set to Input (manual navigation), Read-Only or Hidden. Press the drop-down arrow to choose an option.
1) Whole page, Page width and Page height: these options are self-explanatory.
2) Zone: the viewer will automatically zoom to the zone defined in the Zone menu.
3) Font size: the viewer will show text in the font size specified. Font size 12 is standard and shows text in real size.

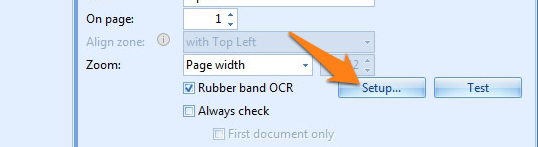
03 Rubber Band OCR
Enable this option if you want to activate the rubber band OCR tool when the user navigates in the selected index field. With the rubber band OCR tool, the user can draw a rectangle around a part of the text to OCR it and fill it out in the index field.
Below videos show how, with Rubber Band and Single click OCR, it recognizes the Supplier name from and automatically triggers a lookup from a database to fill out all other fields.
TIP: The thumbnail on the right will follow you, so you can easily refer to the Setup window. Click on the thumbnail to make the image larger.
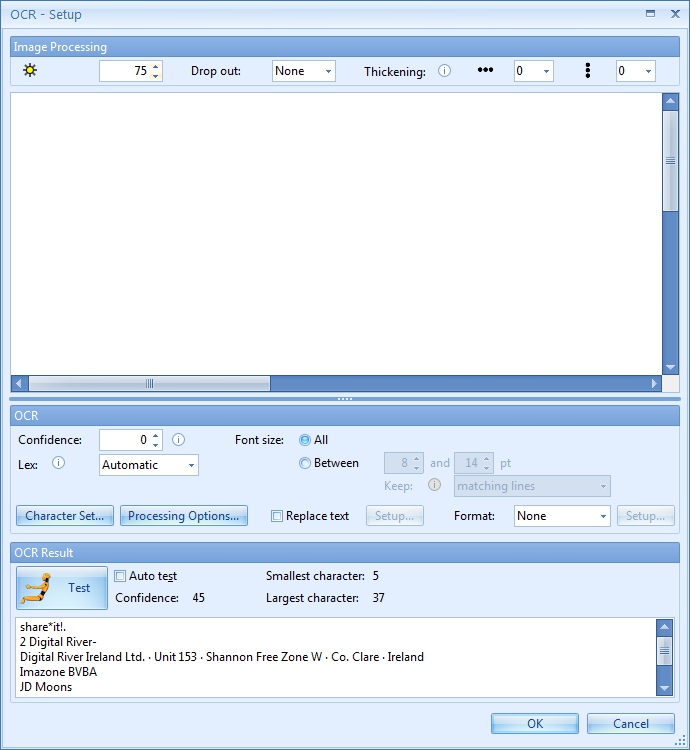
Here you set the OCR settings that will be applied when the validation user draws a selection around a zone on the page for a particular index field. In other words, the settings should focus on the text that is potentially contained in the selected zone. If, for example, the index field is a zip code, you know that the user will draw a zone around a block of text only containing digits.


04 - Confidence Level: when set to 0 (default) extracted characters with a confidence level between 0 and 100 are allowed. In other words, nothing is rejected, even characters with a very low confidence level. Increase the value to reject characters with a low confidence. In combination with a strict validation Format, this can be useful to make sure that critical data is extracted correctly.
For example, when extracting an 8-digit account number that needs to be absolutely correct, set the confidence level to 95. Any character lower than 95 will be rejected resulting in an account number with less than 8 digits. If you set a validation Format to only accept 8 digits account numbers (format 9(8) min. length 8), the user will be forced to enter the questionable digits manually.
05 - Lex: Lex processing is to avoid confusion between look-a-like characters such as 0 and O, 1 and I, 8 and B. It is not language-dependent but uses surrounding characters to detect context. By enabling Lex, you can improve accuracy by interpreting each character in context of the characters around it. Do not enable Lex when working with zones with random character patterns (for example license plates or VIN numbers). When in doubt, select “On”.
06 - Font size: by default, only lines containing at least one character in the range of the specified font-sizes will be accepted.
Keep: you can work more precisely, if you select matching words, it will only accept words that contain characters in the range of the specified font-sizes.
If you select the character level option, then only characters in the range of the specified font-sizes will be retained.
Please refer to Advanced OCR for a visual example.
07 - Character set: use the character set, to exclude or include certain characters. This is useful to extract a value that, for example, only contains numbers or contains only a few special characters. This avoids confusion with other characters that never occur in such number. For example, if the zone only contains a numeric value, disable all letters to avoid confusion between 0 and O or 1 and I.
You enable or disable a character by simply clicking on it. You can also hold the left mouse button and drag over a range of characters to select or deselect them.
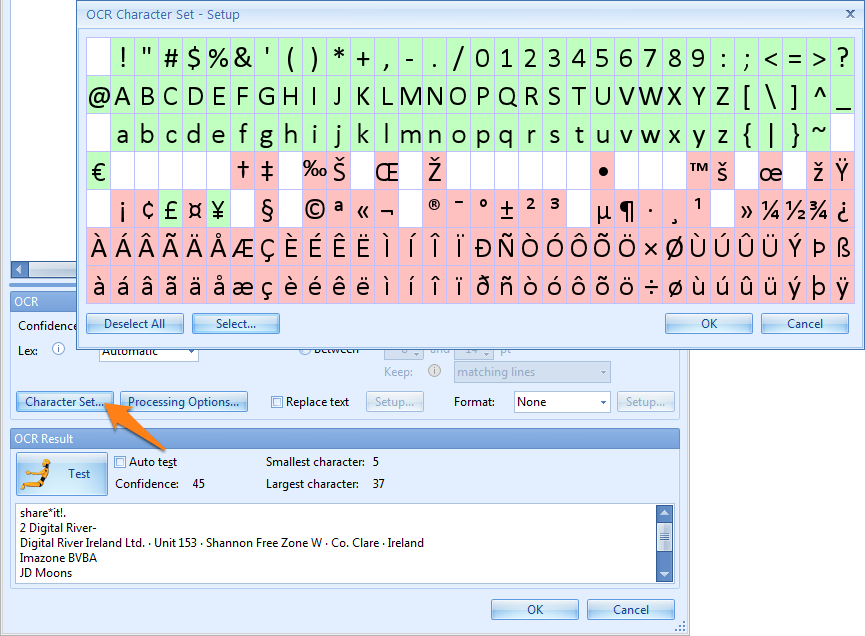
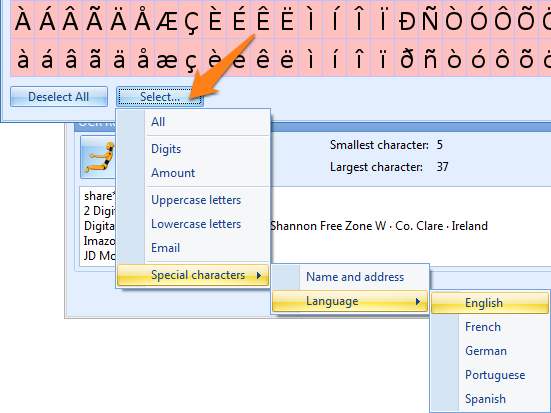
You can choose preselected character sets by first pressing Deselect All and then under the select button you can choose between digits, upper- and lowercase letters, a character set matching a specific language etc.
TIP: Do not use the character set to exclude elements from text.
For example, if you want to read 123/456/789 and reject the / symbols, you may be tempted to exclude the / from the character set. However, if you do so, the / symbol will most likely be recognized as a 1 which makes things actually worse. Better is to leave the / symbol in the set and remove it with the “Replace text” option (replace "/" with nothing).
08 - Processing Options: there are 3 categories of processing options:
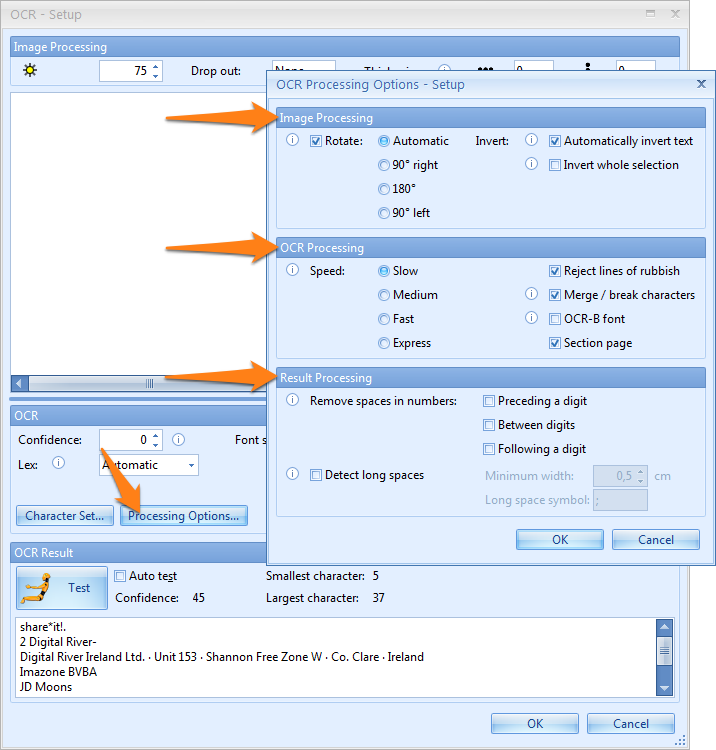
Rotate: the selection will be rotated as specified before OCR processing.
Invert: there are 2 options:
1) Automatically invert text: automatically detects inverted text object in the selection (white text on dark background) and inverts it before sending the selection to the OCR engine.
2) Invert whole selection: always invert the whole selection.
Speed: the speed option indicates how exhaustive the OCR progress should be looking for improvements. There is a small loss in accuracy from slower to faster speed options.
Reject lines of rubbish: this detects random characters with a low confidence level caused by noise in the image. Enable this option to automatically delete lines of rubbish.
Merge/break characters: enable this option when characters stick together. This technology uses font size detection to determine the break points.
OCR-B font: only enable it when the text you want to extract is created with the OCR-B font. OCR-B is a sans-serif font with a fixed pitch. That means that all characters take the same space. For example, the letter i takes the same space as the letter W.
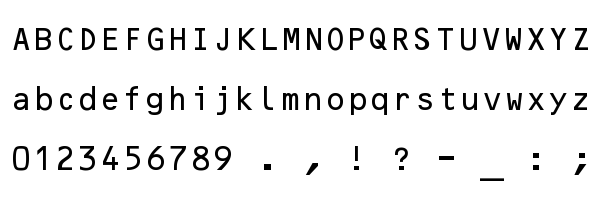
OCR-B font
Remove spaces in numbers: the OCR process sometimes generates redundant spaces in numeric data. You can reject spaces preceding a digit, between digits or following a digit.
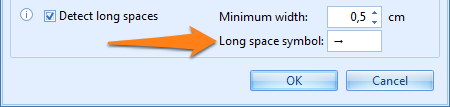
Detect long spaces: replaces long spaces with a specified symbol in the OCR result. A long space is a space between two words longer or equal to the specified length. By default, long spaces are represented by the → symbol and by default the minimum length of a long space is 0,5 cm or 1/5th of an inch.
Imagine data looking like this:
Invoice Nr. Customer Nr.
1 2 3 4 5 6 9 9 9 9
Because of the excessive spacing between the digits, we want to enable “Remove spaces in numbers”. However, if we would apply Single click OCR on the invoice number, it would return 1234569999 because the space between the last 6 of the invoice number and the first 9 of the Customer Nr. would also be removed.
However, by replacing long spaces with →, Single click OCR on the Invoice Nr. would return 123456 correctly.
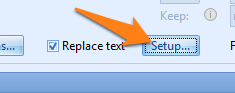
04 Rubber Band OCR – Replace text Setup
Enable this option if you want to activate the Replace text tool. With this tool, you can clean up text, convert alphabetic months to numeric months, for example, or correct OCR-mistakes in the rubber band OCR result on the fly to get consistent output.
Our current example case has no use for the Replace text option, so we will use another example case where we need to replace the alphabetic months in numeric ones.
Press the Setup button next to this option to access additional options.
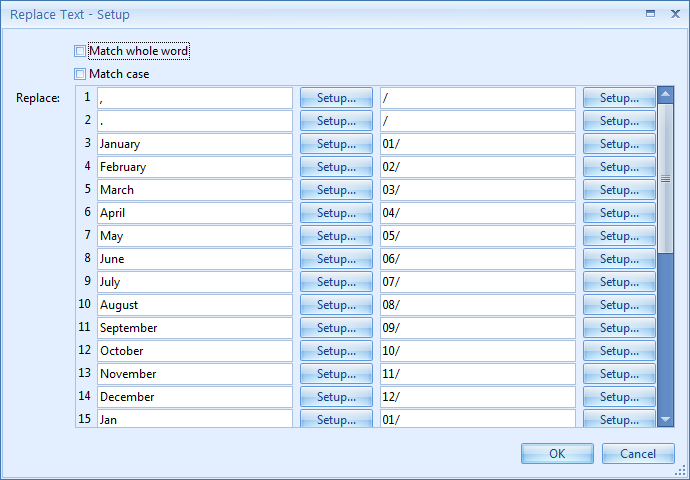
The Replace text Setup window opens.
The Replace text option in action. The alphabetic month is automatically converted to numeric format:
For example, when Match whole word is disabled and when replacing “apple” with “orange”, it would also replace it in words containing “apple”, like “pineapple” would become “pineorange”. If the option is enabled, the rule will only replace the word “apple” if it is a whole word and ignore words like “pineapple”.
For example, when enabled and when replacing the word “January, it would only replace the word “January” and ignore words like “january”, and “JANUARY”.
In our case, we will replace the “,” and “.” characters to “/”, and the months in long and short alphabetic name format with their numeric format.

For example, if you first replace “Jan” with “01/” and then “January” with “01/” the rule will not work correctly. Such rule would convert a date like “Jan 8” to “01/8” just fine. But a date like “January 8” would become “01/uary 8”. It is important in our example that the longest month formats are replaced first, followed by the shorter month format. So first replace “January” with “01/” and only after that replace “Jan” with “01/”.
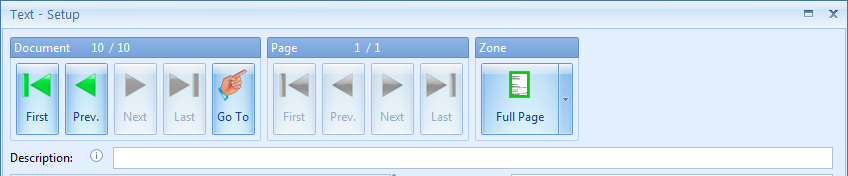
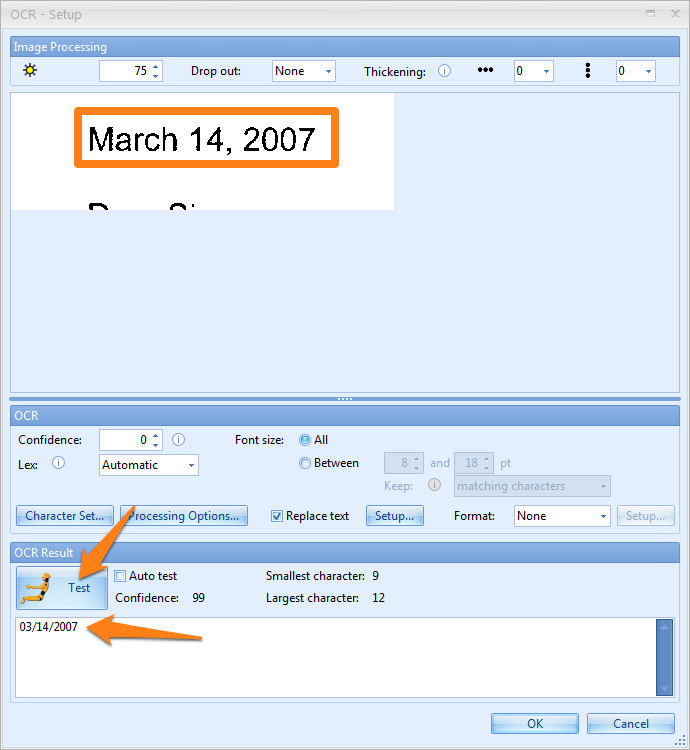
Test: The result after enabling and setting up the Replace text option can be tested by pressing the Test button (button with the yellow test dummy icon). Because we do not know the zone that the user will select during validation, the test will be applied on the zone defined in the Zone menu.
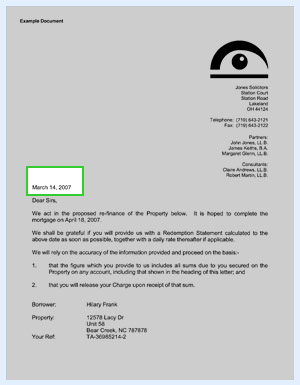
As you can see below, March 14, 2017 is converted to 03/14/2007.
05 Rubber Band OCR - Format
There are 3 types of Format options:
1) None: disables any formatting
2) Date: dates can be written as “02.06.17”, “2/6/2017”, “02-06-2017”, etc… By enabling the Format Date option, you can make the date format consistent. Press the Setup button to access additional options.
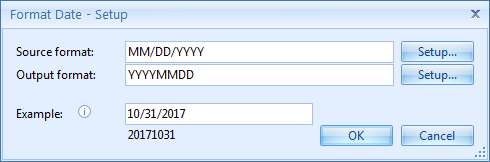
Source format: here you enter the format that matches the Source date, for example, MM/DD/YYYY. You can also press the Setup button to select different format types to compose your date format.

Output format: here you enter the format of the output date, for example, YYYYMMDD, without separators. You can also press the Setup button to select different format types to compose your output date format.
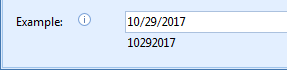
Example: here you can enter a date to test the date format. The result is displayed below the input field.
3) Amount: numbers can be formatted as “123000.5060”, “123,000.51”, “$123’000.51”, etc… By enabling the Format Amount option, you can remove the thousand separators, remove any currency symbols and normalize the decimal point to make the number format consistent. Press the Setup button to access additional options.
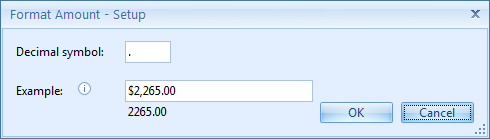
Decimal symbol: here we can enter the decimal symbol for the output format. The most frequently used symbols are “,” in Europe & Latin America and “.” in US, Canada, United Kingdom, South Africa, Australia, etc…
Example: here you can enter a number to test the Amount format. The result is shown below.
06 Check and Sticky Settings
TIP: The thumbnail on the right will follow you, so you can easily refer to the Setup window. Click on the thumbnail to make the image larger.
01 - Always check: enable this option to force the user to check the index field whether the value is valid or not. This is useful to double check critical values that are extracted automatically from the document using OCR.
First document only: this is a sub-setting of the Always check option and is only available when Always check is enabled. This is often used in conjunction with the Sticky option in Automatic mode and Stay sticky between batches. The user can select the initial value on the first document of a batch which will be applied to all other documents in the batch automatically.
For example, you want to scan a set of invoices. Assume that “Fiscal Year” is an index field set to Always check / First document only in combination with Sticky Automatic and Stay sticky between batches enabled. When the Validation screen opens, it will show the first document and will display the Year value of the last batch (Stay sticky between batches). This value can be accepted or changed. All the other documents in the batch will then use the same Fiscal Year value (Sticky Automatic) as the one selected for the first document and it won’t be required to confirm the Fiscal Year for the other documents in the batch (Always check / First document only).
Check if multiple hits: when the searched value occurs multiple times in the database, it is unsure which record to select. This option forces the user to check the possible records in the database to select the correct one. If the option is disabled, the first record matching the searched value is automatically selected.
Check if blank / Check if not blank: this is a sub-setting of the Required option and is only available when Required is disabled. Enable this option when you want to force the user to check when the index field is blank or when it is NOT blank. The user can then accept to keep the field blank or adjust it by entering a new value.
Use case “Check if not blank”: Assume 3 different document types. And one of the 3 document types has a date while all the others don’t have a date. So the field is not-required. However when there is a field value, the user wants to check if the correct date was extracted. In other words “Check if not blank”.
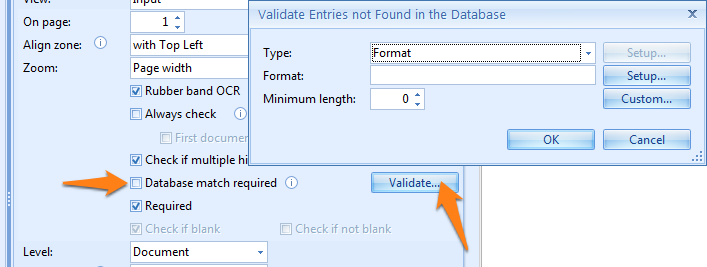
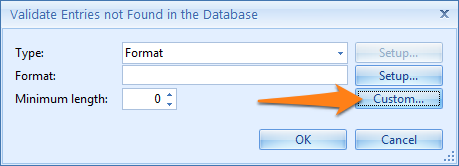
Database match required: enable this option when the entered index value needs to exist in the database. If the option is enabled, it’s not allowed to enter a value that does not exist in the database. Disable this option if you want to allow the user to enter a value that does not exist in the database. If you allow to enter a value that does not exist in the database, you can define a validation format, by pressing Validate… next to the option.
The Required option (see below) is different and indicates whether you can leave the field blank or not (see the explanation about the Required option below).
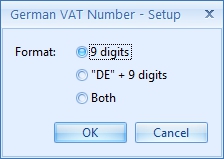
In some cases, like the German VAT number, we can also choose between a few options by pressing the Setup button.

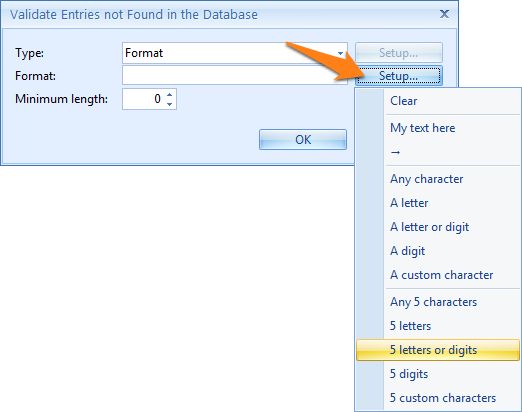
1) Clear: clears the mask
2) My text here: an example text. You can overwrite the example text with your own text if your Format consists of fixed characters. It’s also possible to enter text directly into the Format box.
3) -> : represents a long space. Long spaces are defined in the Rubber Band OCR Processing options.
4) A letter: shown as {A}, any letter is allowed, both upper and lower case. If you want to only accept a specific case, you can use a custom character.
5) Any character: shown as {?}, any character is allowed.
6) A letter or digit: shown as {X}, any single letter or digit is allowed.
7) A digit: shown as {9}, any single digit is allowed.
8) A custom character: shown as {C}, only allows defined custom characters. You can adjust these in the Custom Character Setup (more details below).
9) Any 5…: the number 5 is just an example, replace the 5 with the number of characters you want. For example: {?[6]} means any 6 characters, {A[2]} means 2 letters, {X[5]} means 5 letters or digits,…
Custom: by pushing the Custom button, you can choose the custom characters represented by the {C} element(s) in your format.
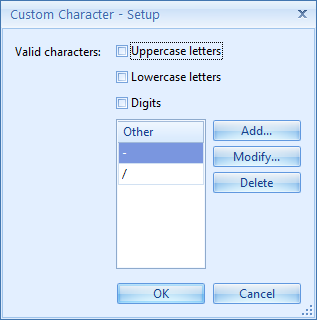
1) Valid characters: you can choose if the engine should return formats that are Uppercase letters, Lowercase letters or Digits.
2) Other: here you can add, delete or modify specific custom characters. In the example above, a custom character can only be a – or /.
{A[2]}{C}{9[8]}-{9}
Minimum length = 11
Maximum length = 13 (2 Alpha + 1 Custom + 8 Digits + 1 Hyphen + 1 Digit)
AB/15687945-2
OK because the number of characters is greater or equal than the defined minimum of 13 and the value starts with 2 letters followed by a custom character (“/“ in this case), 8 digits, a dash and a single digit.
AB/15687945
OK because the number of characters is equal to the defined minimum length of 11 and all the characters comply to the format.
AB/15687945-02
NOT OK because longer (14 digits) than the total length of the defined mask, if you want to accept words containing more digits, you need to increase the length of your mask. In this case “{A[2]}{C}{9[8]}- {9[2]}”, would make this value acceptable.
4B/15687945-2
NOT OK because it contains another type of character than a letter in the first 2 characters and therefore does not comply with the defined format.
1) Document (Default): every document can have its own unique index value
2) Batch: all documents have the same index value. If, during validation, you change the data for any of the documents in the batch, it changes for all other documents automatically. The last change applies to all the documents in the batch.
Important: What is the difference between Batch level index field and Sticky document level index fields?
Batch level index fields are different from document index fields with the Sticky / Automatic option enabled. With the Sticky / Automatic option the index value stays the same for a consecutive sequence of documents until the value changes.
After the index value changes, following documents will use that index value until the value changes again. Batch level fields are the same for all the documents in the batch. The last change applies to all documents, after or before the document with the last changed value.
05 - Sticky: Sticky options are only available for Document level fields. Press the drop-down arrow to select one of the 4 Sticky options:
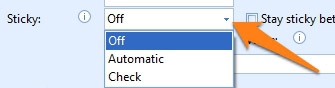
1) Off: the Sticky option is disabled.
2) Automatic: the last extracted or typed value is applied to all following documents having a blank index value until a document is detected with a different value. Then the new value is applied the next documents with blank index values and so on.
3) Check: same as Automatic, but this forces the user to check the index field when a sticky value is applied to a document with a blank index value.
Difference between Always Check and Sticky / Check: assume you have an index field called Document Type. The document type is automatically extracted with OCR extraction rules. Documents without a document type have the same document type as the preceding document. However, the document quality is not so good and OCR extraction of the document type is not 100% accurate. So the document type could be blank for two reasons:
1) There is really no document type and the last detected document type should be used.
2) There is a document type but automatic extraction failed to find it, in that case the document type should be selected manually.
This is a good situation to use Sticky / Check mode. In Check mode, the user won’t have to check the documents with an automatically extracted document type, but he will need to check the blank document types which were taking over the last used document type index value to be sure it was really blank and not related to an extraction problem. This is different from Always check. With the Always check option enabled, the user will have to check all the documents, including the documents with automatically extracted document types.
4) Counter: this option is only available for Text and Number index fields. With Counter index fields, you can create a custom counter which can be used for Bates numbering of legal documents, for example. The counter value can then be printed on the image with the Digital Imprinter.
Counter also has two sub settings: Start Value and Step. The step value can be negative to define a decremented counter.
Stay sticky between batches: this is a sub-setting of the Sticky option and is only available when Automatic or Check is enabled. Enable this option when you want the system to remember the last used index value of the previous batch. The last used value is stored on disk, so even if you restart the PC, it will be remembered.
For example, if you have an index field called Fiscal Year, it can be remembered across batches. The last used value, say 2018, is stored on disk.
So, the scan system can be switched off, and when a week later the user wants to scan some additional documents, the Validation screen will present 2018 as the proposed value for the Fiscal Year. This value can be accepted or changed. If changed, then the changed value will be stored and presented during the next scan session.
Uppercase: with this option enabled, manually entered text or text selected with the rubber band OCR tool will always be uppercase regardless of the state of the SHIFT or SHIFT LOCK keys on the keyboard.
08 Cursor
There are 3 possible cursor options:
1) Preselect all (default): when the user navigates in the index field, the value is selected. When the user starts typing, the existing value is completely overwritten with the new value.
2) In front: when the user navigates in the index field, the cursor is positioned in front of the value in the field. When the user starts typing, the new value is inserted in front of the existing value.
When “Cursor in front” is used in combination with Rubber band OCR, a space is appended after each rubber band OCR result. In that way, you can build a string of words by rubber banding different selections in a text.
3) At end: when the user navigates in the index field, the cursor is positioned after the value in the field. When the user starts typing, the new value is appended at the end of the existing value.
When “Cursor at end” is used in combination with Rubber band OCR, a space is inserted in front of each rubber band OCR result. In that way, you can build a string of words by rubber banding different selections in a text.
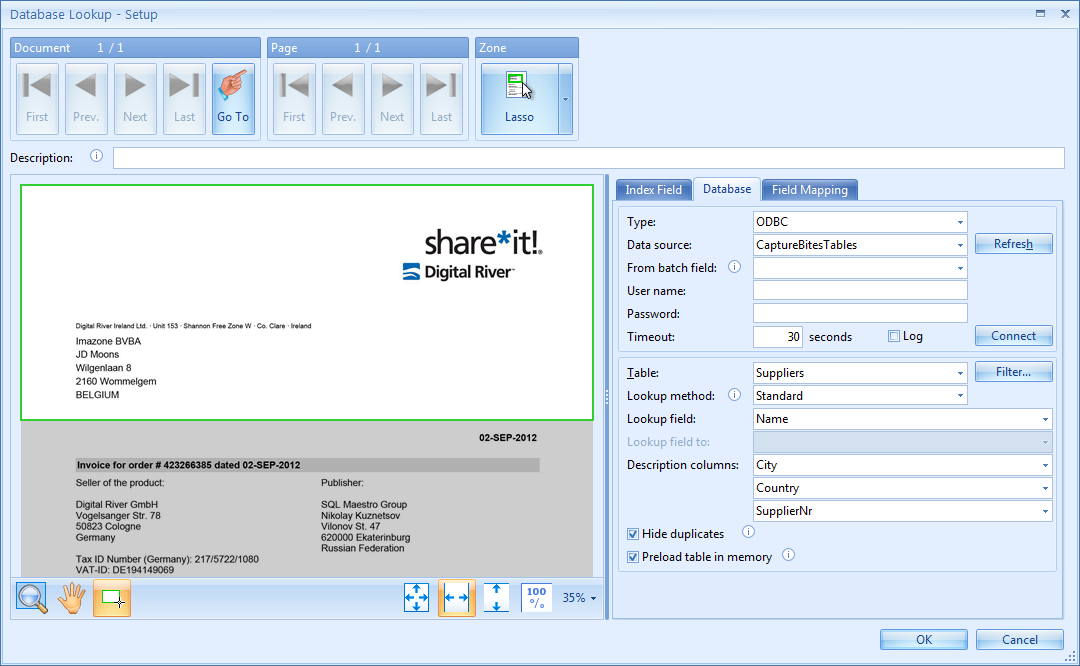
09 Database Lookup Setup – Database Tab
In the Database tab, you define all settings related to the database, database table and database fields.
TIP: The thumbnail on the right will follow you, so you can easily refer to the Setup window. Click on the thumbnail to make the image larger.
1) ODBC: this is the default database type. ODBC is a standard to connect to a wide range of databases. Configuring an ODBC data source is straightforward and for detailed instructions how to do so, please have a look at these instructions. The instructions explain how to define an ODBC source for our database connector which uses exactly the same technology as used for the MetaTool DB lookup functionality.
2) ABN Lookup: we can also integrate cloud based databases through web services. The Australian ABN number lookup is an example of such integration. The ABN database is maintained by the Australian government and contains information about Australian based companies. The access to the database is free of charge. You just have to register here to receive a GUID (Globally Unique Identifier) which you can then enter in the ABN Lookup settings in MetaTool to get access the database.
3) Jobpac: comparable to ABN Lookup, and is also using a web services integration. It is specifically designed to access a supplier table in the Jobpac ERP system.
4) PostAssist: PostAssist is a mail service management system. This integration accesses the recipients table in PostAssist to select the correct recipient of a registered mail piece based on its bar code.
5) SharePoint: SharePoint stores all information in a SQL database. You can maintain tables (called lists in SharePoint) in SharePoint with your document types, customer lists, supplier lists etc. You can use MetaTool to directly lookup data in those tables. SharePoint on-premise and online is supported. SharePoint online is a very economical way to maintain your lookup tables and documents in the cloud with low cost online plans.
Each database type has its specific settings which are often self-explanatory. We will explain the ODBC settings in more detail.
10 ODBC Setup
Example: A service provider handles mail scanning for several accounts. The recipient information is maintained in separate databases. One for each account. By selecting the account and placing it in an index field, we can automatically switch database to access the correct recipients table matching the selected account.
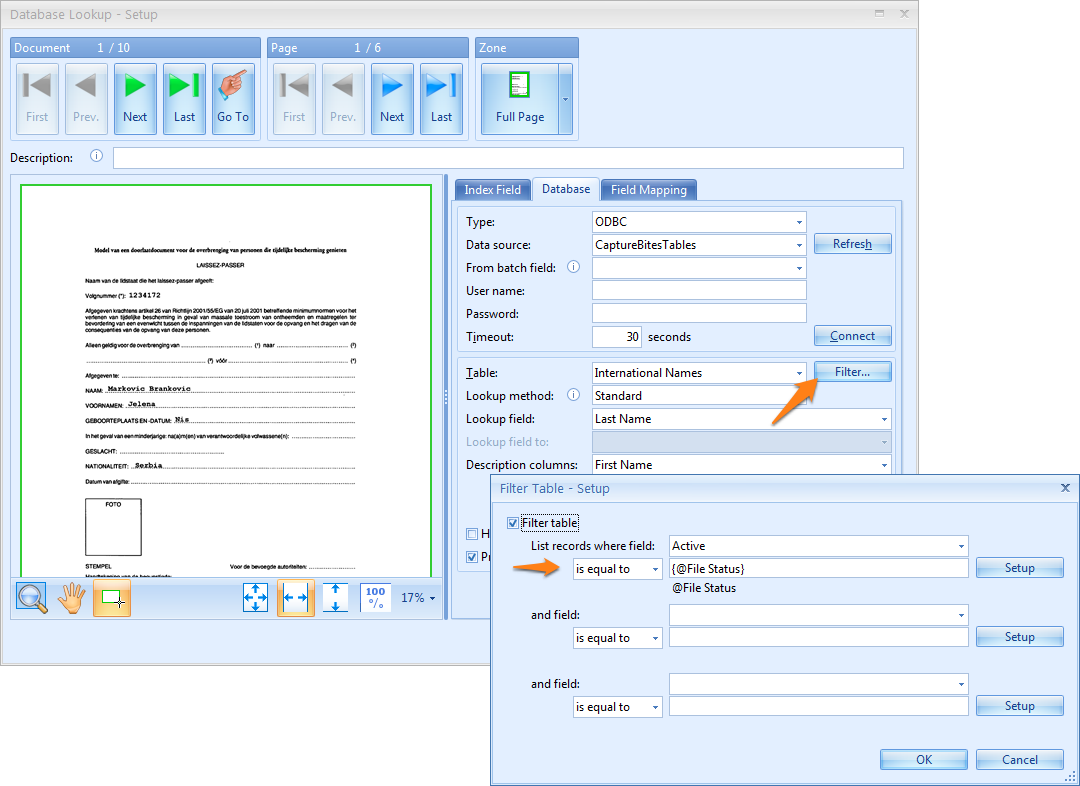
Filtering is a powerful feature to perform drill down lookups also known as cascading lookups. If you are familiar with looking up an address in a GPS / SatNav device, you already know what a drill down lookup is.
When setting an address in the GPS, you typically drill down from country to city to street. You first select the country to only list the cities of that country (the cities are filtered by selected country), then you select the city and only the streets of that city will be listed (streets are filtered by selected city). Finally, you select the desired street and number to finalize the address selection.
Below, you can see drill down lookup in action:
In business applications, drill down searches are used to search large database of employees, customers or products. Every search step filters the number of possible matches.
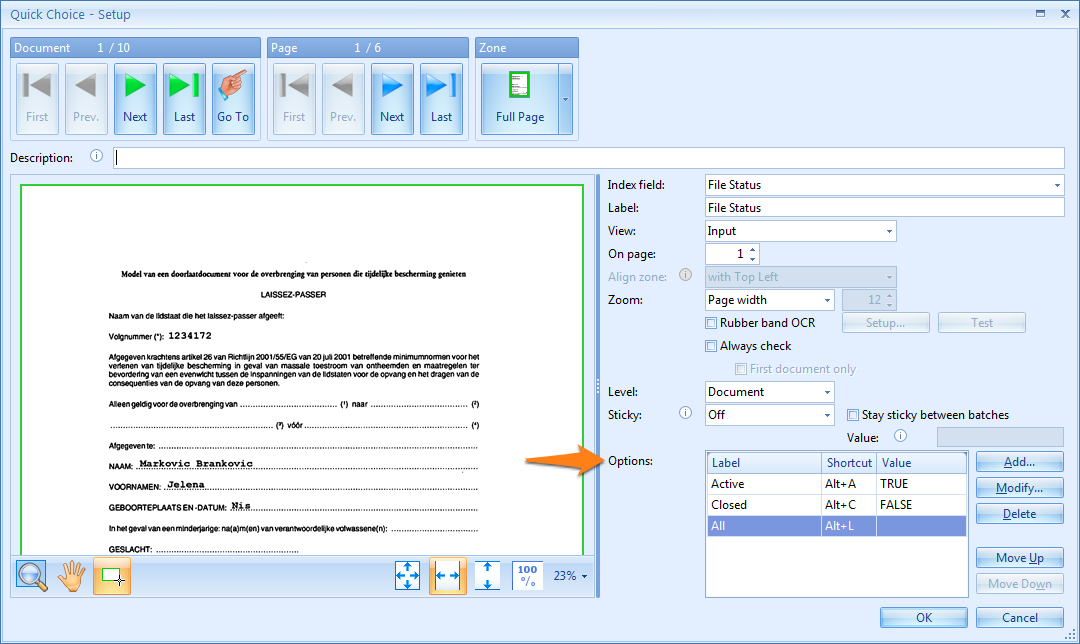
For example, search first for the state, then for a company in that state, then for an employee name in that company. Another example is using an active/closed status column in an accounts database to filter a table to only display active accounts. Occasionally, when you want to look up a closed account, you can use a Quick Choice field to switch the status to closed and all closed accounts will be shown.
Example case: we have defined a File Status Kofax Express index field and defined a quick choice validation rule for this field. File Status values can be TRUE, FALSE or BLANK (no value) and are used to filter the international names table.

This is how the “International Names” table looks like:
| Last Name | First Name | City | Country | Arrival Date | World Region | Rel# | Active |
|---|---|---|---|---|---|---|---|
| Cook | Loraine | Kingston | Jamaica | 2011-08-25 | Western Hemisphere | 1134170 | FALSE |
| Inirat | Halima | Ramallah | West Bank | 2011-08-25 | North Africa and the Middle East | 1134171 | FALSE |
| Padikkal | Sudheer | Palakkad | India | 2011-08-25 | South and Central Asia | 1134173 | TRUE |
| Salagame Keshavamurthy | Kiran Kumar | Mysore | India | 2011-08-25 | South and Central Asia | 1134174 | FALSE |
| Luo | Yimin | Chongqing City | China | 2011-08-26 | East Asia and the Pacific | 1134175 | TRUE |
| Izgarjan | Aleksandra | Novi Sad | Serbia | 2011-08-27 | Europe and Eurasia | 1134176 | TRUE |
| Regan | Nell | Dublin | Ireland | 2011-08-27 | Europe and Eurasia | 1134177 | FALSE |
| Sakal | Moshik | Bnei Brak | Israel | 2011-08-27 | North Africa and the Middle East | 1134178 | FALSE |
- When the validation operator selects “Active” as the quick choice option, the value of the File Status Kofax Express index field becomes “TRUE”, and only Active records will be listed.
- When the operator selects “Closed”, the value of the File Status index field becomes “FALSE” and only closed records will be listed.
- When the operator selects “All”, the value of File Status becomes blank which is the same as disabling the filter and displaying all records.
If you want to see this job in action and look at its configuration, install MetaTool and its configuration files (includes a range of demo jobs) from here and try out the CB MetaTool DB Lookup job.
1) Standard: This is the default lookup method. In standard mode, you just need to select the column you want to use to lookup the data. For example, if you want to lookup suppliers via supplier name and the database column containing the supplier names is called Supp_Name then Supp_Name would be your lookup column.
2) Range: This allows to allocate a range of numbers to a database record. The range is defined with a from and to value. The from value is stored in one column in the database and the to value in another column. Any searched value that falls between the from and to values will return the matching record.
Example: This feature is often used in the registered mail processing market. Postal services assign a range of registered mail numbers to their accounts. Just by reading the registered mail number, the correct account can be looked up.
Basically, the accounts table would look like this:
| Account Name | From | To |
|---|---|---|
| Account A | 100000 | 104999 |
| Account B | 105000 | 109999 |
| Account C | 110000 | 119999 |
| Account D | 120000 | 124999 |
| Account E | 125000 | 129999 |
| VAT | Name | Adress | Postal_Code | City | SupplierNr |
|---|---|---|---|---|---|
| 91397679333 | MOTOR DREAM | ZAC du Cornouiller | 78870 | Bailly | 00000000 |
| 89453992844 | SODIAME S.A.S. Citroën | 101, Avenue de la Victoire – B.P. 31 | 77102 | MEAUX CEDEX | 00000001 |
| 32390013662 | SDS INOLUB | 4, ALLEE CLAUDE DEBUSSY – ESPACE EUROPEEN D’ECULLY | 69130 | ECULLY | 00000002 |
| 14391894292 | Horizon Motos | Quartier de l’agneau | 13127 | VITROLLES | 00000003 |
| 34302208616 | Centre Technique Automobile | 173, boulevard Gambetta | 95110 | SANNOIS | 00000004 |
| 55329724322 | GARAGE DES COTES D’ARMOR | Route de Guingamp – BP 50212 | 22302 | LANNION Cedex | 00000005 |
| 39150621900 | EQUATION TOULOUSE – BMW | 101 Route de REVEL – BP 94433 | 31405 | TOULOUSE Cedex 41 | 00000006 |
| 51444588164 | SAS BLOIS WARSEMANN AUTOMOBILES | 129. AVENUE DE VENDOME BP 3418 | 41034 | BLOIS CEDEX | 00000007 |
| 76484914338 | Grand Tourisme de l’Ouest | rue Clément Ader | 49000 | ANGERS | 00000008 |
| 65516980174 | C.L.C. | 2,Route de Bar-le-Duc | 52103 | SAINT-DIZIER Cédex | 00000009 |
| 71393412846 | AUTO MOTORS – KIA | 78, cours Jean Jaurès | 38130 | ECHIROLLES | 00000010 |
| 47521133611 | SARL HYDRAULIQUE SERVICE | 16 RUE FAIDHERBE | 59330 | HAUTMONT | 00000011 |
| 23438894966 | ETOILES Metz – Mercedes-Benz | Campus d’activité de la Maxe | 57140 | La Maxe-Metz | 00000012 |
| 00662010834 | ELYSEE EST AUTOS S.A.S. – VOLVO | 102, route de la Libération (R.N. 4) | 94430 | CHENNEVIERES / MARNE | 00000013 |
| 28440490456 | T.D.A. PERONNE – PEUGEOT | 9 Avenue de l’Europe | 80200 | Péronne | 00000014 |
For example, in below validation screen, we have defined “Name” as the lookup field and “City”, “Country” and “SupplierNr” as description columns:
12 – Preload table in memory: Looking up data during validation will be considerably faster when the table is loaded in memory. However, we recommend not to use this option with very large tables containing 100-thousands of records. A preloaded table will also show a choice list of possible values while you enter a value. If you want to see this in action, look at the animation here.
11 Database Lookup Setup – Field Mapping Tab
In this tab, you map Kofax Express index fields with Database fields.
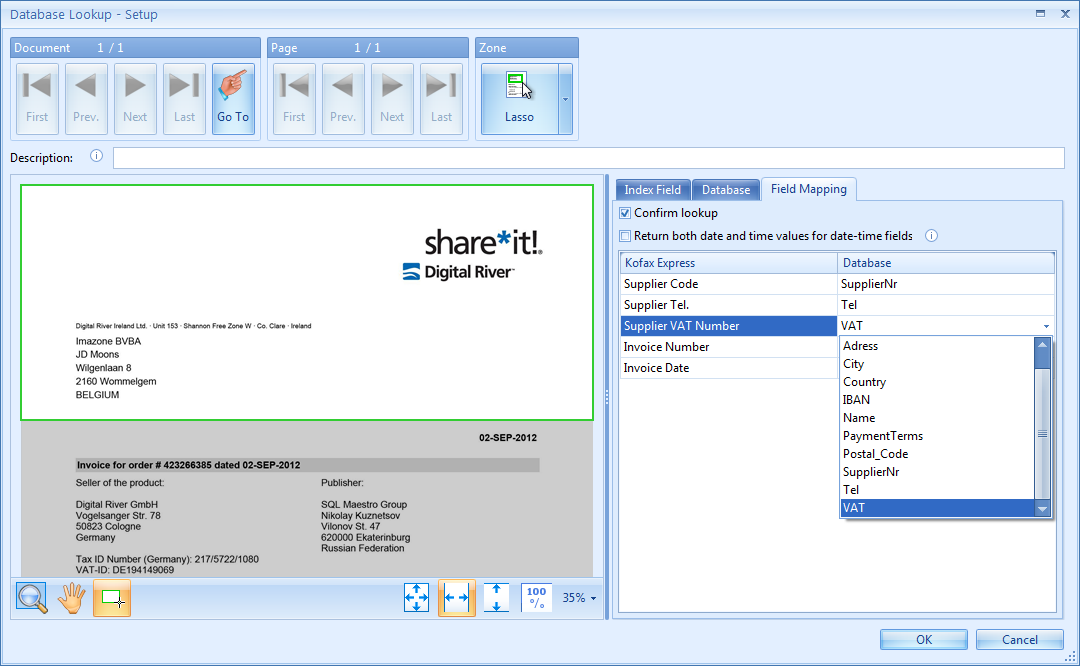
03 – Field mapping table: On the left side, all Kofax Express fields are listed, except the Kofax Express index field lookup field. The lookup field, defined in the Index Field tab, will receive the data from the database lookup field that is defined in the Database tab.
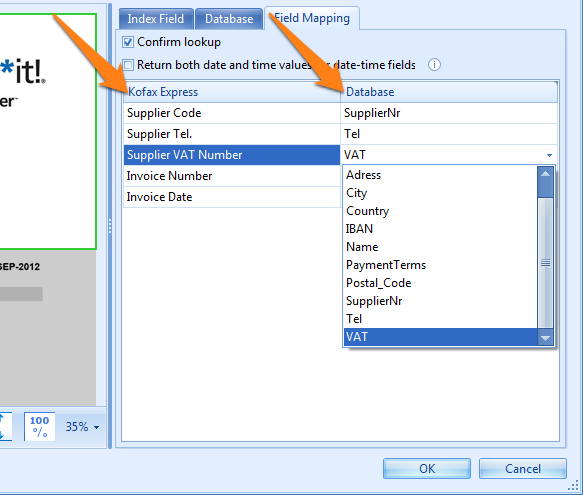
1) We defined a DB Lookup validation rule for Kofax Express Index Field Supplier Name. We defined that in the Index Field tab.
2) We look up data in the Name column of the Supplier Table in the database. So, the found supplier will be filled out in the Kofax Express Supplier Name index field. The DB lookup column is defined in the Database tab.
3) Finally, we want to map other database columns with Kofax Express index fields:
Supplier Code (Kofax Express): mapped with SupplierNr (Database column)
Supplier Tel. (Kofax Express): mapped with Tel (Database column)
Supplier VAT Number (Kofax Express): mapped with VAT (Database column)
| VAT | SupplierNr | Name | Postal_Code | City | Tel |
|---|---|---|---|---|---|
| 91397679333 | 00000000 | MOTOR DREAM | 78870 | Bailly | 01 30 80 20 30 |
| 89453992844 | 00000001 | SODIAME S.A.S. Citroën | 77102 | MEAUX CEDEX | 01 60 09 99 10 |
| 32390013662 | 00000002 | SDS INOLUB | 69130 | ECULLY | 04 37 45 40 43 |
| 14391894292 | 00000003 | Horizon Motos | 13127 | VITROLLES | 04 42 75 35 20 |
| 34302208616 | 00000004 | Centre Technique Automobile | 95110 | SANNOIS | 33 1 34 44 10 84 |
| 55329724322 | 00000005 | GARAGE DES COTES D’ARMOR | 22302 | LANNION Cedex | 02 96 46 64 64 |
| 39150621900 | 00000006 | EQUATION TOULOUSE – BMW | 31405 | TOULOUSE Cedex 41 | 05 62 71 11 11 |
| 51444588164 | 00000007 | SAS BLOIS WARSEMANN AUTOMOBILES | 41034 | BLOIS CEDEX | 02 54 52 12 12 |
| 76484914338 | 00000008 | Grand Tourisme de l’Ouest | 49000 | ANGERS | 02 41 31 21 11 |
| 65516980174 | 00000009 | C.L.C. | 52103 | SAINT-DIZIER Cédex | 03 25 05 10 48 |
| 71393412846 | 00000010 | AUTO MOTORS – KIA | 38130 | ECHIROLLES | 04 76 23 30 63 |
| 47521133611 | 00000011 | SARL HYDRAULIQUE SERVICE | 59330 | HAUTMONT | 03 27 67 52 91 |
| 23438894966 | 00000012 | ETOILES Metz – Mercedes-Benz | 57140 | La Maxe-Metz | 03 87 31 85 85 |
| 00662010834 | 00000013 | ELYSEE EST AUTOS S.A.S. – VOLVO | 94430 | CHENNEVIERES / MARNE | 01 45 93 04 00 |
| 28440490456 | 00000014 | T.D.A. PERONNE – PEUGEOT | 80200 | Péronne | 03 22 84 73 73 |
Supplier Name: Horizon Motos
Supplier Code: 00000003
Supplier Tel.: 04 42 75 35 20
Supplier VAT Number: 14391894292
Important Note: If the looked up value “Horizon Motos” is extracted automatically by means of OCR or Bar Code extraction rules defined in the MetaTool Extraction tab, then the lookup is fully automatic. Only if the extraction fails, the validation operator will then need to lookup Horizon Motos manually by typing the first letters of the name in the lookup field.