- Provide 300 DPI color samples of your documents to pre-configure the system
- Provide a dedicated Windows PC that will be used to run the software.
- Install Kofax Express and TeamViewer
- User access rights, antivirus settings, and email settings
- Final step: installation of the configuration via TeamViewer
1) Provide 300 DPI color samples of your documents to pre-configure the system
To pre-configure the system, we need scanned samples of your documents. The samples should be scanned with the same or a similar MFP as you will use during production.
The scans should be scanned as color TIF files. These are the ideal settings for a Lexmark MFP:
Image Format:
- TIFF
- Single File – “Single File” means one file containing multiple pages, this is also known as a multi-page TIF file
- JPEG Quality 82
Scan Settings:
- Resolution: 300 DPI
- Darkness: 3
- Content Type: Photo
- Content Source: Photo/Film
[JobName]_[ReversedDate]_[TimeStamp].TIF
Example: SALES_ORDERS_2016-09-21-145501048.tif
Please avoid the use of spaces in the file name. Replace any spaces with “_” like in “SALES_ORDERS”
Email the samples
Please email the samples to CaptureBites support. Click here to send an email.
The attachment should not exceed 20MB. If the attachment is larger than 20MB, please make use of the free WeTransfer website to send your attachment to support@capturebites.com
Note: The MFP output file name is temporary and after processing the documents, the files will be renamed using the extracted data such as Sales Order Nr., Delivery Ticket Nr. Document Date, etc.
2) Provide a dedicated Windows PC that will be used to run the software.
The software runs in unattended mode and it is highly recommended that the PC should not be used for other purposes than running the Kofax Express / CaptureBites solution.
PC Requirements
- Windows 11* or Windows Server 2008 R2 and more recent.
- If a new PC is acquired, make sure it is completely configured, networked and that all Windows updated are installed.
- The PC’s processor should be i5 or better. Especially when you output searchable PDF files (also known as OCR-ed PDF) with the system, we recommend a fast processor (i7).
- 4GB RAM
- 500GB available disk space
- Monitor 1440×900 or better. A standard 1920×1080 HD monitor is ideal for remote configuration and support.
- The PC should be wired to the local network. Please avoid WIFI to assure a stable availability of the system on the network.
- In case you use Office 365 products for your databases (e.g. MS Access, MS Excel) it’s required to install the 32-bit version. This will allow you to use and create ODBC data sources (need to be 32-bit).
* Our products are technically compatible with Windows 7, 8, 10 and 11. Since Microsoft discontinued support for Windows 7 in January 2020, we recommend working with the most recent Microsoft OS system, Windows 10 or 11.
3) Installing the Software
The following software needs to be installed on the system.
A. Install Kofax Express 3.2 (1GB)
Place the zip file in C:\Kofax-Software and unzip it.
Install the software by running C:\Kofax-Software\install-kofax-express\Kofax Express Server Setup
Accept all the proposed defaults during the installation.
B. Install the latest Kofax Express 3.2 Fix Pack (15MB)
Go to the Kofax Express 3.2 downloads page to download the latest Kofax Express 3.2 fix pack.
Place the zip file in C:\Kofax-Software and unzip it.
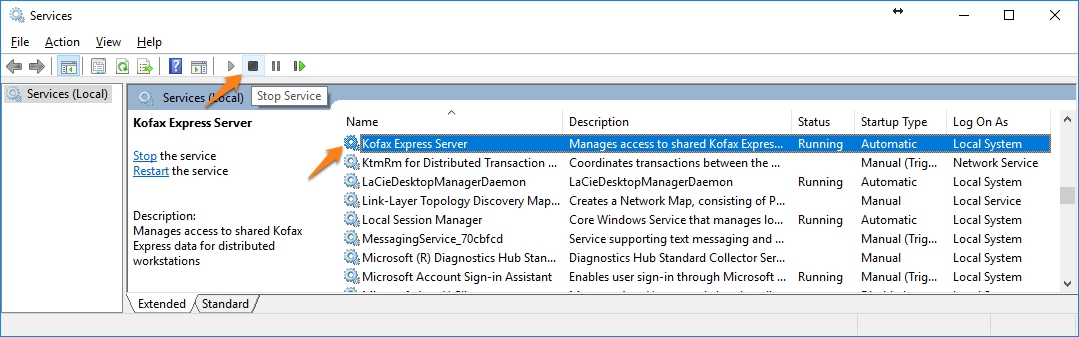
On a Kofax Express server installation, you first need to stop the Kofax Express service before you can install the fix pack. To do so just run Services from the Windows Administrative Services and stop the Kofax Express Service.
On a server install, restart the Kofax Express service.
C. Install TeamViewer (14MB)
Place the file in C:\Kofax-Software and run it to install TeamViewer. Simply accept all defaults. We will use TeamViewer to remotely install the configuration and for future updates, new configurations and support.
If you are familiar with TeamViewer, configure it to auto-start with Windows and allocate it a permanent password. Please provide us the TeamViewer ID and the permanent password. If you are not familiar with TeamViewer we can do the TeamViewer configuration for your during installation.
4) User access rights, antivirus settings and email settings
A. Windows User Account:
Please provide us a Windows user account and password with permissions to update and install software.
The provided Windows user account should also have full access rights to the folders where the system will store the scanned files after processing.
The system should auto-login with this user account when the system is rebooted (reboot often happens after an automatic Windows update).
B. Create and share a “KOFAX-IN” folder
Create a shared C:\KOFAX-IN folder. This is the folder your MFP(s) will scan to. The user account used to log in the MFP on the network should have full access rights to the C:\KOFAX-IN folder in order to transmit the scanned TIF files to that folder for further processing.
C. Exclude folders from the Antivirus software
Exclude following folders from the antivirus software running on the system:
- C:\ProgramData\Kofax
- C:\ProgramData\CaptureBites
- C:\Users\[Logged_User_Name]\AppData\Local\Temp\CaptureBites
- C:\KOFAX-IN
- C:\Program Files (x86)\Kofax (on 64 bit systems)
- C:\Program Files\Kofax (on 32 bit systems)
The system creates temporary files in these folders and most Antivirus software often conflicts with this process.
For more details about Antivirus software settings, please go here.
D. Outgoing email server settings (optional)
If your system makes use of email export for exception processing or sharing documents externally, you need to provide us outgoing email server settings also known as SMTP settings.
Following settings are required:
- SMTP server – Example: smtp.company.com
- Port: Typical SMTP ports are 25, 26 or 587
- SSL: None, Explicit or Implicit
- User – Example: scansystem@company.com
- User Password
For exception emails we also need to know the email address the exceptions should be sent to. Example: accounting@company.com
5) Final step: installation of the configuration via TeamViewer
In the final step, we will log in your system using TeamViewer and complete the installation. Please provide us a contact who can help us getting access to the PC and provide us with a Windows user, password, TeamViewer ID and password.
We also need someone familiar with the MFP to configure the hot buttons and provide us additional sample scans. This is often a technical person from your hardware and software provider or their reseller.
Finally, we will ask the user to test the setup by scanning some documents and checking the end result. If necessary we’ll adjust the configuration based on the user’s feedback.