MetaServer > Help > Validate
040 MetaServer Validate
With the Validate action, you can define validation rules for each of your fields to verify, correct or complete your document’s metadata. If the data doesn’t pass the validation rules, the document shows up in the Validation Viewer.
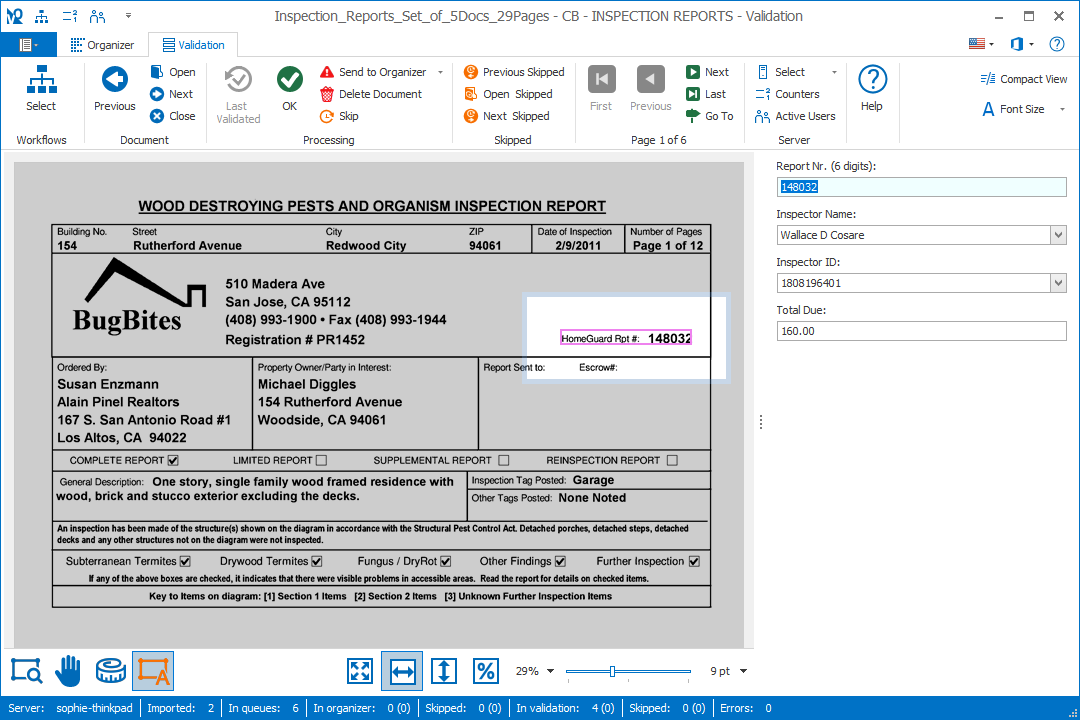
Validation Viewer in the MetaServer Operator Client
For very critical data, you can force the user to always check that field, even if it passes the validation rules.
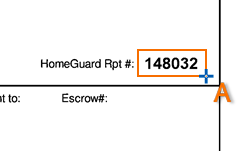
If the user needs to manually enter or change a value, he can use the Text Selection tool that fills in the data automatically by drawing a rectangle around the information.

Select Workflows
Select one more more workflows to validate.
The icon turns red if not all workflows are selected to clearly indicate that not all documents will be available for validation.
Previous Document
Open the previous document for validation.
Navigating through documents with the blue buttons does not “OK” them. To save all changes and move the document to the next step, you must press OK.
Open Document
Open a list of available documents to select a specific document to validate or reserve documents to hide them from other validation stations. You can also preview the selected document within the Open Document window.
Other features:
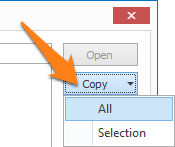
1) Copy the list of waiting documents in the validation queue. Press “Copy All” to copy the whole list or “Copy Selection” to only copy your selected documents.
2) Filter documents based on the visible field values. Click the filter icon in the column of the field you want to use and check the value(s) that needs to be filtered. You can filter using multiple fields.

3) Multi-select several documents and OK them all with a single click using the “OK Selected” button. Be aware that values will not be checked with the Validate rules and will be OK-ed as they are. This function can be enabled / disabled in the Server tab of the Administration Client.
Next Document
Open the next document for validation.
Navigating through documents with the blue buttons does not “OK” them. To save all changes and move the document to the next step, you must press OK.
Close Document
Close the current document.
As long as a document is open, it is not available for any other Validation stations. By closing it, it can be opened on another station.
Last Validated
When you have validated a document and pressed the OK button, it goes to the next step.
However, there is a timer of 10 seconds (the duration can be adjusted here) before the document moves to the next step.
This gives you the opportunity to reload the last validated document to make some final corrections.
When the timer expires, the document moves automatically to the next step and is not available anymore.
If you delete or reject a document, you can also call it back within the set time using the “Last Validated” button.
OK (ENTER)
Once you have validated a document and checked all index data, you need to confirm by pressing OK to move it to the next step.
OK All
If you have many “Always Check” fields that haven’t been verified yet but that are marked green (valid but to be verified), you can OK all green “Always Check” fields with a single click by pressing OK All. This function can be enabled / disabled in the Server tab of the Administration Client.
Reject
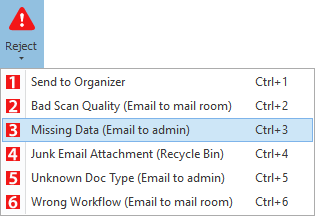
If a document cannot be processed because it is unreadable (bad scan) or some key information is missing, you can use the Reject function to trigger a special workflow.
For example, a rejected document can be emailed to the scanner operator to inform him about bad image quality.
You can define up to 10 different reject reasons here.
Delete Document (Ctrl+D)
If a document is irrelevant, it can be deleted. Workflows can be configured to completely delete the document or move it to a special folder.
Skip Document
When you need input from a coworker or need to lookup some info in a separate system to validate a document, then you can skip it and continue working on other documents.
Once you have validated all documents, you can reopen the skipped documents with the Skipped tools like “Open Skipped”, “Next Skipped” and “Previous Skipped”.
The Skip function can be disabled and in that case none of the skip functions will be visible.
Skip Controls
Use these controls to open and navigate through skipped documents.
– Previous Skipped
– Open Skipped
– Next Skipped
The Skip function can be disabled and in that case none of the skip functions will be visible.
Also see Skip Set
Bookmarks
In the Import Email action, when you select the import option “Email body and attachments PDF”, the complete email with all its attachments becomes a single bookmarked PDF.
NOTE: only for this scenario will the Bookmark drop-down list become visible in validation.
This way, the Operator can easily jump to each attachment and the email body.

Page Navigation
If the selected document has multiple pages, the page navigation buttons are active.
- First page
- Previous page
- Next page
- Last page
- Go to page ...
You can also use the Page Up and Page Down keys to page through the document.
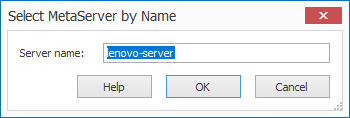
Select Server
A system can contain several MetaServers. Select the MetaServer you want to work with.
If the MetaServer is not on the same domain as the client, you can enter the server's name manually by pressing the arrow under the icon and by selecting "Select by Name".
You can easily find the correct Name by opening this setup window on the server.
Click on the image to enlarge.
Counters
This shows counters of all documents being processed by MetaServer and resource usage.
The 1st list shows a total document count per action and totals across all workflows.
The 2nd list shows the number of document sets and individual documents per workflow.
When you select an action or workflow, you can press the "Details" button to see a more detailed overview of the documents in that selected action or workflows.
At the bottom you can check your current system's usage of CPU, RAM, disk activity and disk space.

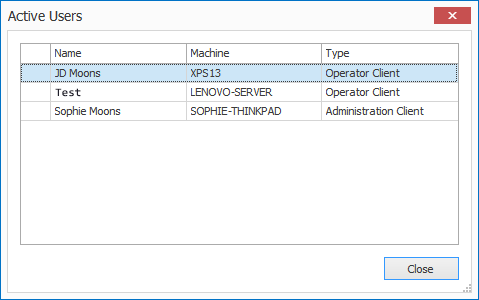
Active Users
You can see a list of all active users and the type of client they're using on the current MetaServer.
Compact View
Toggle Compact View to remove white spaces between all your validation fields.
This will show the maximum number of fields in your validation window’s field panel.
Normal View:

Compact View:

Font Size
You can change the font size of your fields in validation for a more comfortable validation view on higher resolution screens.
You can choose between Large, Medium or Standard font size.
Standard:

Medium:

Large:

Server: The name of the machine MetaServer is running on.
Imported: The total number of originally imported documents in MetaServer across all workflows. The counter does not get filtered by the Select Workflows functionand always shows the total imported document count for both selected and unselected workflows.
In queues: The total number of documents in the MetaServer queues across all workflows. The counter does not get filtered by the Select Workflows function and always shows the total document count for both selected and unselected workflows. If your workflow separates documents, this counter will show the total number of documents after separation.
In organizer: Number of documents available (not locked by any user) for Organizing. The counter only shows the count of the selected workflows. See Select Workflows button.
Skipped: Number of documents available (not locked by any user) for Organizing with skipped status. The counter only shows the count of the selected workflows. See Select Workflows button.
In validation: Number of documents available (not locked by any user) for Validation. The counter only shows the count of the selected workflows. See Select Workflows button.
Skipped: Number of documents available (not locked by any user) for Validation with skipped status. The counter only shows the count of the selected workflows. See Select Workflows button.
Errors: Number of documents in error state. These documents triggered a red error. Errors and the documents that caused them can be viewed and managed in the Errors tab. The counter only shows the count of the selected workflows. See Select Workflows button.
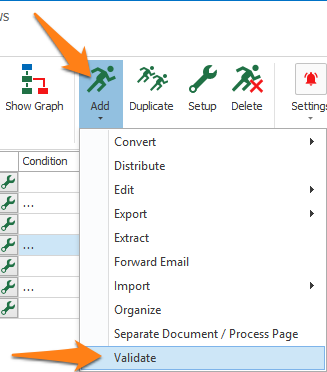
To add a Validate action, select the action after which you want to insert Validate action and press Add -> Validate. The Setup window will automatically open.
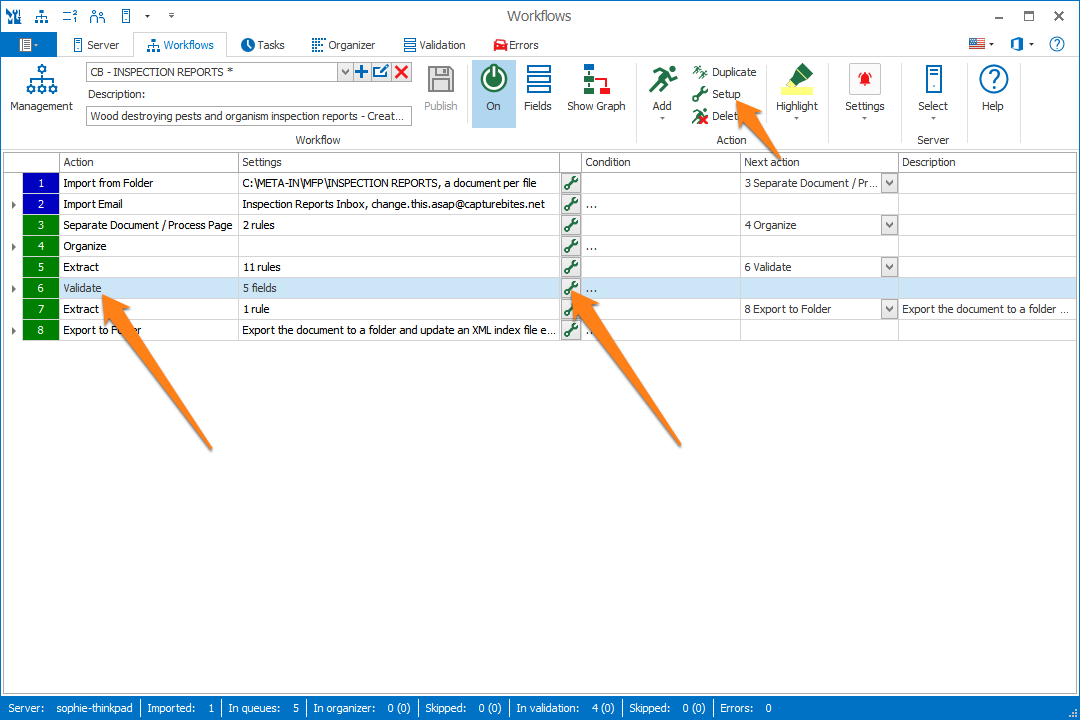
You can also open an existing Validate action by double-clicking the action or by pressing the setup button on the right side of the action or in the ribbon, as shown below.
As our example, we will make use of the “CB – INSPECTION REPORTS” workflow. This workflow is automatically installed with CaptureBites MetaServer.
TIP: The thumbnail on the right will follow you, so you can easily refer to the Setup window. Click on the thumbnail to zoom in.
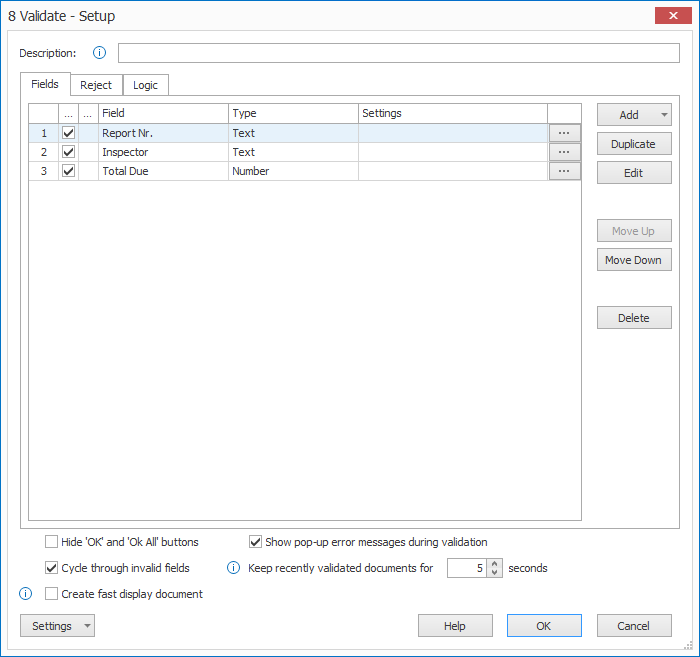
The Validate Setup shows your validation rules and their type.
In the Reject setup tab, you can define custom reasons why a document may be rejected. These reasons will show in the Operator Client and can be selected by the validation operator when rejecting a document. This will be explained in more detail later.
In the Logic setup tab, you can set specified fields to “Always Check” or “Not Always Check” depending on a specific condition. For example, on a registration form, if the “Status” field has “Married” as a value, the “Spouse Name” field will need to be set to “Always Check”. If it’s set to “Single”, then the “Spouse Name” is set to “Not Always Check”. This will be explained in more detail later.
To make sure each field has been extracted correctly or to check if manually entered data is correct, you make use of Validation rules.
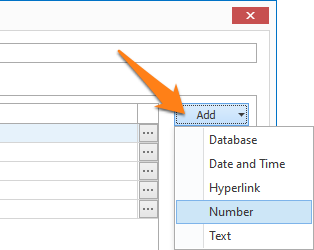
When adding rules, you can choose between different types of validation rules:
Text
To make sure a text field value has the correct format, length, etc. you can use a Validate Text rule.
CSV
To make sure all fields in a CSV are correct, you can use a Validate CSV rule. You set a name for each column and each column can be defined as Text, Number or Date field with all the usual format checks.
NOTE: Database lookup columns are not supported yet.
Database
you want to check if a value exists in a database and map other fields with the looked-up result, you can use a Validate Database rule.
Date and Time
To check if a date or time field value has been extracted correctly, you can use a Validate Date and Time rule. You can set the required format, time range, etc. You can even calculate a date or time based on other date or time field.
Note
With the Validate Note rule, you can let an operator enter notes in a multi-line field or let them check or edit a value with multiple lines.
Hyperlink
With the Validate Hyperlink rule, you can let an operator open external files in an associated program. If the path points to a folder, the hyperlink button will open the folder in Windows File Explorer.
Number
If you want to validate amounts or quantities, you can use a Validate Number rule. You can only accept certain numbers based on a defined minimum and maximum, define the decimal point and the number of decimal places and calculate a value based on other fields also containing values (e.g. Total Amount = Net Amount + Tax).
01 – Add: press the Add button to add validation rules and select the correct validation type.
02 – Duplicate: press the Duplicate button to copy the selected rule. The duplicated rule will automatically be added after the selected rule and the setup of the duplicated rule will open. Adjust it and press OK or press Cancel to stop the creation of the duplicated rule.
03 – Modify: press the Modify button or double-click a rule to make changes.
04 – Move Up / Move Down: press the Move Up or Move Down button to change the order of the rules. The sequence of the rules influences the sequence of the field values in the validation
05 – Delete: press the Delete button to remove the currently selected validation rule.
06 – Hide ‘OK’ and ‘OK All’ buttons: enable this option in case you want to force the operator to select one of the Reject options instead of pressing “OK”. A common use-case is when operators are required to decide where to redirect documents to after checking the document in the Organizer.
07 – Show pop-up error messages during validation: if you only want to use custom error messages and prefer to not see any auto-generated pop-up validation error messages (e.g. This field is required. It cannot be left blank.), disable this option.
This option is enabled by default.
08 – Cycle through invalid files: when this option is disabled, pressing the ENTER or OK button will put the focus on the first field to be validated.
When the option is enabled (= default) pressing the ENTER or OK button will put the focus on the next field to be validated.
Once all fields are validated, the focus cycles back to the first field that remains to be validated.
09 – Keep recently validated documents for [ x ] seconds: during validation, you can go back to the last validated document for a specified time. After the given time, document processing resumes automatically, and the document won’t be available anymore for validation. If you want to disable the possibility to go back to the last validated document, set the delay to 0.
10 – Create fast display document: enable this option if you have documents that contain pages with a very large resolution.
A fast display document contains reduced resolution versions of very large pages (> 17.5 Megapixels). The file is temporary and for display purposes only. It will not affect the output.
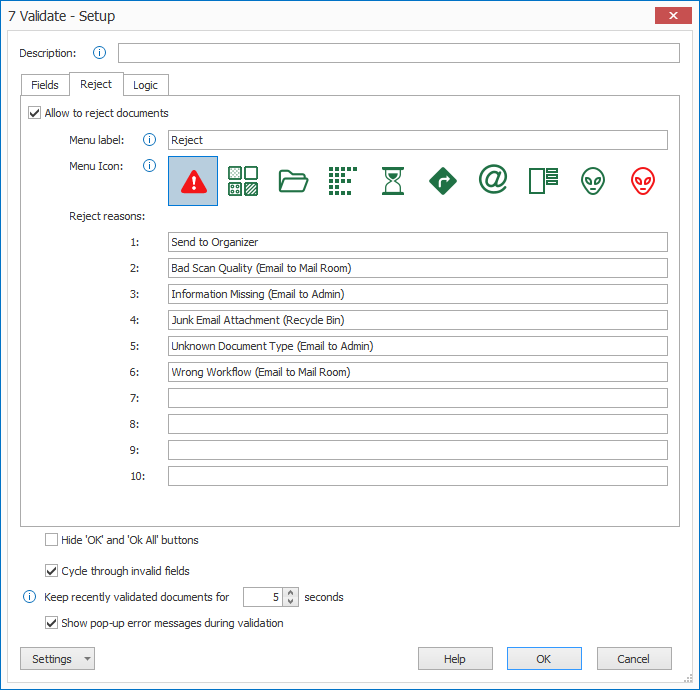
If a document cannot be processed because of bad scanning quality or some key information is missing or any other reason, the validation operator can use the Reject button to send that document to another action for further processing.
You can customize your Reject button’s label and icon and you can define up to 10 different reject reasons.
In the Operator client, you can choose between the different reject / redirect reasons by pressing the the Reject button or by pressing the shortcut keys.
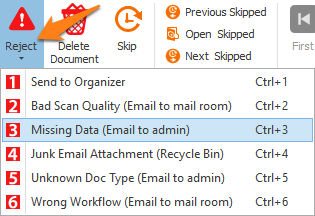
For example, a rejected document can be emailed to the mail room to inform them about bad image quality or, if a document was not separated correctly, you can send that document back to the Organizer and separate it there.
A Validate action with several reject reasons is often followed by a Distribute action to process each reject reason differently.
Sometimes certain fields are only necessary to be checked in certain conditions. For example, in case of a registration form:
– Status = “Married”? Then the Spouse’s name needs to be checked.
– Status = “Single”? Skip the Spouse’s name.
In the example below, we only let the Operator check to add a comment in case the total amount is higher than 1500 $.
Currently, you can set a field to “Always Check” or “Not Always Check” within the specified conditions.


TIP: you can copy the current settings and paste it in another setup window of the same type. Do this by pressing the Settings button in the bottom left of the Setup window and by selecting Copy. Then open another setup window of the same type and select Paste.

