MetaServer > Help > Workflows
240 MetaServer Workflows
A Workflow is a document processing and data capture workflow and is used to configure the processing of a certain document type. In a workflow you configure several processing actions like import from folder, separate documents, extract data, convert to searchable PDF, export to folder etc.
Each action has its own setup and conditions. The most advanced action is the Extract action where you can combine an unlimited set of rules to extract data from your documents and use that data to populate index fields. Find a detailed description of each action here.

Manage Workflows
Use this function if you want to activate or deactivate or delete multiple workflows with a single click. This is useful for a demo MetaServer or a MetaServer used by a BPO company using many workflows.
Workflow List and Tools
Open the list to select a workflow that you want to modify. Workflows marked with a * are active workflows.
![]() Press this button to add a new workflow. You can optionally base a new workflow on an existing one.
Press this button to add a new workflow. You can optionally base a new workflow on an existing one.
![]() Rename the selected workflow.
Rename the selected workflow.
![]() Delete the selected workflow
Delete the selected workflow
Description: Describe the purpose of the workflow
Publish Workflow
You can make changes or create new workflows on a production MetaServer while documents are being processed. Once you are OK with the changes you have applied to a workflow you can publish those changes. Only then, they become active for future documents.
If the workflow is being used and documents are still in process after making changes, a message will appear to ask what to do with the documents in process.
Click on the image to enlarge.

Use new workflow: Apply the changes to all documents in process for this workflow and reprocess them with the new settings.
Don’t update workflow: Use the old workflow definition before the changes to process all documents currently in process. Only new documents imported after publishing the changes will use the new definition.
Delete: Delete all documents in process and import new ones using the new settings.
Yes: Apply the changes
No: Don’t apply the workflow changes
Activate Workflow
Press this button to activate a workflow.
When it is active the workflow will be listed in the Activity list in the server tab and continuously watch for incoming documents to process them.
The button is red when the workflow is inactive.
Fields
This opens the Fields Setup. Click on the image to enlarge.
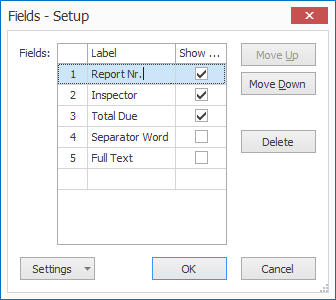
Here you can define your metadata fields. Each document type typically has its own set of fields. Like Purchase Orders will have a PO number, PO Date and Client Name for example.
You typically define one workflow for all documents sharing the same set of fields.
The check box next to each field enables displaying it in the Open Document list on the Validation clients.
Once you have defined fields, you can use them in actions to populate them with data using OCR, OMR and Barcode extraction rules.
You can use field data to define the output file name and folders dynamically depending on the document’s content.
You can use fields to calculate other fields or lookup additional information in a database.
Extracted field data can be checked or completed in validation clients.
The way you use fields is virtually unlimited and makes MetaServer very flexible.
Show Graph
A workflow is represented by a list of actions that are linked together in a logical order. See below for more information.
If you want to see the workflow in a graphical format, use this function.
This is how the Inspection Reports workflow looks like graphically.
Click on the image to enlarge.

Add Action
You create a workflow by combining several actions.
A minimal workflow contains an Import Action, Extract Action and Export Action.
Before adding an action, select the action after which you want to insert the action. The function is also available from the right-click menu.
New actions are automatically linked with previous and next actions. The default proposed link can be adjusted to other actions.
Find extensive documentation and online help about the different action types here.
Duplicate Action
If you want to create a new action based on another one, you can duplicate an action and make some adjustments. The function is also available from the right-click menu.
The duplicate will be placed after the original.
If you want to place the action in another position, it’s better to create a new one in the correct position and then copy and paste the settings of the original to the new action.
Setup Action
Press this button to modify the setup of the selected action. The function is also available from the right-click menu.
You can also double-click an action or press the small setup button next to the action to open the setup.
Delete Action
To delete an action, select it and press the Delete button. The function is also available from the right-click menu.
Remaining actions are automatically linked with each other to avoid orphaned actions (actions not connected to anything). The default proposed link can be adjusted.

Move action up or down
Use the Move Up and Move Down buttons to move Actions in your workflow.
NOTE: When you move actions, your links between actions (see the “Next action” column) stay the same.
So don’t forget to change these links if required.
Highlight
The highlighter tool can mark up actions belonging to each other in the same color.

This is useful when working with complex workflows containing distribute trees and conditional actions.
Email Alert
Configure Email Alerts to send error report emails to help you pinpoint potential configuration mistakes in your workflow or to get warnings if a critical error occurs in production.
Press the Email Alert button next to open the setup window.
Click on the image to enlarge.

By default, our smtp.capturebites.net demo server is used. We recommend to use your own smtp server for maximum performance.
You are also able to use Gmail or Office 365 SMTP Server by changing the “Server type” and signing in to your Gmail or Office 365 account using the “Sign in” button.
By default error messages are sent to:
change.this.asap@capturebites.net
In order to receive your error emails, it is important that you change this to your own email address as soon as possible.
Internet timeout
Below actions depend on an internet connection.
If internet is down, we will try to re-establish an internet connection during 60 minutes (default). After the defined timeout, we assume that there is a critical internet connection issue and the below MetaServer actions will get in a red error state.
– Archive email
– Delete email
– Convert HTML to PDF (planned for future release)
– Download URL (planned for future release)
– Export to email
– Forward email
– Email alerts
To resolve red errors, fix the internet connection problem and restart the MetaServer using the Restart Server function in the Server tab of the Administration client.
Log
When you cannot resolve certain problems with emails sent or received by MetaServer or with Kofax VRS, please select one of the following log options:
1) Log Email Communication
2) Kofax VRS
On the client side:
Logs of tests during setup are saved in:
C:\ProgramData\CaptureBites\Programs\Validation\Data\Log
On the server side:
Logs by actions (import email, export email, extract, separate documents / process pages, etc.) are saved in:
C:\ProgramData\CaptureBites\Programs\MetaServer\Data\Log
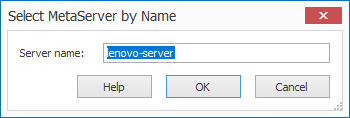
Select Server
A system can contain several MetaServers. Select the MetaServer you want to work with.
If the MetaServer is not on the same domain as the client, you can enter the server's name manually by pressing the arrow under the icon and by selecting "Select by Name".
You can easily find the correct Name by opening this setup window on the server.
Click on the image to enlarge.
Counters
This shows counters of all documents being processed by MetaServer and resource usage.
The 1st list shows a total document count per action and totals across all workflows.
The 2nd list shows the number of document sets and individual documents per workflow.
When you select an action or workflow, you can press the "Details" button to see a more detailed overview of the documents in that selected action or workflows.
At the bottom you can check your current system's usage of CPU, RAM, disk activity and disk space.

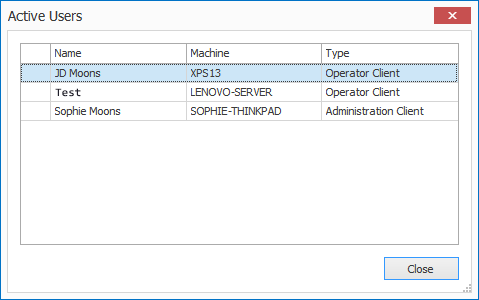
Active Users
You can see a list of all active users and the type of client they're using on the current MetaServer.

– Action: shows the type of action.
– Settings: shows a short summary of the settings for each action.
– Condition: there can be multiple outcomes of an action, for example an imported email can be valid (has attachments) or rejected (no attachments).
– Next action: after each action you define the next action. For example, after importing an email, the attachments are sent to extraction to extract some key data.
– Description: shows that action’s description (if applicable).
Server: The name of the machine MetaServer is running on.
Imported: The total number of originally imported documents in MetaServer across all workflows. The counter does not get filtered by the Select Workflows functionand always shows the total imported document count for both selected and unselected workflows.
In queues: The total number of documents in the MetaServer queues across all workflows. The counter does not get filtered by the Select Workflows function and always shows the total document count for both selected and unselected workflows. If your workflow separates documents, this counter will show the total number of documents after separation.
In organizer: Number of documents available (not locked by any user) for Organizing. The counter only shows the count of the selected workflows. See Select Workflows button.
Skipped: Number of documents available (not locked by any user) for Organizing with skipped status. The counter only shows the count of the selected workflows. See Select Workflows button.
In validation: Number of documents available (not locked by any user) for Validation. The counter only shows the count of the selected workflows. See Select Workflows button.
Skipped: Number of documents available (not locked by any user) for Validation with skipped status. The counter only shows the count of the selected workflows. See Select Workflows button.
Errors: Number of documents in error state. These documents triggered a red error. Errors and the documents that caused them can be viewed and managed in the Errors tab. The counter only shows the count of the selected workflows. See Select Workflows button.