MetaServer > Help > Validate > Validate Database
040-020 MetaServer Validate – Validate Database
With MetaServer’s Validate Database rule, you can lookup data from an external database. You can use an MS-SQL database, any ODBC compliant database or a CSV-based MetaServer database.
MetaServer databases allow to add new records to the database. If the value does not already exist in the database, you can update the database by entering the value manually or by drawing a rectangle around the data using the Select Text Tool.
In our example, we will make use of the “CB – INSPECTION REPORTS” workflow. This workflow is automatically installed with CaptureBites MetaServer.
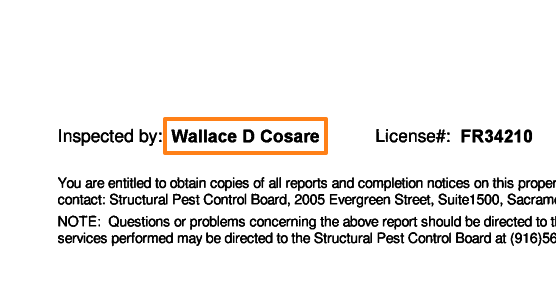
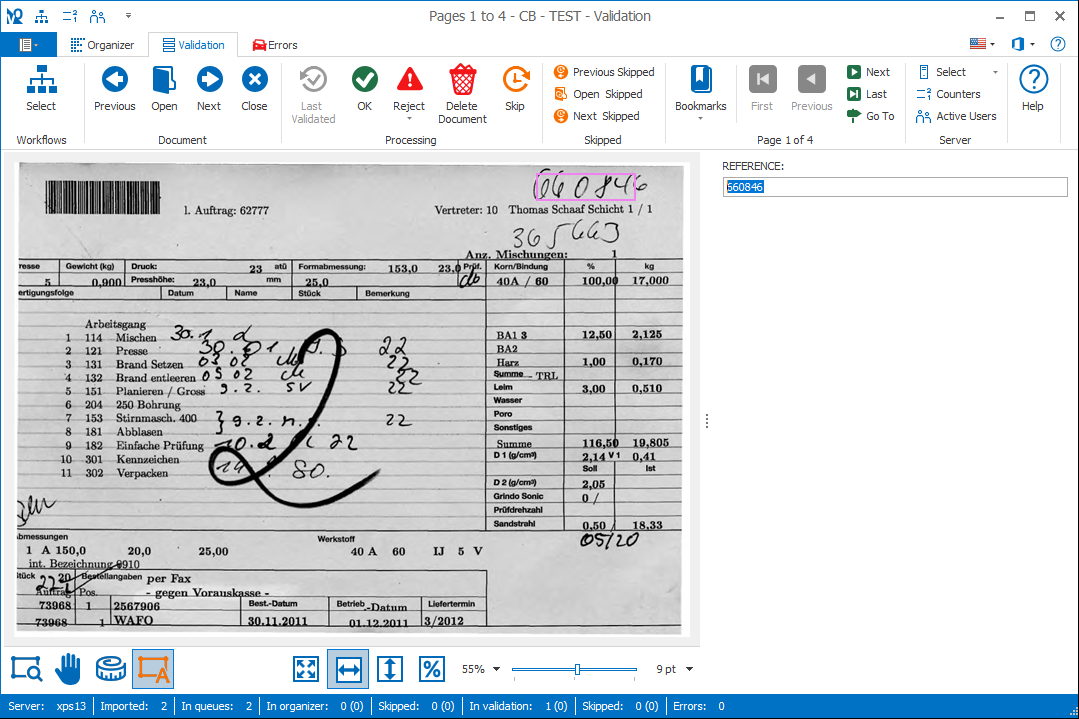
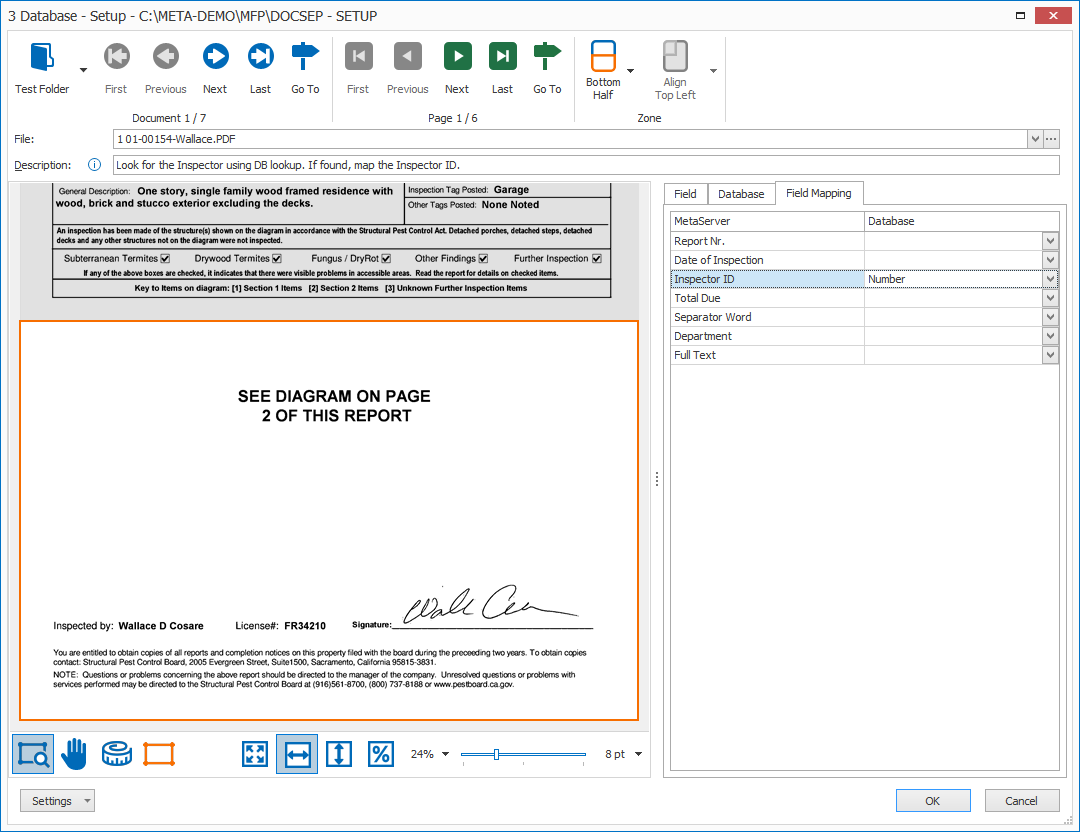
We need to extract and validate the Inspector of each document, which is always located in the bottom of the first page:
Validate Database rules are defined as part of a MetaServer Validate action.
If you are not familiar with adding a Validate Action to your workflow, please refer to our Validate action help guide.
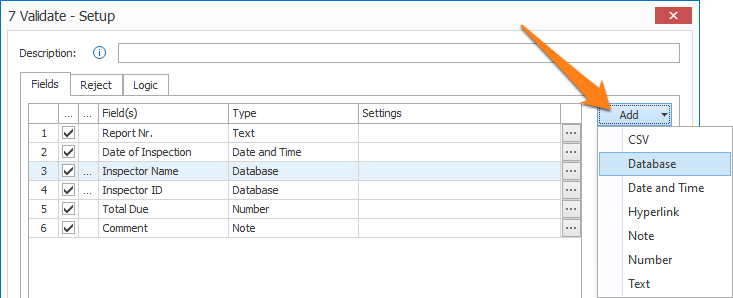
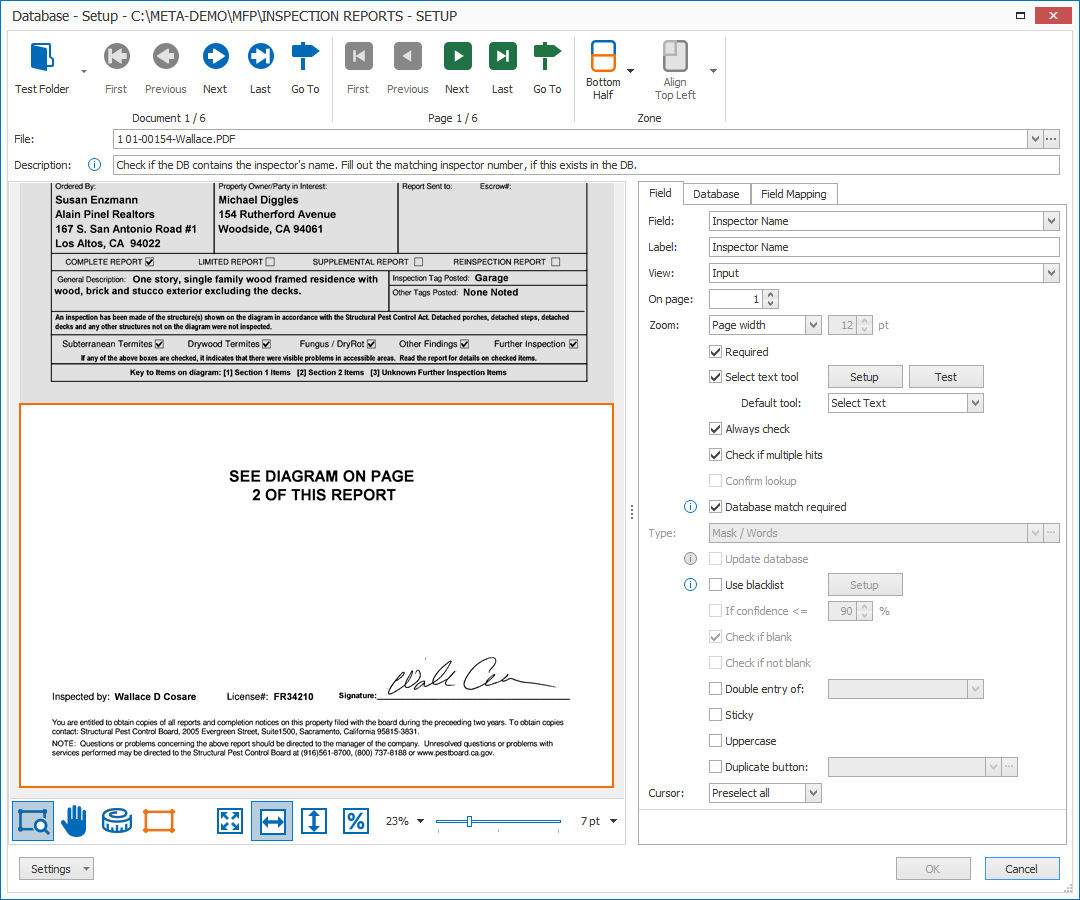
After adding a Validate action to your workflow or opening the setup of an existing one, you can add a Validate Database rule. In the Validate action, press the Add button and select Database.
TIP: The thumbnail on the right will follow you, so you can easily refer to the Setup window. Click on the thumbnail to zoom in.
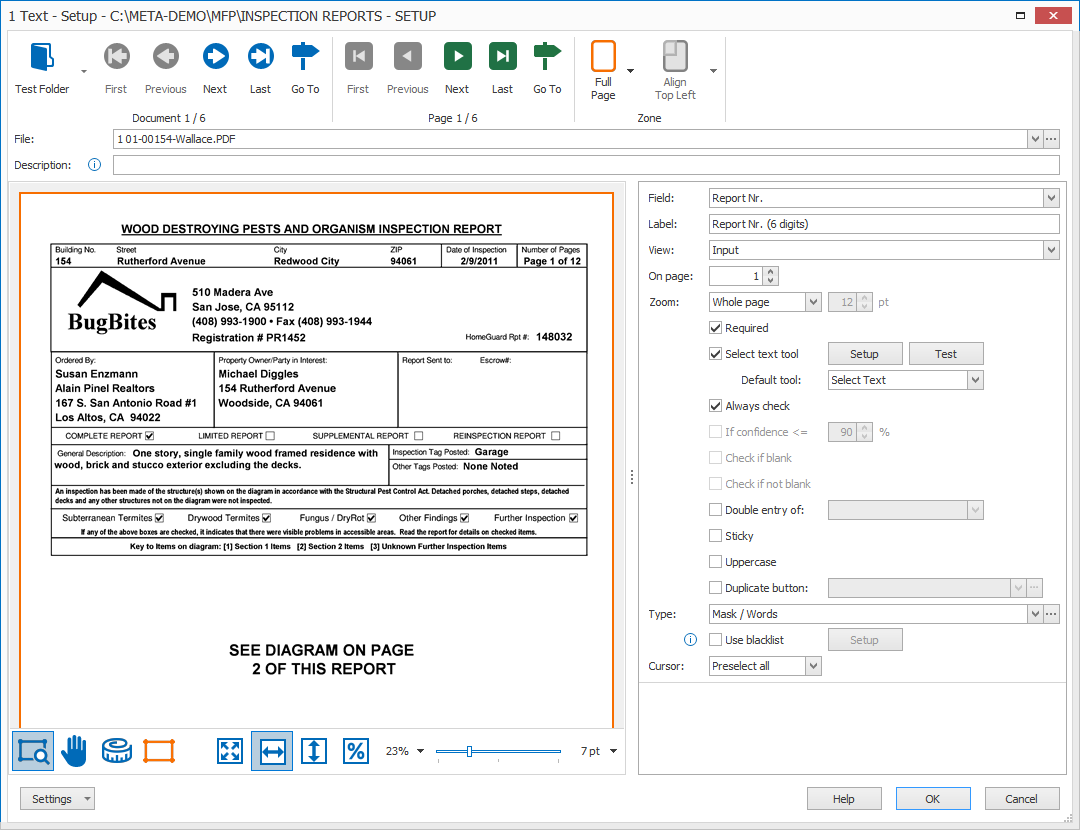
First, add a description to your rule. Then, select the field that will hold the looked up value. In this case, we select the field “Inspector”.
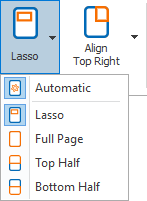
01 – Zone: in the Validate Text setup window’s toolbar, you will find two Zone tools to specify the highlighted zone on the page where your field value is typically located.
The purpose is to draw the attention to the correct part of the page to assist the operator to find the data on the page:
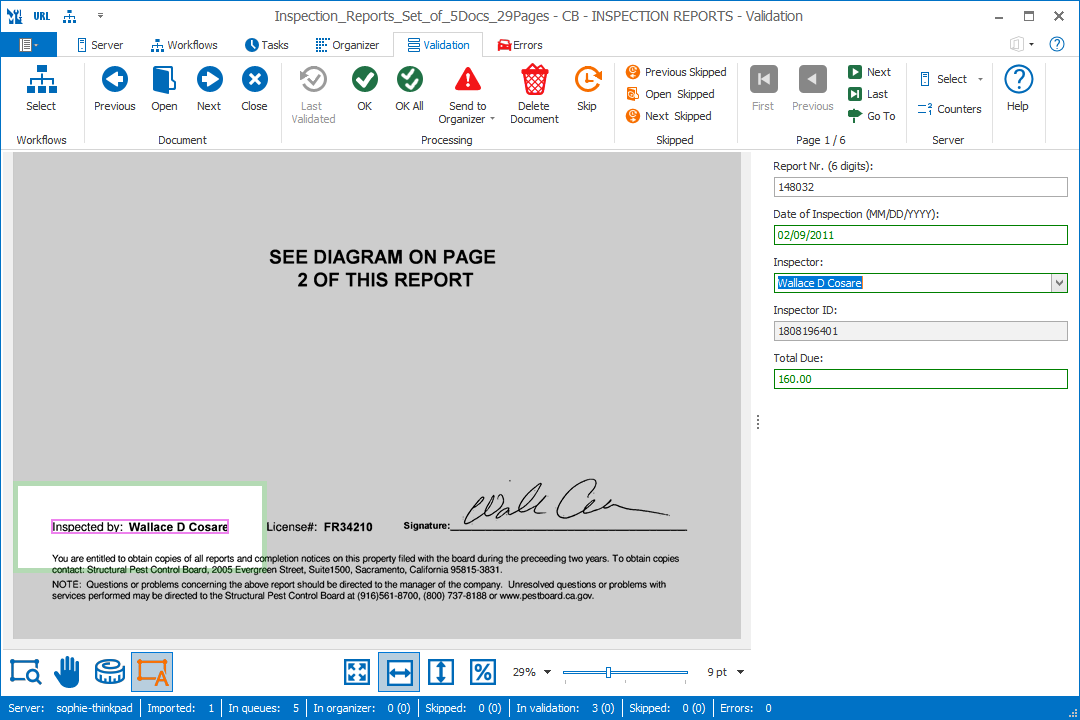
1) Automatic: this automatically jumps to the page where the data that was found by your previous Extract rules, frames it with a pink border and and highlights the zone (1 cm / 0.5 inch around the pink frame).
This helps to draw the Operator’s attention to the exact location on the page.
Only if the Extract rules failed to extract the data, the defined highlight zone will be used (Lasso, Full Page, Top Half or Bottom Half). By default, the “Automatic” highlighting is enabled.
The Inspector was automatically extracted and shows its exact location.
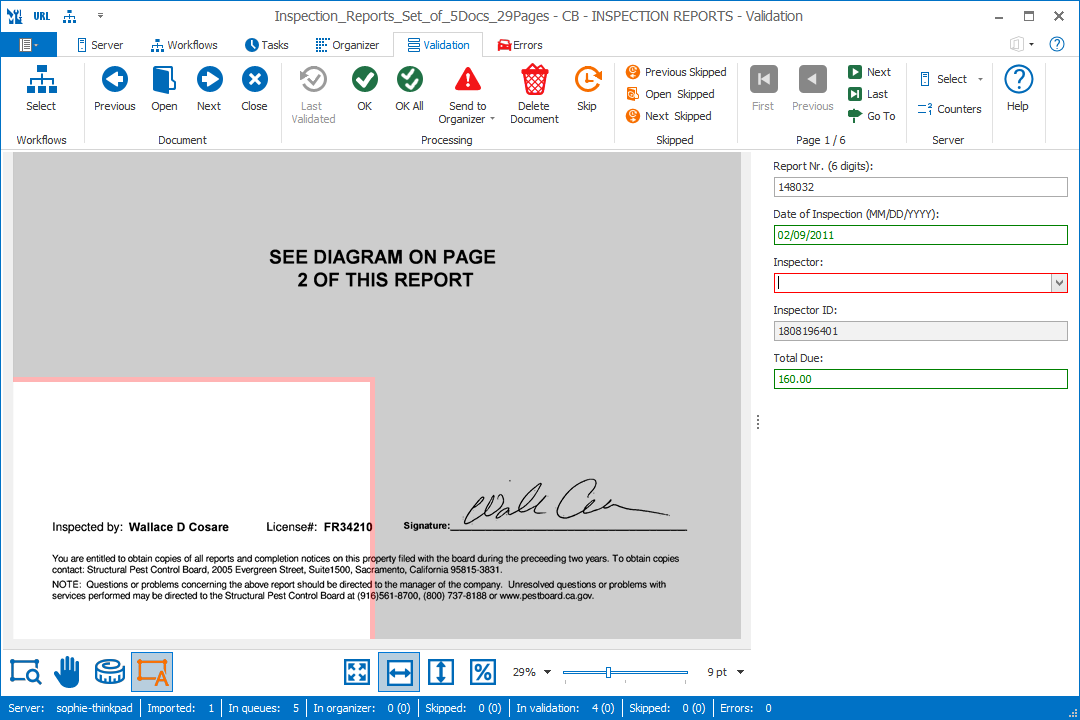
2) Lasso / Full Page / Top Half / Bottom Half: you can choose what part should be highlighted on the page when the operator navigates in the validation field if the data was not automatically extracted.
You can highlight the full page, the top or bottom half of the page or you can specify a custom zone with the Lasso option. You can do this by drawing a zone with the select tool which will be framed with an orange border.
The area around that highlighted zone will be dimmed in the validation viewer.
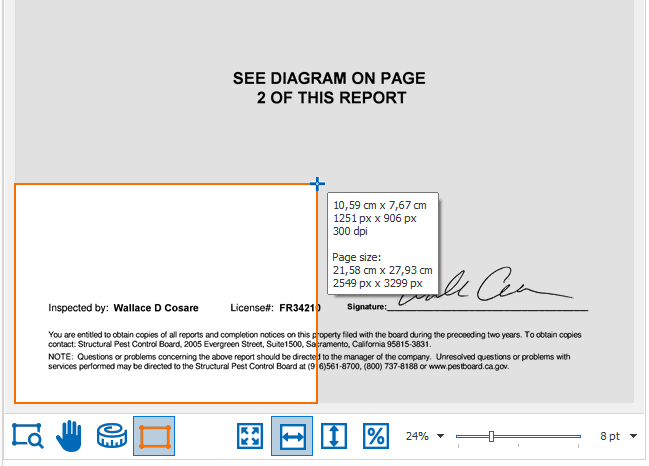
TIP: while drawing, you can see the zone’s dimensions in cm/inches (depending on your regional settings) and in pixels. You’ll also find the page’s resolution in DPI and the page size in cm/inches and pixels.
We recommend you scan your documents with a resolution of 300 DPI for the best OCR result and compact file size.
This is what the result looks like in the validation viewer when a value was not automatically extracted:
The Inspector was not automatically extracted and shows the highlighted zone instead.
02 – Align: when your documents vary in size or have mixed orientations (portrait and landscape mixed together), you can align your highlight zone in relation to any of the 4 corners of the image: the top left or right corner or the bottom left or right corner.
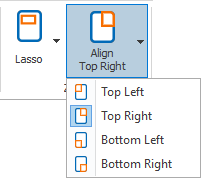
That way, the zone will be positioned correctly on all sizes and orientations.
03 – Label: the label displayed during validation above your current field’s input box. The default label is the same name as your field, but you can change this to a custom label. For example, the full field name, name with hints, abbreviations, etc.
In our example we have set the label to “Report Nr. (6 digits)” to help the operator enter the expected format.
Note: The colon (:) following the label is automatically added.

04 – View: select the view mode of the field when the user navigates in the field:
2) Input (manual navigation): disables highlighting and automatic page loading when there is no automatically extracted data.
The operator will need to navigate to the correct position manually during validation. Only when the value was extracted automatically, the page will be automatically loaded and the value will be highlighted. This is often used when the field value needs to be manually entered and is never in the same position (e.g. the Total Amount on an invoice).
3) Read-Only: this grays out the field value. This only allows the operator to view the extracted field value. The operator cannot change the value.
It still highlights and automatically loads the page where the data was found. If the read-only field does not hold any data, the viewer will stay in its current position.
05 – On page: set the page number to where the field value is most likely located. This page will be loaded when the value was not extracted automatically. Otherwise, the page where the value was extracted from will be loaded.
The default is page 1.
For example:
– Enter 1 for the 1st page
– Enter -1 for the last page
– Enter -2 for the page before the last page
– Etc.
If a document does not contain the specified page, it will load the last page. For example, validating page 3 on a 2-page document will show page 2.
06 – Zoom: set the Zoom to the preferred level when the operator navigates in the field.
You can choose between:
1) Whole page: shows the whole page in the validation viewer. This can be useful if you want to show the location of the field value in context of the whole page.
2) Page width: fits the page horizontally in the validation viewer and focuses automatically onto the part where the extracted value is located.
This option is most often used on smaller displays. It gives you a good overview of the page while still being very readable.
3) Page height: fits the page vertically. This can be useful when validating landscape-oriented page.
4) 100%: shows the page without scaling. This option is most commonly used on a large HD monitor with the same resolution as the scanned pages (typically 300 DPI).
5) Font size: zooms the page to a size so that normal text on the page is shown in the specified font size.
6) Zone: the viewer will automatically zoom in on the result. That means that if the result is only a short text like the report number, the viewer will be completely zoomed in on the number and show it very large in the viewer.
07 – Required: a required field means that a value needs to be present in order to pass validation. Disable this option if the field value can be left blank.
This option is useful when working with critical values like amounts, names that can’t be looked up in a database, etc. It’s also essential to double-check when the document is of very poor quality, or, like in our example case, during a demo.
09 – Check if multiple hits: if a value occurs multiple times in the database, it’s not clear which record should be selected. When disabled, the first record matching the value is automatically selected.
Enable this option to force the operator to check the multiple records in the database and select the correct one.
10 – Confirm lookup: enable this option if, after the operator adjusts anything to the value, the operator needs to first confirm that the value was looked up correctly before completing validation.
If disabled, the document will be immediately validated if there are no other invalid or to-be-checked fields.
11 – Database match required: enable this option if the value needs to already exist in the database. The operator can’t enter a value that does not exist in the database.
Disable this option if you want to allow the operator to enter a value that doesn’t exist in the database, or you want to update the database with new values. To avoid any mistakes and keep the value in a consistent format, you can define a Mask or Type that the new value needs to match with.
You can also use a blacklist to set up a list of values that are not allowed to be used for this field, even though the mask or type is correct. For example, for incoming invoices, you can reject your own VAT number.
12 – Update database: enable this option if you want to allow the operator to update the database with any new values. When the operator enters a value that does not exist, the database is updated with that value and all its mapped column values.
During validation, the operator will be shown a confirmation window when they’ve completed their validation.
NOTE: Only MetaServer CSV-type databases can be updated. For help on how to create a MetaServer database, you can refer to this guide.
13 – Use blacklist: enable this option to set up a list of values that are not allowed to be used for your specified field, even though the mask or type is correct. For example, for incoming invoices, you can reject your own VAT number.
14 – If confidence is lower then: with this option, you can force the operator to check a field value on the condition that it is below the specified confidence percentage level. If the confidence level is higher than the specified value, then the operator is not required to check the field value.
15 – Check if blank: enable this option to only let the operator check this value if it’s blank. The operator can then accept to keep the field blank or adjust it by entering a new value.
16 – Check if not blank: enable this option to only let the operator check this value if it’s NOT blank. The operator can then check if any adjustments need to be made to the extracted value.
17 – Double entry of: “Double-entry” or “Double-Keying” is a process used by operators when they need to enter important information twice. The two entries are then compared with each other to ensure that they match.
NOTE: the double entry is a 2nd field you’ve created based on the original field (e.g. “Groom’s Occupation (2)”).

When the operator presses ENTER or navigates to the next entry, then the first entry is obfuscated.
This is a safety measure for operator 2 so that they are not tempted to just read the value from the first entry but is forced to look at the document again to enter the second value.
When there is a mismatch, it will prompt a warning and force operator 2 to perform one of the following options:
1) Hit SHIFT+ENTER and the value they entered is accepted despite the difference with operator 1’s value. The cursor would also jump to the next field to validate. This is the case where operator 2 overrules operator 1 and believes operator 1 made a mistake.
2) Hit ALT+ENTER to duplicate operator 1’s value in field 2 and the cursor would jump to the next field to validate. This is the case where operator 2 admits that operator 1 got it right and takes over operator 1’s value.
3) Continue repairing the field value. This is the case where operator 2 realizes that neither his value nor operator’s 1 value is correct. After the operator made any changes and hits ENTER, a mismatch is checked again and we go through the above logic again.
For example, operator 2 entered “DRIVER” while operator 1 entered “TRUCK DRIVER”. As soon as operator 2 hits the ENTER key, operator 2’s value is revealed and a pop-up warns that there is a mismatch:

Only by applying 1 of the 3 options we’ve mentioned, can the loop be broken.
The final output will be operator 2’s values.
18 – Uppercase: enable this option to automatically convert the text value to uppercase.
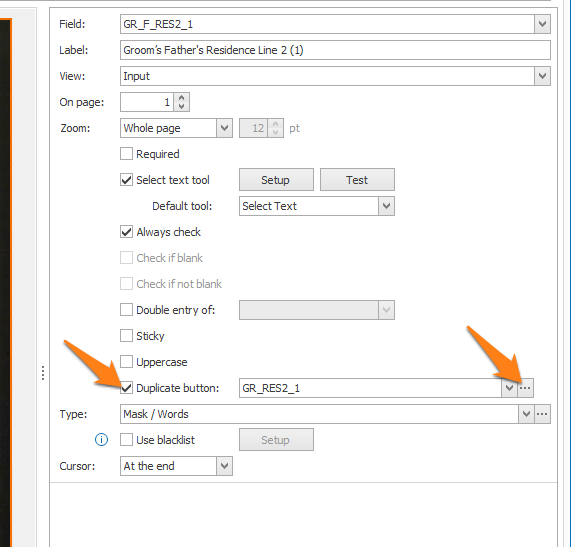
19 – Duplicate button: enable this option to show a duplicate button next to your field during Validation to trigger a duplication of another field value:

In the above example, on a marriage certificate, the original address of the groom is often the same as his father’s. In that case, the already filled out values of the groom can be used in the groom’s father’s fields.
This means that the father’s address fields would have the “Duplicate button” option enabled to duplicate the Groom’s address fields with a single click.
Below you can see an example setup of the groom’s father residence line 2:


If the operator prefers to use the Zoom tool first to manually zoom in on the value before selecting the text, you may want to choose “Zoom” as the default tool.

Brightness value: default (75)

Brightness value: 140
02 – Drop out: When working with forms with lines and labels in red, green or blue, we can filter these by using the drop out setting.
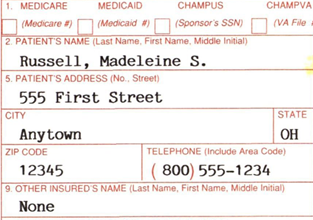
Drop out: None
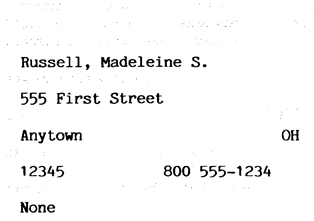
Drop out: Red

Thickening value: Default (0)

Thickening value: 2 horizontal, 3 vertical
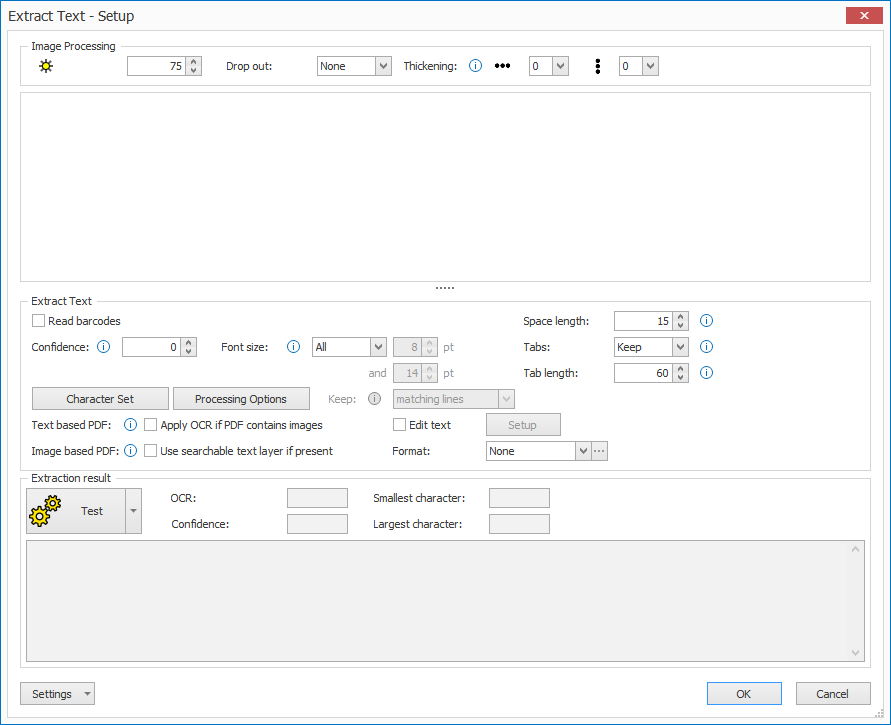
Most of these settings are related to the OCR and Barcode engine and the processing of the resulting text.
01 – Read barcodes: enable if the field value needs to be extracted from a barcode.
02 – Confidence: characters with a confidence level lower than the set confidence level, will be ignored and not returned in the result. If set to 0, all characters are accepted.
03 – Font size: you can set up a range of acceptable font sizes to only return lines or words containing at least one character within the specified range. You can also choose to only keep the characters matching the selected font size.
04 – Space length: if the result shows too many spaces, like spaces between individual characters, increase this value. If spaces are missing and words start sticking together, decrease the value.
The value is a percentage of the font size of the character following the space. So, spaces in large font type words are automatically considered to be larger than spaces in small text.
05 – Tabs: by default, lines are segmented in multiple word groups that are separated by tabs (long spaces). If you want no tabs at all, press the drop-down button to select the “Remove” option and all the words will be grouped as 1 single word group for each line.
06 – Tab length: define the length of long spaces to convert them to tab characters. If you only want to convert very long spaces to a tab, increase this value. Spaces shorter than the set value will be converted to a single space.
The value is a percentage of the font size of the character following the tab character.
Open the character setup window to exclude or include certain characters during extraction. This can avoid confusion with other characters that never occur in the drawn zone. For example, if the zone only contains a numeric value, disable all alphabetic characters to avoid confusion between 0 and O or 1 and I.
In our example, the operator will draw a rectangle around the report number, so we only select digits.
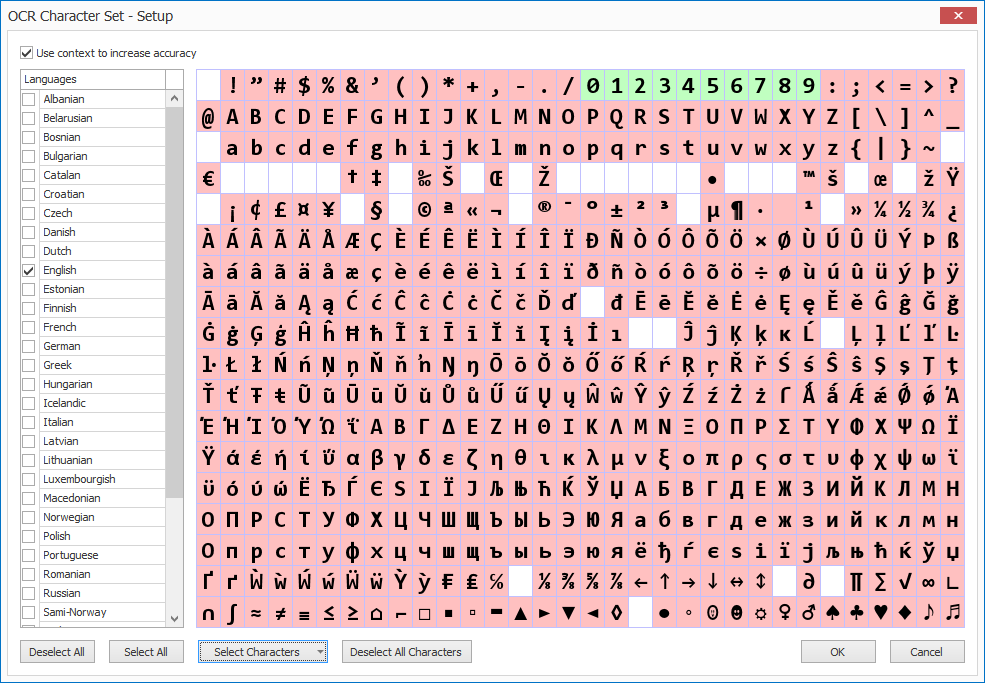
1) Languages: select the primary language(s) of the documents. Selecting a language, will automatically select that language’s character set in the character table.
2) Deselect All Characters: unchecks all characters in the character set. This can be helpful to set up your own custom character set, which is explained in the next step.
3) Select Characters: next to manually selecting / deselecting characters directly in the table, you can press the dropdown button to select a preset of special characters, like digits, uppercase letters, characters for e-mail addresses, etc.
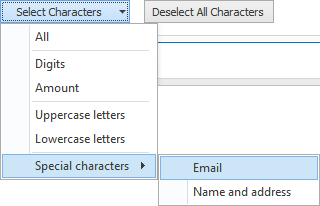
TIP: don’t use the character set as a method to exclude elements from the text.
For example, if you want to extract a code like “123/456/789” and filter out the “/” characters, you may be tempted to just uncheck the “/” character from the character set. But if you do this, the “/” character will most likely be recognized as a 1, which makes the code illegible.
It’s recommended to leave the characters in the set that appear in the actual text and later remove characters with the Edit text option or change the result with the Format Amount / Date and Time settings in this setup or with Format rules in an Extract action following the Validate action.
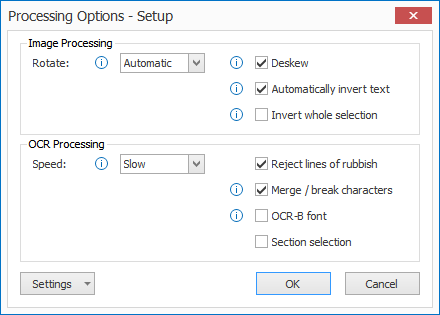
NOTE: these settings do not alter the actual image permanently, they are temporary corrections to correctly extract the text.
There are 2 types of processing options:
01 – Image Processing:
1) Rotate: the selection will be rotated as specified. The rotation occurs just before the OCR extraction takes place. In Automatic mode, the OCR engine will try to detect the orientation of the text automatically. Only use the fixed rotation settings (90° right, 180° and 90° left) if the text on your documents has a fixed orientation that never changes.
2) Deskew: straighten skewed text before OCR processing.
3) Automatically invert text: automatically detects inverted text (white text on a dark background) in the selection and inverts it before OCR processing.
4) Invert whole selection: forces to invert the whole selection before OCR processing.
02 – OCR Processing:
1) Speed: the speed option indicates how exhaustive the OCR process should be looking for improvements. There is a small loss in accuracy if you set it to a faster speed option.
2) Reject lines of rubbish: this detects random characters with a low confidence level caused by noise in the image. Enable this option to automatically delete lines of rubbish.
3) Merge/break characters: enable this option when characters stick together. This technology uses font size detection to determine the breakpoints, so it’s not recommended to use this option on text blocks with a high variety of font sizes on a single line.
4) OCR-B font: only enable it when the text you want to extract is created with the OCR-B font.

Section selection: Experiment with this setting when there are different font sizes on the same line. Sometimes sectioning may drop results when different font sizes occur on the same line.
03 – Text based PDF: text-based PDFs, also known as electronic PDFs, contain computer text. They are typically generated by a text-editor programs like MS Word, Excel or by invoice or report creation software.
By default, we directly extract the original electronic text and don’t need to perform any OCR. This results in to a very fast and accurate extraction of the text.
Apply OCR if PDF contains images: some electronic PDFs contain one or more small images that have logos or small header or footer text. These elements are seen as images, not text. If you want to extract the text in these images, enable this option so it automatically converts the full page to a 300 DPI image. It will then apply OCR to extract the text.
04 – Image based PDF: image-based PDFs, also known as scanned PDFs, are typically generated with a document scanner. They contain an image of each page of that document. By default, we apply OCR to these pages, so the images are converted to text.
Use searchable text layer if present: some scanned PDFs contain an invisible, searchable text layer. If you want to extract this existing searchable text layer instead of applying OCR, enable this option.
If, in a previous Extract action, you have used an Extract Text (Azure Computer Vision) rule with the Convert to searchable PDF option enabled, you are able to use that high-quality text layer when you enable the “Use searchable text layer” option.
This way, you will be able to use the Select text tool on hand-written, arabic, cyrillic or low-quality text:
Enable the “Edit text” option to automatically remove spaces and replace words from the selected text.
The video below shows the Edit text option in action. The alphabetic month is automatically converted to a numeric format:
Press the Setup button to open the Edit text settings.
Below, we show an example for the “Inspection Date”, which is related to the a Validate Date and Time rule, but it’s a very good example on how to effectively use the Edit option.
If you select something like “November 19, 2020” on the document, the replacements will be instantly applied, and the value will become “11/19/2020”.
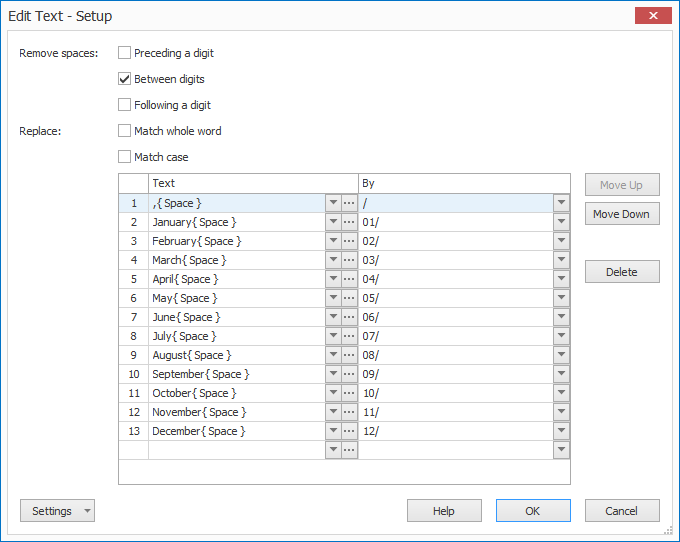
01 – Remove spaces: you can choose to remove spaces preceding, between or following digits. You can also combine these three different options.
02 – Replace: here you set up any replace rules for your extracted text. You can also apply the following options:
1) Match whole word: enable this to only replace text exactly matching the specified word(s). When disabled, it will also replace the specified text if it’s a part of a word.
For example: when disabled and replacing the word “jan” with “01”, words containing “jan” like “january” will be replaced and become “01uary”.
2) Match case: enable this to only replace text that exactly matches the defined word(s)’ case. When disabled, it will replace the specified word(s), regardless the case.
For example: when enabled and replacing the word “JANUARY” with 01, it will only replace “JANUARY” and ignore words like “January”, “january”, etc.
Enter the text you want to replace in the left column. In the right column, you enter the values that the text in the left column will be replaced with.
Press the drop-down arrow to select different system and index values to compose your text.
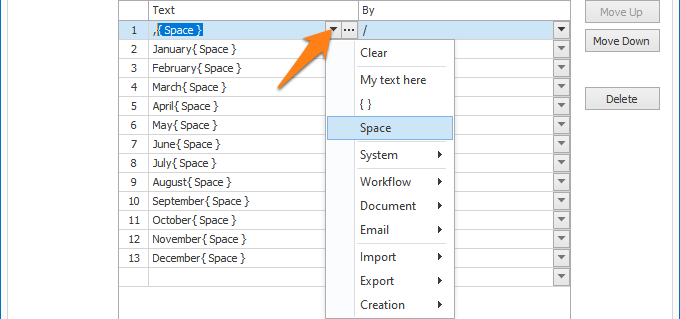
In the example above, we replace the months in long name format followed by a space with their MM/ format. We also replace “,” followed by a space with a “/”. So, a date like “August 15, 1969” would become “08/15/1969”.
You can also specify the location of that text to get a more accurate result. Press the “…” button next to the drop-down arrow to open the setup window for the text location.
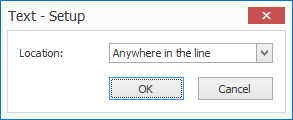
You can select one of the following options:
– Anywhere in the line
– Beginning of line
– End of line
– Beginning of word group
– End of word group
– Beginning of word
– End of word
For example:
Assume you are extracting codes always starting with 1 letter followed by 4 digits like
O-1204
P-5048
W-7042
Etc.
The OCR engine may occasionally make a mistake and read an “O” as a “0” resulting in something like:
0-1204
If you would automatically replace all “0”s with “O”s with the Edit option, you would get “O-12O4” which is not correct either.
However, if you also specify that the element to be replaced (0) needs to be in the beginning of a word. It will only replace the “0” in the beginning of the word and not touch any “0”s in the middle of the word, perfectly correcting the OCR mistake and outputting: O-1204.
To learn more about the difference between lines, word groups and words, please refer to this guide.
You can use the Format option to convert different value types to standardized formats. Press the “…” button to open the setup window.
01 – Amount: with the Format Amount option, you can normalize the decimal symbol of amount values, remove thousand separators and currency symbols. This makes the amount format consistent.

02 – Date and Time: with the Format Date and Time option, you can convert date and time values to a standardized format.

Input format: enter the format that matches the input date and time. You can press the drop-down arrow to select different format types to compose your date and time format.
In this example case, we set up a DD(?)MM(?)YYYY date format. The (?) indicates any character, so if the Date’s separator varies, it will still convert it to the output format.
Output format: here you enter the format for the output date and time. You can press the drop-down arrow to select different format types to compose your date and time format.
In this example case, the date is converted to a DD-MM-YYYY output format.
This feature is to test your Select Text setup and is planned for a future release.
NOTE: The Type setup is only available if you disable the Database match required option.
Press the dropdown button to select a custom mask or type.
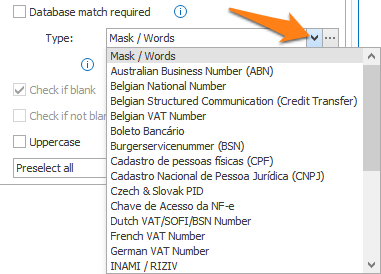
Most types are self-explanatory check-sums, like VAT number checks in Europe, ABN in Australia, CNPJ in Brazil, etc.
A popular check-sum, for example, is the Luhn (modulus 10) algorithm used to check credit card numbers, IMEI mobile phone device codes, etc.
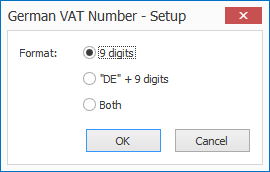
In some cases, like the German VAT number, you can choose between a few options by pressing the “…” button.
01 – Mask / Words: you can set up a mask to check if the extracted or manually entered value is correct and matches that mask. To set up the mask, press the “…” button.

By pressing the Setup button, you can select different format types to compose your mask. You can even add a field to your mask. The value entered in that field during Validation needs to be equal to the value contained in that field.
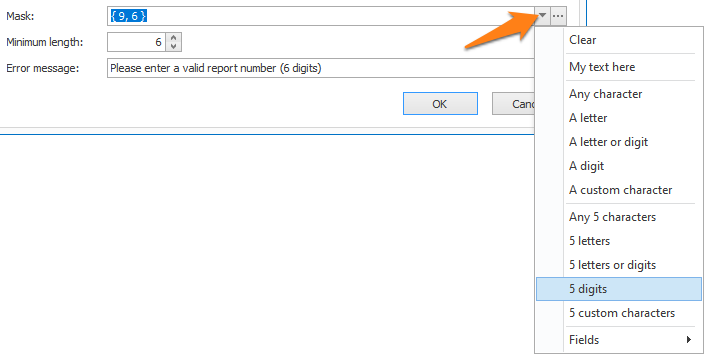
1) Clear: clears the mask.
2) My text here: an example text. You can overwrite it with your own text. Use it if your masks consist of fixed characters or separators. It’s also possible to type fixed text directly in the mask’s input box.
3) Any character: shown as { ? }, any character is allowed.
4) A letter: shown as { A }, any letter is allowed, both upper and lower case. If you want to only accept a specific case, you can use a custom character.
5) A letter or digit: shown as { X }, any letter or single digit is allowed. If you also want to allow periods, , commas, etc., you need to use the { ? } “Any character” type.
6) A digit: shown as { 9 }, any single digit is allowed.
7) A custom character: shown as { C }, only allows a list of defined characters. You can define these in the Custom Character Setup. Press the “…” button next to the Mask to set up your custom characters.
The Custom Character Setup window opens…
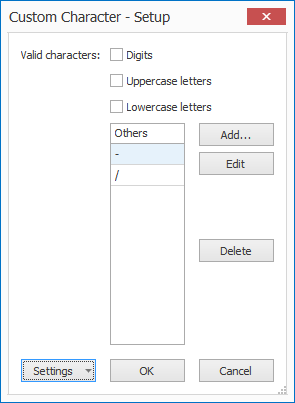
Above custom character definition only allows a “-” or “/” for every C element in your mask.
1) Valid characters: you can choose if the custom character also allows uppercase letters, lowercase letters or digits.
2) Others: Here you can add, delete or modify specific custom characters. In the example above, a custom character can only be a “-” or “/”.
8) Any 5 … : the number 5 is just an example, replace the 5 with the number of characters you want.
For example: { ?, 6 } means any 6 characters, { A, 2 } means 2 letters, { X, 5 } means 5 letters or digits, etc..
02 – Minimum length: If you only want to allow part of the mask, set the minimum length lower than the total length of the mask.
To explain how the Minimum length setting works, consider below settings:

AB/15687945-2:
OK because the number of characters is greater or equal than the defined minimum of 13 and the value starts with 2 letters followed by a custom character (“/“ in this case), 8 digits, a dash and a single digit.
AB/157945-2:
NOT OK because the number of characters (11) is smaller than the defined minimum length of 13.
AB/156870945-02:
NOT OK because longer (15 digits) than the total length of the defined mask.
4B/15687945-2:
NOT OK because it contains a digit instead of a letter in the first 2 characters and therefore does not comply with the defined mask.
03 – Cursor: there are 3 possible cursor options:
1) Preselect all (default): when the user navigates in the index field, the value is selected. When the user starts typing, the existing value is completely overwritten with the new value.
2) In front: when the user navigates in the index field, the cursor is positioned in front of the value in the field. When the user starts typing, the new value is inserted in front of the existing value.
When “Cursor in front” is used in combination with the Select Text tool, a space is appended after each Select Text tool result. In that way, you can build a string of words by selecting different words in a text.
3) At end: when the user navigates in the index field, the cursor is positioned after the value in the field. When the user starts typing, the new value is appended at the end of the existing value.
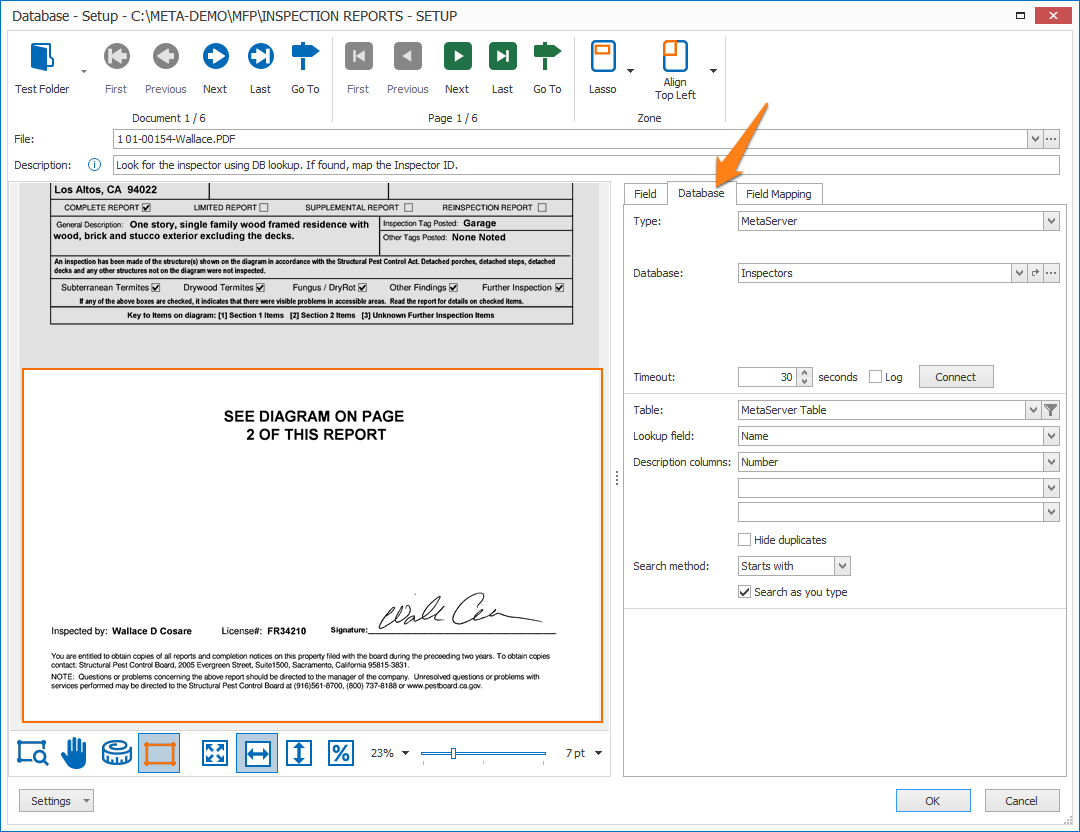
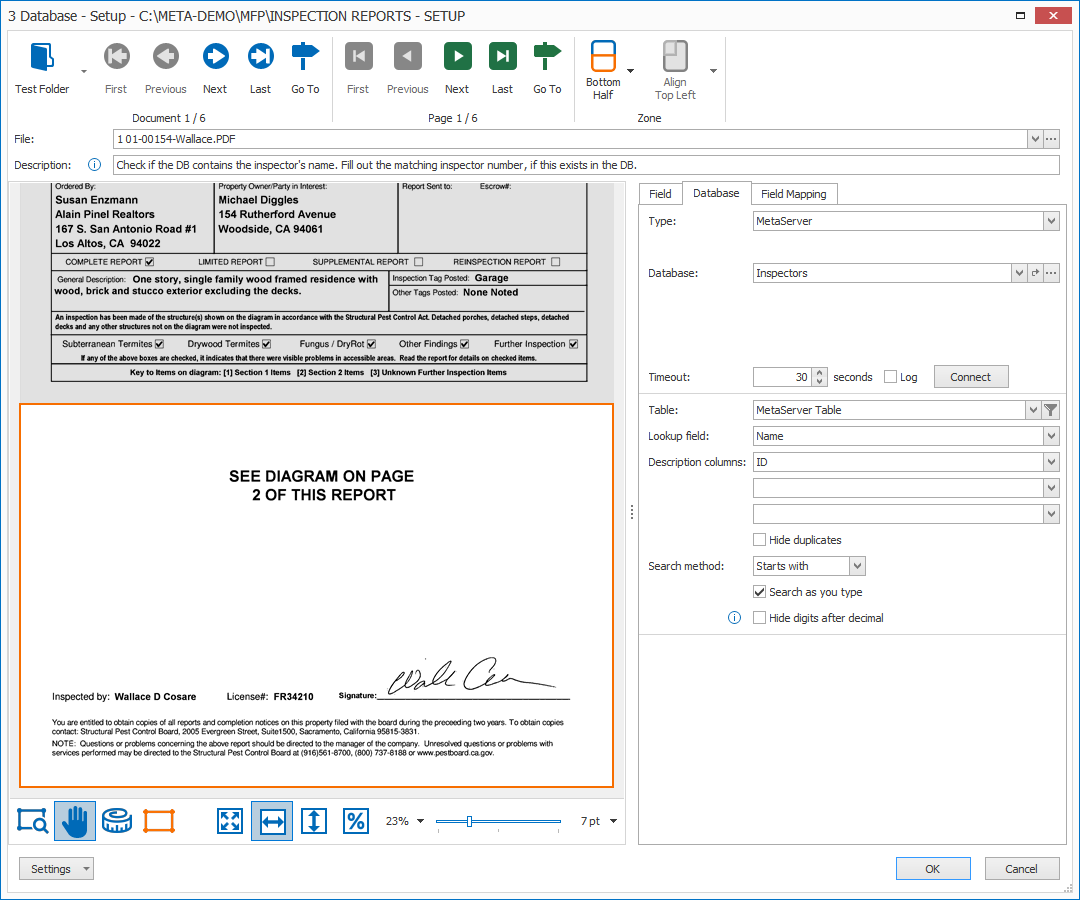
In the Database tab, you define all settings related to the database, database table and database fields.
01 – Type: select your database type
ODBC
IMPORTANT: It is not possible to connect to a “single-access” database type (e.g. Excel). This technical limitation applies for both database lookup during validation and extraction. This limitation does not apply for exporting to a database.
This is an overview of the ODBC settings:
1) Data source: select the data source you want to use. An ODBC data source needs to be defined first using the ODBC Data Source Administrator tool in Windows. To find step by step instructions how to define an ODBC Data Source in Windows, have a look here.
Select data source from field: you can use this option to switch databases dynamically using a field value.
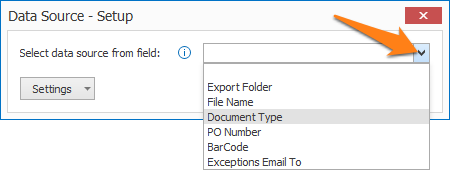
To access this setup window, press the “…” button next to Data Source. You can select the field containing your database name by pressing the drop-down arrow.
Be aware that when you use this feature, all possible databases that can be loaded, must share the same table name and schema.
2) User name & Password: some databases require to login. If so, enter the user name and password in these fields.
3) Timeout: when the database does not respond in the specified time, the action will fail.
Log: enable this option to create a log file each time the database is called. This option is typically used during testing.
On the client side, you can find the information in the following folder:
C:\ProgramData\CaptureBites\Programs\Admin\Data\Log
On the server side, you can find the information in the following folder:
C:\ProgramData\CaptureBites\Programs\MetaServer\Data\Log
SQL Server
When you use a direct connection, it’s not required to set up an ODBC data source. Because the communication with the SQL server is direct, searching and updating SQL tables is more efficient.
NOTE: If you change the connection type from ODBC or a MetaServer Database to Direct SQL and you connect to the same table with identical field names, the mappings are preserved.
MetaServer
A MetaServer database is a shared CSV database. It doesn’t require any ODBC sources on any of the clients and is very easy to deploy. The MetaServer DB settings are very similar to the MS-SQL and ODBC settings.
For help on how to create a MetaServer database, you can refer to this guide.
02 – Table: a database typically stores data in one or more tables, such as a table holding document types, suppliers, products, etc. Specify the correct table containing the data you want to use to lookup information.
1) Filter Table: with the filter option, you can reduce the number of records to search in. This makes it possible to do drill down lookups, also known as cascading lookups.
Press the funnel icon next to the table field to open the Filter Table Setup.

Drill down lookups are used to search large database of employees, customers or products. Every step filters the number of possible matches.
In the example below, when looking for a city, you can filter the results to only show cities from a certain zip code.
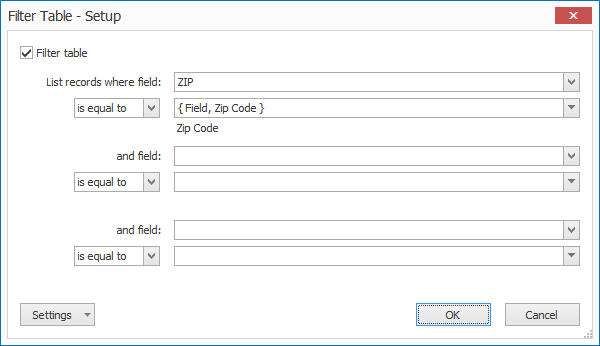
Another example would be for employee names. You first search for the state, then for a company in that state, then for the employee name in that company.
03 – Lookup field: select the column that contains the corresponding field value. For our example, you want to look for the Inspector’s name in the database, so you select the column “Name”.

04 – Description columns: a table typically contains one or more columns, such as a name column, address column, phone number column etc. You can show 3 additional columns that help describe the lookup field.
For example, if the operator needs to look up an address, you can add the ZIP code, City and State as description columns.
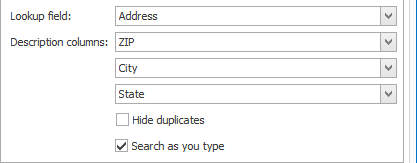
This is what the description columns look like during validation:
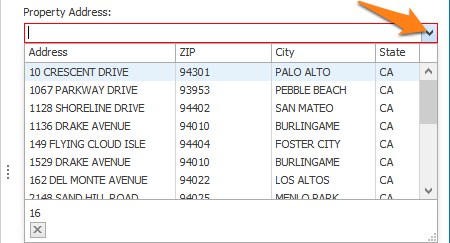
05 – Hide duplicates: if the table contains duplicate records, you can hide them. A record is considered as a duplicate if the lookup field in combination with its description columns is identical to another record.
NOTE: To detect duplicates, we do not consider the case. For example, “John Doe” will be considered the same as “JOHN DOE”.
06 – Search method: by default, MetaServer always searches for a record starting with the value. Press the drop-down button to change this so it searches for a record that doesn’t necessarily start with your value, but only needs to contain the value.
07 – Search as you type: by default, MetaServer always searches records as you type. We recommend disabling this option if you need to look up records in very large tables. When disabled, it will only trigger the search when hitting the ENTER key or pressing OK in the Validation Tab.
08 – Hide digits after decimal: in Oracle databases through ODBC, NUMBER(14) are integers but they are reported as DECIMAL. To avoid that, for example, an order number like 123456 is returned as 123456.00, you can enable this “Hide digits after decimal” option.
This can also be useful if ID numbers are stored as a NUMERIC or DECIMAL data type in MsSQL.
NOTE: thousand separators are never displayed in looked up decimal values, regardless whether the option is enabled or not.
This only applies to the lookup field, not the mapped fields.
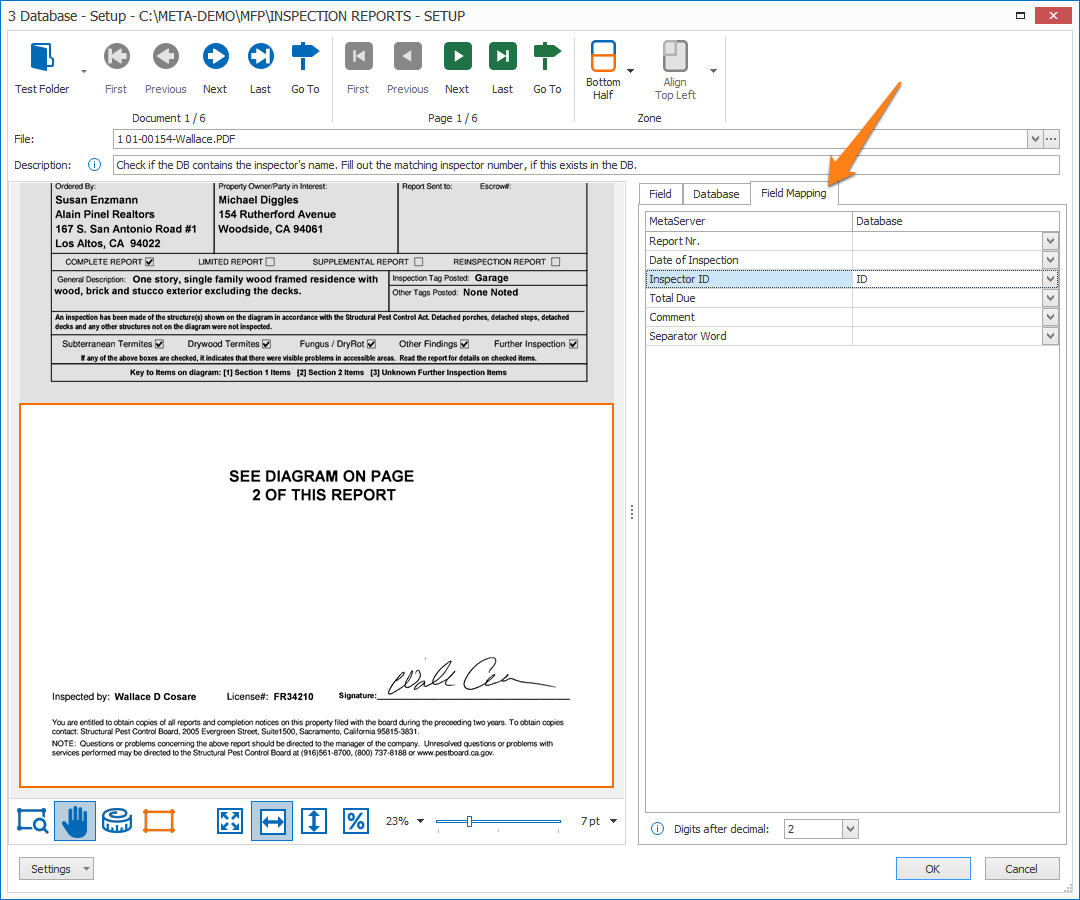
In the Field Mapping tab, you can map MetaServer fields with database fields.
On the left side, all the fields of your current workflow are listed, except the lookup field. The lookup field, as defined in the Field tab, will receive the data from the database lookup field that is defined in the Database tab. It will then map the corresponding fields as defined in the Field Mapping tab.
In our example, we map the Inspector ID with the Inspector Name’s associated “ID” database field.
01 – Digits after decimal: the precision of decimals can be changed between 0 and 9 digits after the decimal.
By default, MetaServer uses the decimal precision as set in the Windows regional settings, which is typically 2 digits after decimal. This setting affects the precision of the following database field types: Choice, Decimal, Numeric, Number, Real and Float.
NOTE: if you’ve enabled the Update database option in the Field tab, both the lookup field and the mapped fields will be added to the MetaServer database when you add an inspector that did not exist before.
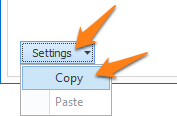
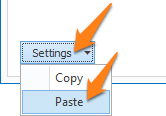
TIP: you can copy the current settings and paste them in another setup window of the same type. Do this by pressing the Settings button in the bottom left of the Setup window and by selecting Copy. Then open another setup window of the same type and select Paste.
