MetaServer > Help > Extract > Find Line with Mask / Words
120-210 MetaServer Extract – Find Line with Mask / Words
01 What is a Line, Word Group and Word?
A line of text is all the text on the same horizontal line. All the text in the green box below is located on the same line.
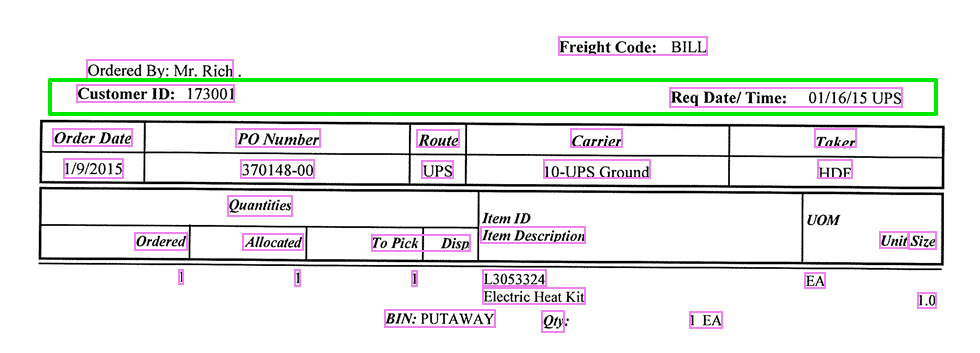
Word Groups are clusters of words separated by large spaces or TABs. As you can see in the example image, the word groups are marked in pink. The TABS are represented with a → character in MetaServer.
The line of text marked in green contains two word groups and is extracted by MetaServer as follows:
Customer ID: 173002→Req Date/ Time: 01/16/15 UPS
Words are separated with spaces. In our example, we marked some words in blue.
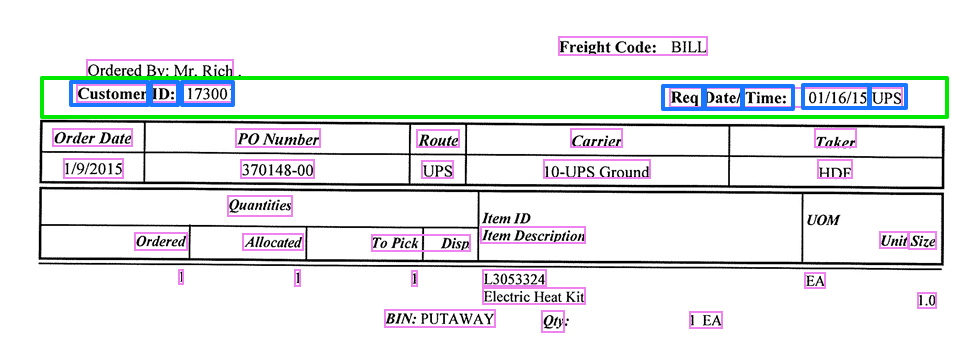
In conclusion, a line consists of 1 or more word groups, and a word group consists of 1 or more words.
MetaServer’s Find Line with Word / Mask rule makes it possible to find specific line(s) of text or a range of lines. It’s frequently combined with a Set field value rule and / or Replace Text rule.
This can be very useful when you need to extract lines of text from documents that don’t have a fixed format or to ignore certain lines that conflict with your search.
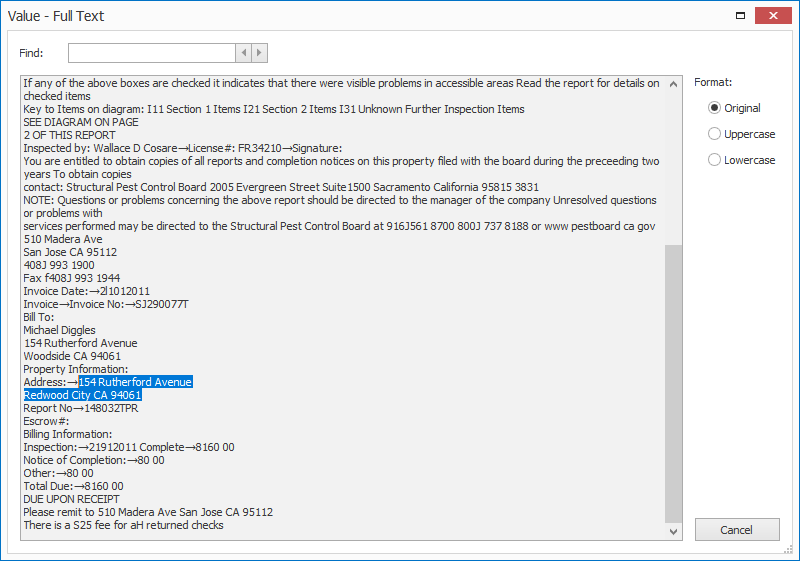
For example, reports contain the client’s address which is spread across multiple lines, like this:
Address: 618 Gopher Road
Gravity Falls, OR, 97005
You need to return both these lines and ultimately format them, so they become 1 address line.
You can extract these lines by using a Find Line with Word / Mask rule where you use the “Address:” label to return the matching line and the line below.
You typically define an Extract Text rule first to place the full text of the document in an index field you call “Full Text”. Next, you would define a Find Line with Mask / Words to filter the text and only keep the lines containing the data you are interested in. After that, you clean up and format the text with a Set field value rule and/or Replace Text rule.
In this guide, we will only focus on the Find Line with Mask / Words rule.
In our example, we will make use of the “CB – INSPECTION REPORTS” workflow. This workflow is automatically installed with CaptureBites MetaServer.
Find Line with Mask / Words rules are defined in a MetaServer Extract or Separate Document / Process Page action.
To add this rule, press the Add button and select Find –> Line –> with Mask / Words.
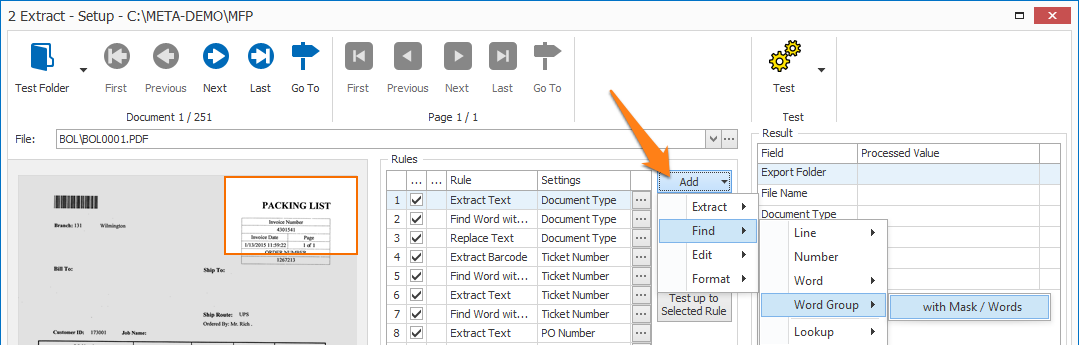
TIP: The thumbnail on the right will follow you, so you can easily refer to the Setup window. Click on the thumbnail to zoom in.
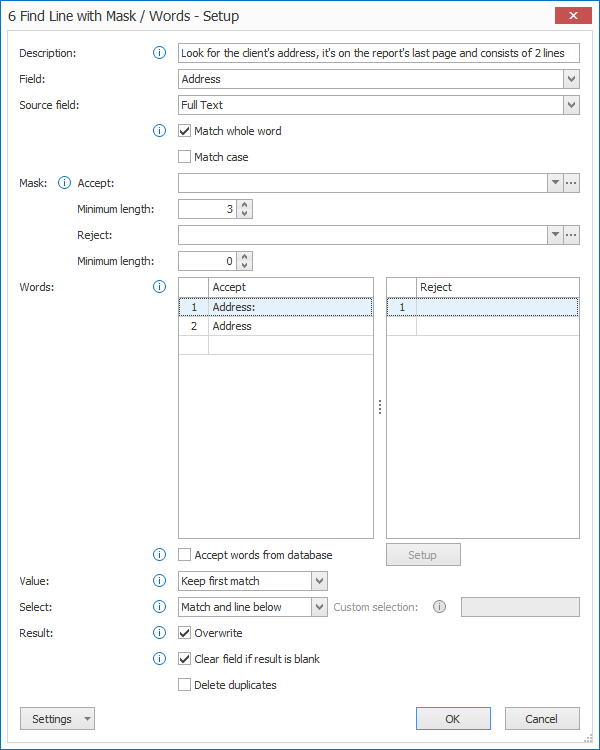
First, add a description to your rule. Then, select the field that will hold the result. In this case, we select the field “Address”.
01 – Source field: press the drop-down arrow to select the source field. This is the field containing the text you want to parse to find your lines. In our case, it’s the “Full Text” field.
1) Match whole word: only returns lines containing words exactly matching the defined mask or word(s). When disabled, it will also return lines containing the accepted word or mask. For example: with “Match whole word” disabled and when searching for “apple”, it will also return lines containing “pineapple”.
2) Match case: enable this option to make the search Case Sensitive. If you search for “PO Number”, for example, it will only return lines containing that word in the exact same case. Disable the option to also find lines containing “po number”, “PO NUMBER”, “PO number” etc.
Masks are used to search for a line containing a word with a format also known as a regular expression. However, you don’t need to use complex regular expressions, MetaServer uses an easy to use formatting pick list and you can construct your mask by selecting the elements you need.
Example: you want to find the customer name which is always located in the line below a telephone number:
– Assume telephone numbers always look like 859-232-0000.
– You would look for a line containing a word with mask: { 9, 3 }-{ 9, 3 }-{ 9, 5 } with a minimum length of 12.
This would find the line containing a telephone number. Then, with the Select settings, you specify that you want to select the line below the line with the found telephone number.
The Reject mask is used to skip lines containing words with the defined Reject mask.
For example, if you want to skip all lines containing dates between the years 1900 and 1999, you could define a reject mask like 19{ 9, 2 }. See below for details about the mask syntax and how to define a mask.
TIP: when you have both Accept and Reject masks defined in a single rule, all the lines containing words matching the reject mask are eliminated first. Then, the remaining lines are used to only keep the lines containing words that match the accept mask.
01 – Accept / Reject masks: here you define the masks. Lines containing a word matching the Reject mask will be eliminated, lines containing words matching the Accept mask will be kept. Both masks use the same setup method.
By pressing the drop-down arrow, you can select different format types to compose your mask. You can even add a field to your mask, so it can change dynamically based on that field value.
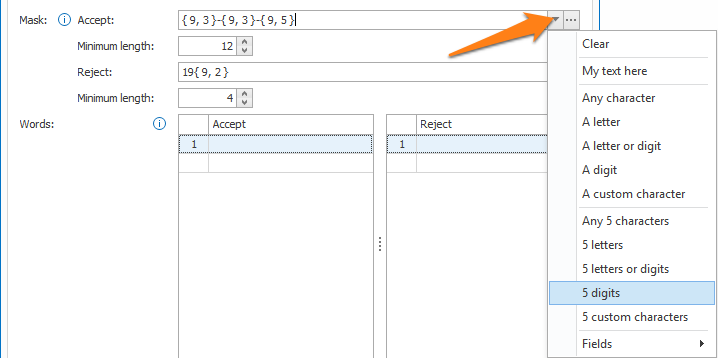
1) Clear: clears the mask.
2) My text here: an example text. You can overwrite it with your own text. Use it if your masks consist of fixed characters. It’s also possible to type fixed text directly in the mask’s input box.
3) Any character: shown as { ? }, any character is allowed.
4) A letter: shown as { A }, any letter is allowed, both upper and lower case. If you want to only accept a specific case, you can use a custom character.
5) A letter or digit: shown as { X }, any letter or single digit is allowed. If you also want to allow periods, hyphens, commas, etc., you need to use the { ? } “Any character” type.
6) A digit: shown as { 9 }, any single digit is allowed.
7) A custom character: shown as { C }, only allows a list of defined characters. You can define these in the Custom Character Setup. Press the “…” button next to the Accept or Reject Mask to set up your custom characters.

The Custom Character Setup window opens…
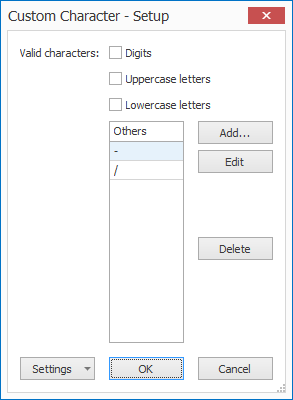
Above custom character definition only allows a “-” or “/” for every C element in your mask.
1) Valid characters: you can choose if the custom character also allows uppercase letters, lowercase letters or digits.
2) Others: Here you can add, delete or modify specific custom characters. In the example above, a custom character can only be a “–” or “/”.
8) Any 5 … : the number 5 is just an example, replace the 5 with the number of characters you want.
For example: { ?, 6 } means any 6 characters, { A, 2 } means 2 letters, { X, 5 } means 5 letters or digits, etc..
02 – Minimum length: If you only want to read a part of the mask, set the minimum length lower than the total length of the mask.
To explain how the Minimum length setting works, consider below settings:

Examples:
AB/15687945-2
OK, because the number of characters is greater or equal than the defined minimum of 13 and the value contains 2 letters, a custom character (“/“ in this case), 8 digits, a dash and a single digit.
AB/157945-2
NOT OK, because the number of characters is smaller than the defined minimum length of 13.
AB/156870945-02
NOT OK, because longer (15 digits) than the total length of the defined mask, if you want to accept words containing more digits, you would need to disable “Match whole word”.
4B/15687945-2
NOT OK, because it contains another type of character than a letter in the first 2 characters and therefore does not comply with the defined mask.
Here you can specify words that should or shouldn’t be included in the line.

1) Accept: return lines that hold one of these words. In our case, we return the line containing the “Address” label.
2) Reject: when one of these words appear in a line, it will be rejected. Even when it has also found an Accept word in the same line. Reject words win from Accept words.
Example: you want to find the the invoice date, which is always the first occurring date on the first page of an invoice. You search for it using a mask in a Find Word with Mask / Word rule and return the first match. But, on some invoices, it’s preceded by another date, the due date.
To filter out the due date, you set up a Find Line with Mask / Words rule before your Find Word rule. This will make sure you reject any lines in the text containing the due date. Other examples of reject words to get rid of wrong dates are “Deadline”, “Established”, etc.
NOTE: Spaces also count as characters.
With the “Accept words from database” option, you can maintain a list of Accept Words outside MetaServer using an external database.
Enable the “Accept words from database” option and press the Setup button.

The Accept words from database Setup window opens…
In the Database Setup, you can select the database table and column containing the Accept Words. Any changes you make in a database table are automatically applied.
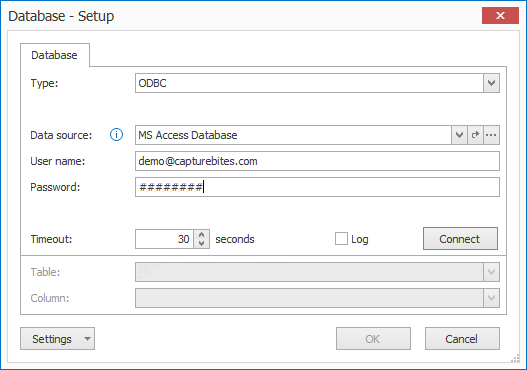
01 – Type: select your database type:
IMPORTANT: It is not possible to connect to a “single-access” database type (e.g. Excel). This technical limitation applies for both database lookup during extraction and validation. This limitation does not apply for exporting to a database.
This is an overview of the ODBC settings:
1) Data source: select the data source you want to use. An ODBC data source needs to be defined first using the ODBC Data Source Administrator tool in Windows. To find step by step instructions how to define an ODBC Data Source in Windows, have a look here.
Select data source from field: you can use this option to switch databases dynamically using a field value.
To access this setup window, press the “…” button next to Data Source. You can select the field containing your database name by pressing the drop-down arrow.
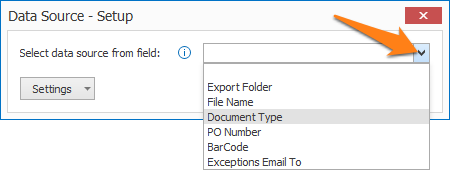
Be aware that when you use this feature, all possible databases that can be loaded, must share the same table name and schema.
2) User name & Password: some databases require to login. If so, enter the user name and password in these fields.
3) Timeout: when the database does not respond in the specified time, the action will fail.
4) Table: a database typically stores data in one or more tables, such as a document types table, a suppliers table, a products table, etc. Specify the correct table containing the Accept words you want to use in your rule.
5) Column: a table typically contains one or more columns, such as a name column, address column, phone number column etc. Specify the correct column containing the Accept words you want to use in your rule.
SQL Server: when you use a direct connection, you don’t require the setup of an ODBC data source. Because the communication with the SQL server is direct, searching and updating SQL tables becomes more efficient.
Note: If you change the connection type from ODBC to Direct SQL and you connect to the same table, the mappings are preserved.
1) Server: enter the SQL server you want to connect to.
2) Database: enter the name of the database you want to access.
3) User name & Password: most SQL databases require to log in. If so, enter the user name and password in these fields.
4) Extra: allows you to add custom connection string parameters. If you don’t need to use any special options, you can leave that field blank.
5) Timeout: when the database does not respond in the specified time, the action will fail.
6) Table: a database typically stores data in one or more tables, such as a document types table, a suppliers table, a products table, etc. Specify the correct table containing the Accept words you want to use in your rule.
7) Column: a table typically contains one or more columns, such as a name column, address column, phone number column etc. Specify the correct column containing the Accept words you want to use in your rule.
MetaServer: a MetaServer database is a shared CSV database. It doesn’t require any definition of ODBC sources on any of the clients and is very easy to deploy. The MetaServer DB settings are very similar to the ODBC settings.
To create a MetaServer database, you simply create or copy a CSV file in:
C:\ProgramData\CaptureBites\Programs\MetaServer\Data\DB
The CSV file needs to comply to the following characteristics:
1) The first line defines the column names
2) The following lines are data records
3) Fields are separated by “,” (comma) or “;” (semi colon)
Example of a basic CSV:
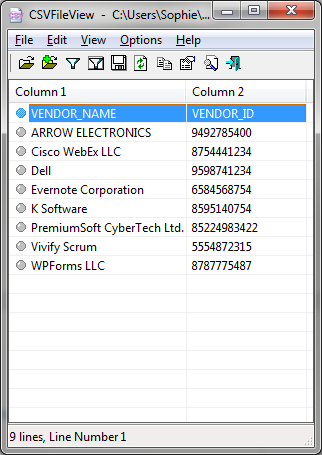
VENDOR_NAME,VENDOR_ID
ARROW ELECTRONICS,9492785400
Cisco WebEx LLC,8754441234
Dell,9598741234
Evernote Corporation,6584568754
K Software,8595140754
PremiumSoft CyberTech Ltd.,85224983422
Vivify Scrum,5554872315
WPForms LLC,8787775487
The “,” delimiter can also be a “;” delimiter.
Here is the example CSV again as seen in a CSV Viewer:
NOTE: the ; (semi-colon) delimiter is often used in Europe because the comma is commonly used as a decimal point in European countries.
If you use a comma delimited CSV and you have values containing a comma, you need to put the value between double quotes. A value like 22500, Broadway would need to be quoted like “22500, Broadway” to avoid the comma in the street to be interpreted as a field separator.
01 – Value: You can specify which lines you want to keep. There are 3 options:
1) Keep all matches: this will return all lines containing the defined Accept Mask or Accept Words and not containing the defined Reject Mask or Reject Word(s).
2) Keep first match: this will return the first line containing the defined Accept Mask or Accept Words and not containing the defined Reject Mask Reject Word(s).
3) Keep last match: this will return the last line containing the defined Accept Mask or Accept Words and not containing the defined Reject Mask or Reject Word(s).
02 – Select: By default, you typically want to keep the same line(s) as the one containing the mask or keyword(s), but sometimes you are interested in the line below the line with keywords.
Take our example case, the address consists of 2 lines, one on the same line as the label and the second line below it. So, we need to return the matching line and the line below it.

1) Match: select the same line as the one matching the search criteria
2) Line below match: select the line following the line matching the search criteria.
3) Match and line below: select the line matching the search criteria and the next line.
4) Custom selection: select the specified line(s) using the line number or ranges separated by commas.
Some examples:
3 = the 2nd line after the match
1-3 = a range that selects the match and the two lines following that match (3 lines in total)
-1,2 = selects the line before the match and the line following the match (2 lines in total)
-1-2 = a range that selects the line before the match, the match and the line following the match (3 lines in total)
-3—1 = a range that selects the 3 lines before the match (3 lines in total)
NOTE: You cannot change the original sequence of the lines with the Find Line with Mask / Words rule. In other words, “1,2,3” generates the same output than “3,2,1” or “1,3,2”.
03 – Overwrite: if enabled, the result will overwrite the previous field value. Otherwise, the result will be appended to the value that is already in the field.
04 – Clear field if result is blank: If enabled and if the result is blank, any values already in the selected field are cleared, otherwise they are preserved.
05 – Delete duplicates: enable this option to delete duplicate lines and only return unique lines.
TIP: you can copy the current settings and paste them in another setup window of the same type. Do this by pressing the Settings button in the bottom left of the Setup window and by selecting Copy. Then open another setup window of the same type and select Paste.


After:
- Extracting the text holding the address
- Using a Find Line with Mask / Words rule to only keep the address
- Using a Set Field Value rule to remove the label and format the address so it becomes 1 line
we get the following result:
Before
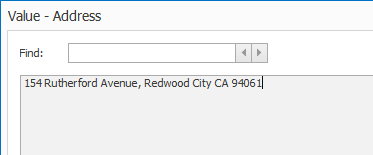
After