MetaServer > Help > Extract > Format CSV
120-660 MetaServer Format – Format CSV
With MetaServer’s Format CSV rule, you can merge and convert fields with header data and / or multi-line values in a compatible CSV format. This rule is essential if you’re planning to validate a table using the Validate CSV rule or when you’re exporting a CSV file index.
Some automatic CSV formatting includes:
- Values are put between double quotes in order to handle commas (,) and semicolons (;) inside values correctly.
- Double quotes (“) inside the values are doubled. This is critical to preserve the inch symbol in a value like, for example, 65” TV.
- Tabs are replaced by spaces.
- Any conflicts where columns do not have the same number of lines as other columns are automatically resolved.
- If one of the merged fields only contains one value (like header data), that value is repeated as many times as there are rows in the other fields.
On top of that, you can specify each column in your CSV and further format them as CSV, Date and Time, Excel Hyperlink, Number or Text fields.
Format CSV rules are defined in a MetaServer Extract or Separate Document action.
To add this rule, press the Add button and select Format -> CSV

In our example, after extracting the name and department columns from the table, you want to merge them as a CSV so you can validate it as a table using a Validate CSV rule. For each of these fields, you need to add the appropriate column.
You can specify and format each column as a CSV, Date and Time, Excel Hyperlink, Text or Number field.
TIP: The thumbnail on the right will follow you, so you can easily refer to the Setup window. Click on the thumbnail to make the image larger.

First, add a description to your rule. Then, select a field that will hold your formatted CSV. In this case, we select the field “ATTENDANCE LIST”.
01 – Merge method for columns with different line counts: press the drop-down arrow to choose the method you want to use:
1) Merge columns with highest line count: the default merge method. For example, if you have 4 columns to format as a CSV and Column 1 has 10 lines, Column 2 and Column 3 have 8 lines and Column 4 has 10 lines, then the highest line count is 10 and the values of Column 1 and Column 4 will be included in the CSV. The other columns will all get blank values.
2) Equalize by adding blank lines: this option will add blank lines to the columns with less lines than the column with the highest number of lines to make the line count of all columns equal. This option will keep all column values in the CSV output.
NOTE: this option could cause a data shift in some of the columns.
02 – Delete line if [ X ] is blank: with this option you can choose if you’d like to delete lines from your CSV in certain conditions. Leave the condition blank if you don’t want to delete any lines.
For example, you can set the condition that a complete line / record is empty, it will be deleted. Or you can set the condition that a line is deleted in case a specific field value is blank.
03 – Delimiter: specify the delimiter for your resulting CSV. This can be comma (,) or (;).
04 – Overwrite: enable this option to overwrite any existing data in the specified CSV field. When disabled, the result is appended to the existing data. This way, 2 or more CSV’s can be merged together.
05 – Clear field if result is blank: if enabled and if the result is blank, any values that were already in the selected field are cleared. When disabled, they are preserved.
The CSV column type is useful if you want to merge an already existing CSV field with additional fields or columns. The most common use-case is to merge an already formatted CSV with header data after validation.
Double-click the Date and Time column type field or press the “Edit” button to open the setup window.

01 – Field: select the field that holds your date and time value.
02 – Input format: enter the format that matches the input date and time of your field value. You can press the drop-down arrow to select different format types to compose your date and time format. In the below example case, we set up a DDMMYYYY date format.

03 – Output format: enter the format for the output date and time. You can press the drop-down arrow to select different format types to compose your date and time format. In the above example case, we set up the date output format as DD/MM/YYYY.
04 – Example: here you can enter a date or time code to test the format. When you enter an invalid date in the example, the preview will show “Error”.
05 – Clear invalid dates: if this option is enabled, any invalid dates become blank cells. By default, this is disabled, meaning that the original values of the invalid dates are preserved and can be corrected during validation.
The Excel Hyperlink column type is useful if you, for example, have a file path to a PDF that you want to include in your resulting CSV. You can choose different formatting options to show it as a clickable hyperlink in Excel.
Double-click the Excel Hyperlink column type field or press the “Edit” button to open the setup window.

01 – Field: select the field that holds your hyperlink’s destination (e.g. filepath, URL, etc.).
02 – Link text: specify your hyperlink’s link text. You can choose a custom link text, show it as the file name or the full file name.
Double-click the Number column type field or press the “Edit” button to open the setup window.

01 – Field: select the field that holds your numeric value.
02 – Decimal symbol: specify the decimal symbol of your resulting number.
03 – Digits after decimal: specify the number of digits after the decimal. If you don’t want a decimal symbol and digits after the decimal, make the decimal symbol blank and enter 0 as the number of digits after decimal.
For example, “$2,265.00” will become “$2,265″.
04 – Convert bracketed number to negative values (100.00) -> -100.00: enable this option if you want to automatically convert numbers between brackets to negative values. Disable this option if you want to keep the original value and, optionally, correct them during validation.
05 – Clear invalid values: if this option is enabled, any invalid numbers become blank cells. By default, this is disabled, meaning that the original values of the invalid numbers are preserved and can be corrected during validation.
Double-click the Text column type field or press the “Edit” button to open the setup window.

01 – Field: select the field that holds your text value.
02 – Excel text: if your text column contain numbers like, for example, invoice numbers, you can enable this option to make sure your text values are displayed and treated as text in Excel.
If you open a CSV in Excel and the value of, for example, a report number is “000123456”, it will be displayed as “123456”. When you enable the Excel text option, a “=” character is added in front of the value to force value to be interpreted as text, preserving the leading zeroes:

Result with the “Excel text” option disabled

Result with the “Excel text” option enabled
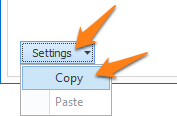
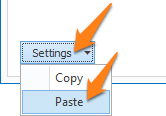
TIP: you can copy the current settings and paste it in another setup window of the same type. Do this by pressing the Settings button in the bottom left of the Setup window and by selecting Copy. Then open another setup window of the same type and select Paste.
After extracting the Name and Department line items from the table and setting up our Format CSV rule, we get the following result:
