060 MetaTool Extraction
The MetaTool setup opens the Extraction tab by default and provides access to the core feature set of MetaTool.
TIP: The thumbnail on the right will follow you to easily refer to the Setup window. Click on the thumbnail to make the image larger.
Here you can define a sequence of rules to extract and format data.
A basic set of rules could be:
- Extract the full text of page 1 using OCR
- Find a word in the full text matching a specific mask. For example, a word matching an account number format.
- Find a date on a line containing the words “Invoice Date”.
Typically you define a set of rules for each index field that you want to extract. You can define as many rules as you want.
There are many types of rules and even the most complex extraction processes can be defined. All this by combining easy to configure extraction rules.
Testing your rules is very easy. The viewer in MetaTool setup shows the documents in your current batch. And you can just press the Test button at any moment to try out your rules on any of the documents of your batch. Instantly the Test result is displayed in the results panel.
If you want to watch some short tutorial videos to learn how to setup MetaTool extraction rules, have a look at these videos.
Here is an overview of all rule types. Press the link for a detailed help:
Zonal extraction rules:
– Advanced Barcode
– Advanced OCR
– OCR (extra languages)
– Blank Detection
– Mark Detection
Find data rules:
– Find Line with Mask / Words
– Find Line with Line number
– Find Number
– Find Word with Mask / Words
Edit data rules:
– Keep characters
– Remove characters
– Remove text
– Replace text
– Set field value
– Calculate Date
– Calculate Number
Message rule:
– Show progress
Format data rules:
– Arabic
– Change case
– Date
– Number
– Text
01 Extraction – Setup
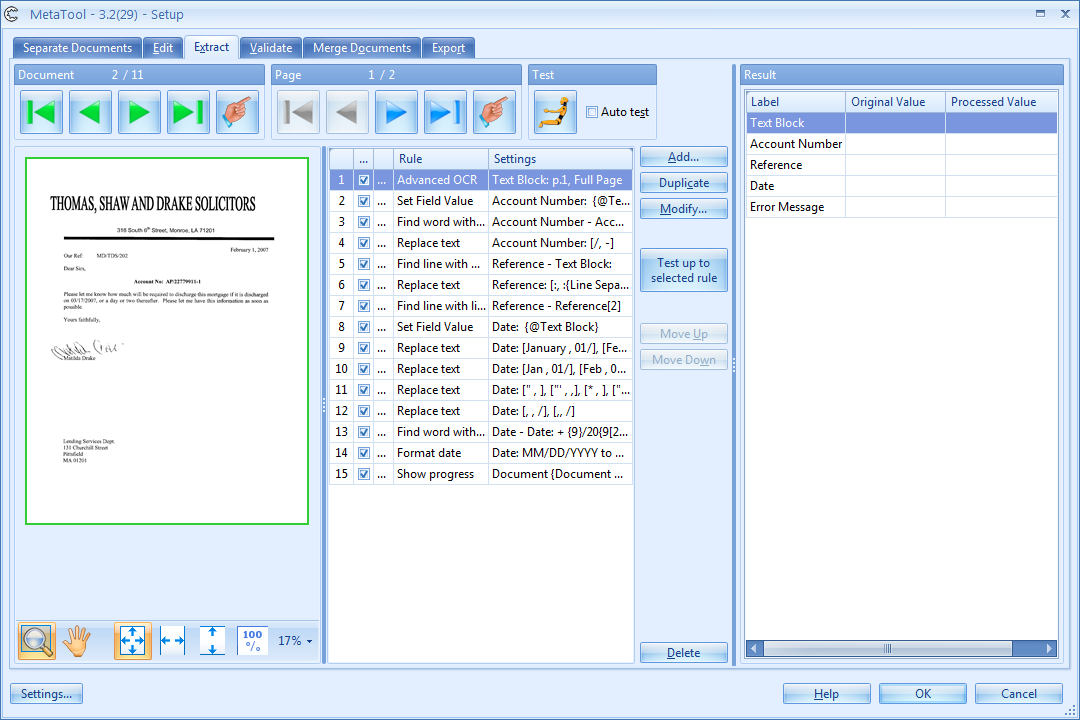
To set up your Extraction rules, press the Extract tab if it is not open yet.

The Extraction Setup shows the images of your current batch in the left panel. The green zone indicates the extraction zone of the current rule. In this case, it’s full page.
The middle panel shows your extraction rules. You can define as many rules as required.
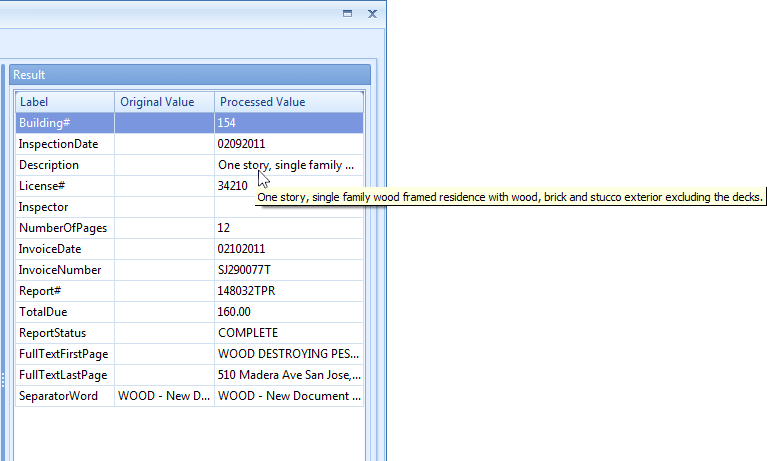
The right panel shows the index fields defined in Kofax Express. The Original Value column shows the values already extracted by Kofax Express (for example using its barcode reader). The Processed Value column shows the result of the extraction after pressing the Test button.
01 – Navigation Toolbar:
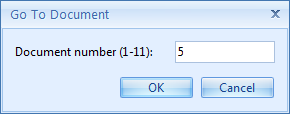
1) Document buttons: use the green buttons to navigate through the documents in the current batch.
Use the Go to document button to directly navigate to a specific document:
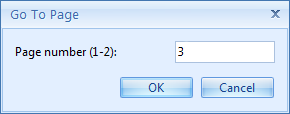
2) Page buttons: use the blue buttons to page through the current document if it has more than one page.
Use the Go to page button to directly navigate to a specific page in the document:
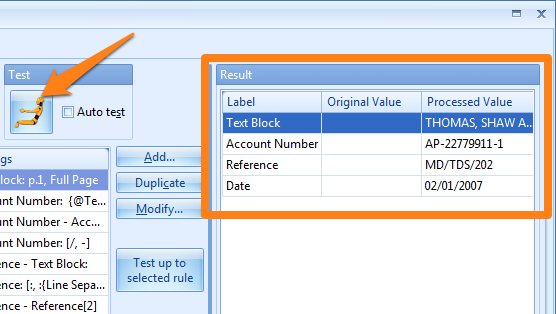
3) Test button: press the Test button to show the result in the “Processed value” column.
Enable the Auto test option to automatically do a test as you go through the documents of your test batch using the green document navivation buttons.
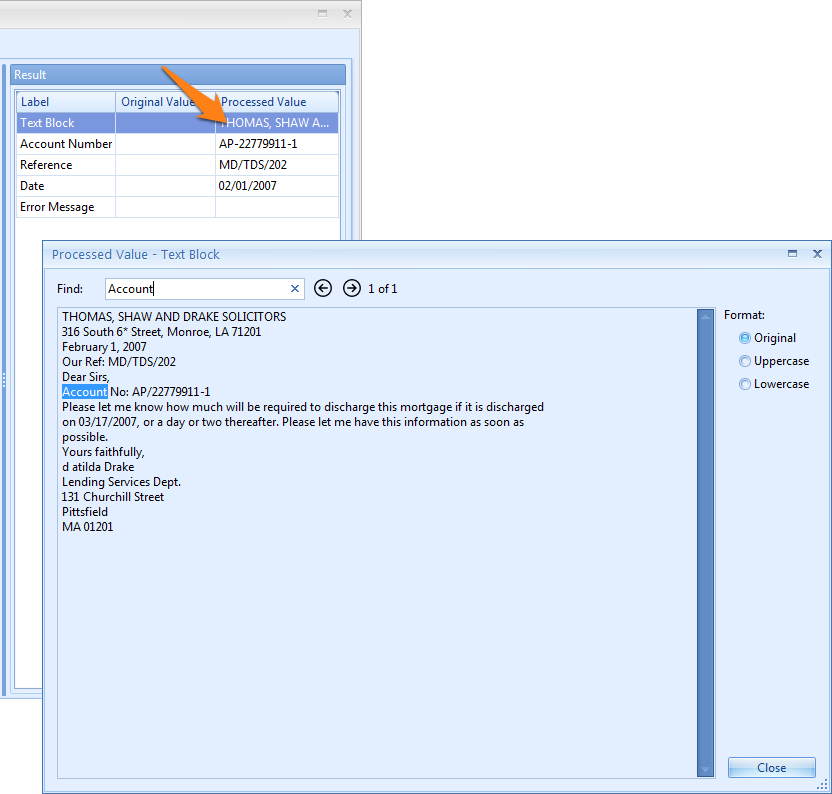
Searching the full text is useful when you want to search for a value in the full text OCR result that could not be found with the extraction rules. Analyzing the OCR result is often useful to understand why extraction rules fail.
Use the Format case option to switch the text to another case. In uppercase, it is easier to detect OCR errors like l versus I (in uppercase, that would be L versus I).
For example, the Voyage Code FI735R is hard to interpret for the OCR engine. The second position could be a lower case l and upper case I or a pipe character |:
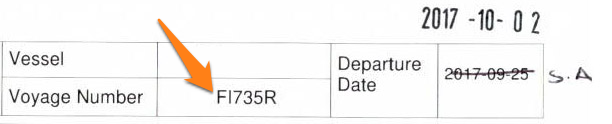
By switching the case, you can detect these kind of problems much easier:


04 – Modify: press the Modify button to open the Setup window of the currently selected rule. You can do the same by double-clicking the rule itself.
06 – Move up / Move down: press the Move up or Move down button to change the order of the Extraction rules.
The order of the rules influences the result. For example, if you want to format a date, you first need to extract the date with Advanced OCR and Find Date rules. The Format Date rule needs to occur after the extraction of the date.
02 The Viewer – Controls & Shortcuts
The viewer control is used in many MetaTool screens. The buttons and shortcuts to zoom and pan the image works in the same way across the product.
Below video demonstrates how to zoom and pan images in the MetaTool viewer: