080 MetaTool Validation
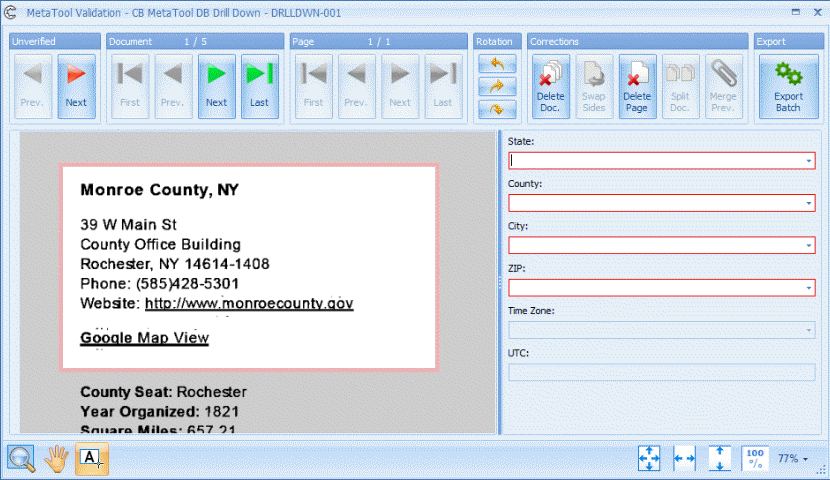
MetaTool features a highly optimized validation viewer. You can configure it to only display the fields you want to validate. Based on validation rules, the viewer will only show documents that don’t pass the rules. The relevant zone on the image is highlighted while the rest of the image is dimmed but still readable.
For very critical data, you can force the user to always check a field even if it passes the validation rules.
For every field type, you can enable Rubber band OCR to fill in data by drawing a rectangle around the information.
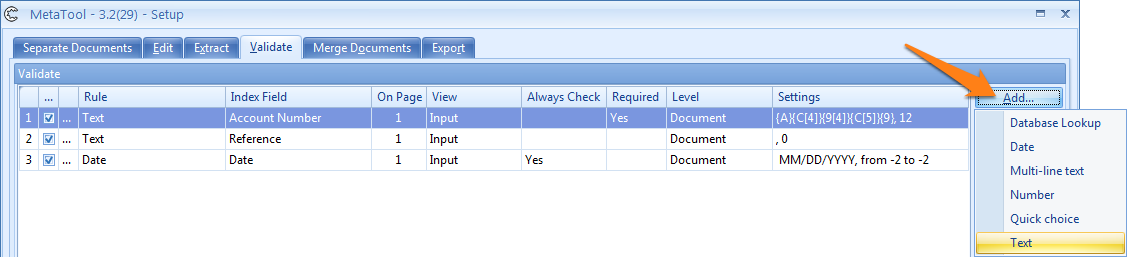
For index fields with only a few possible values, you can define Quick Choice fields. The quick choice options can be selected through single letter shortcuts.
Use Database Lookup to complete other index fields efficiently. You can define as many lookup fields as needed and connect each with multiple database tables. You can also trigger the lookup automatically by using extraction rules to extract the search value from the documents.


TIP: The thumbnail on the right will follow you to easily refer to the Setup window. Click on the thumbnail to make the image larger.
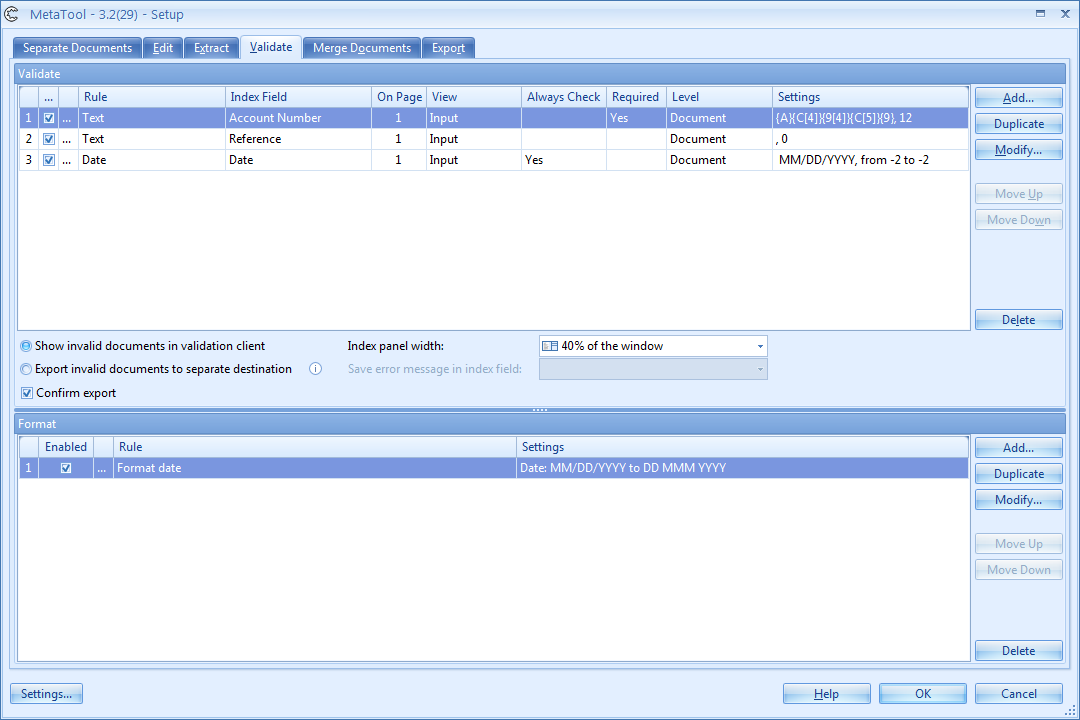
01 Validation Rules & Viewer Options
To add or edit validation rules, you need to select a batch in Kofax Express with at least one document. This is required to define the validation zoom zones on the image of a sample document.
Database Lookup: Kofax Express features basic database lookup out of the box, but CaptureBites MetaTool adds:
Automatic lookup using extracted OCR data: For example, extract the Tax ID (VAT Nr. ABN Nr,…) by means of MetaTool’s OCR and extraction rules and look up the matching supplier name and email using database lookup.
Multi Search Field lookup: Search a record through multiple lookup fields. For example, search for a supplier by Tax ID, Name or City
Drill down search: This is similar to searching for an address in a GPS – Sat / Nav device by drilling down from country to city to street. In business applications, drill down searches are used to search large database of employees, customers or products. Every search step filters the number of possible matches. For example, search first for the state, then for a company in that state, then for an employee name in that company.
Typically, database lookup is automatic and uses the result of extraction rules to trigger the lookup. If the automatic lookup fails, the user can then manually enter the first few letters of, for example, a Supplier Name to look it up in a supplier database. The user can also use the Rubber band OCR tool to trigger the lookup.
Click here to see the Database Lookup help-page.
Date: with the MetaTool Date Validation rule, you can validate if an automatically extracted date value is correct and if it is not, define settings to make the user manually enter a correct date. Manual entry can be semi-automated by using Rubber band or Single click OCR.

Click here to see the Date validation help-page.
Multi-line text: with the MetaTool Multi-line Validation rule, you can validate if an automatically extracted Multi-line text value is correct and if it is not, define settings to make the user manually enter a correct value. Manual entry can be semi-automated by using Rubber band or Single click OCR.
Click here to see the Multi-line validation help-page.
Number: With the MetaTool Number Validation rule, you can validate if an automatically extracted numeric value, such as a total amount or quantity and check if it is correct or not. You can define settings to make the user manually enter a correct number. Manual entry can be semi-automated by using Rubber band OCR or Single click OCR.

Click here to see the Number validation help-page.
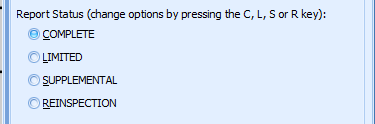
Quick choice: with the MetaTool Quick Choice Validation rule, you can validate if an automatically extracted value is correct and if it is not, define settings to make the user choose a value from a quick choice list.
Click here to see the Quick Choice validation help-page.
Text: with the MetaTool Text Validation rule, you can validate if an automatically extracted text value is correct and if it is not, define settings to make the user manually enter a correct value. Manual entry can be semi-automated by using Rubber band OCR or Single click OCR.

Click here to see the Text validation help-page.
This is practical during testing or when or diagnosing issues. You can temporarily expose index fields in validation during testing or support incidents and then disable them once the configuration is moved in production.
02 Invalid Documents & Viewer Options
Invalid documents are any documents that would normally open in the validation client because one or more validation rules failed.
For example, export valid documents to the final folder structure and send invalid documents via email, using the Email connector, to request manual filing of the invalid documents.
This is useful to display the reason why a document failed in an email message using the Email connector. Press the drop-down button to select an index field to hold the validation error message.

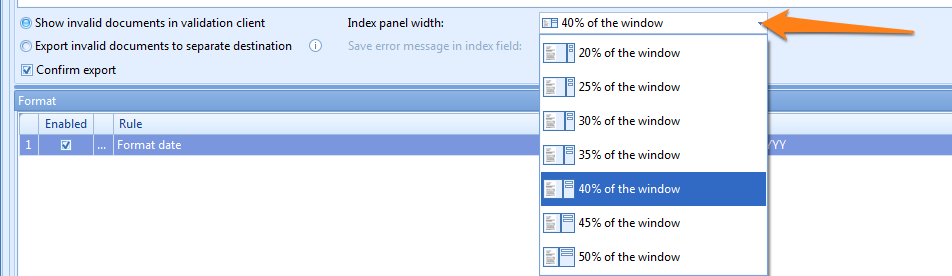
03 Validation Format Rules
You can set up extra format rules just after validation and before the documents are exported. For example, if the validation user has to manually type in a value, for example, a date, then it’s better to use a user-friendly format, like DD/MM/YYYY. But the exported format needs to be YYYYMMDD. By adding a Format rule, Format Date in this case, the value will be converted to the correct format.
You have access to Edit, Message and Format rules and they work identically as the rules in the Extraction tab. For a detailed explanation of each of the rules, please refer to:

For example, if you want to use the date in an index field setting the file name. Then you need to format the date first, then set the file name index field using the formatted date.
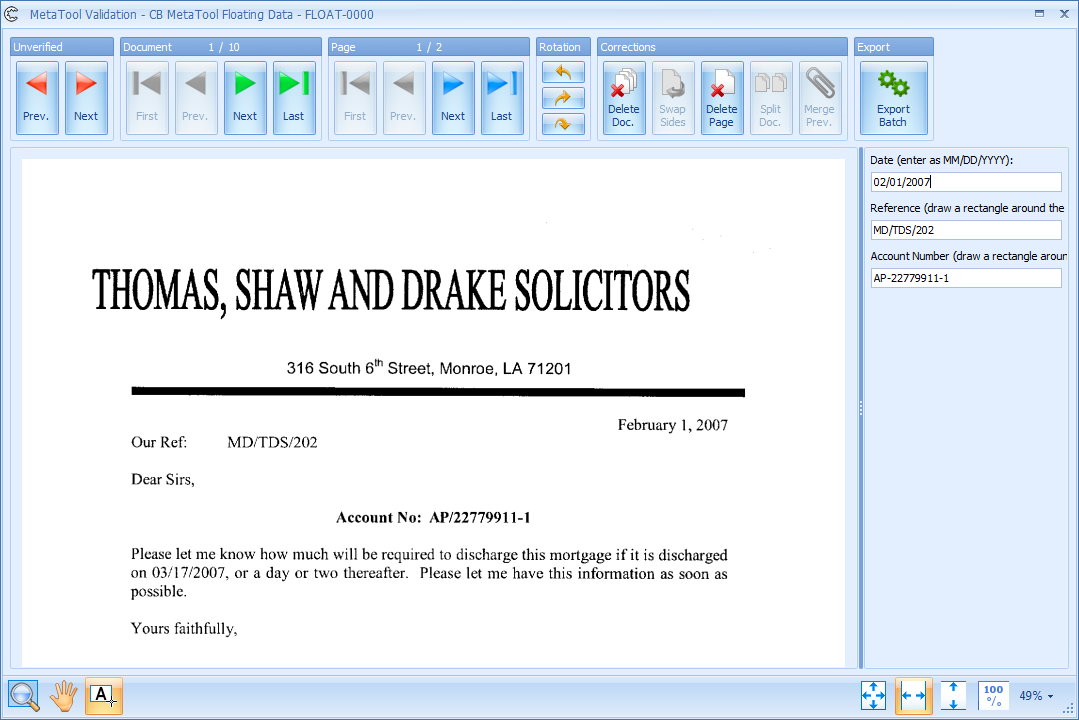
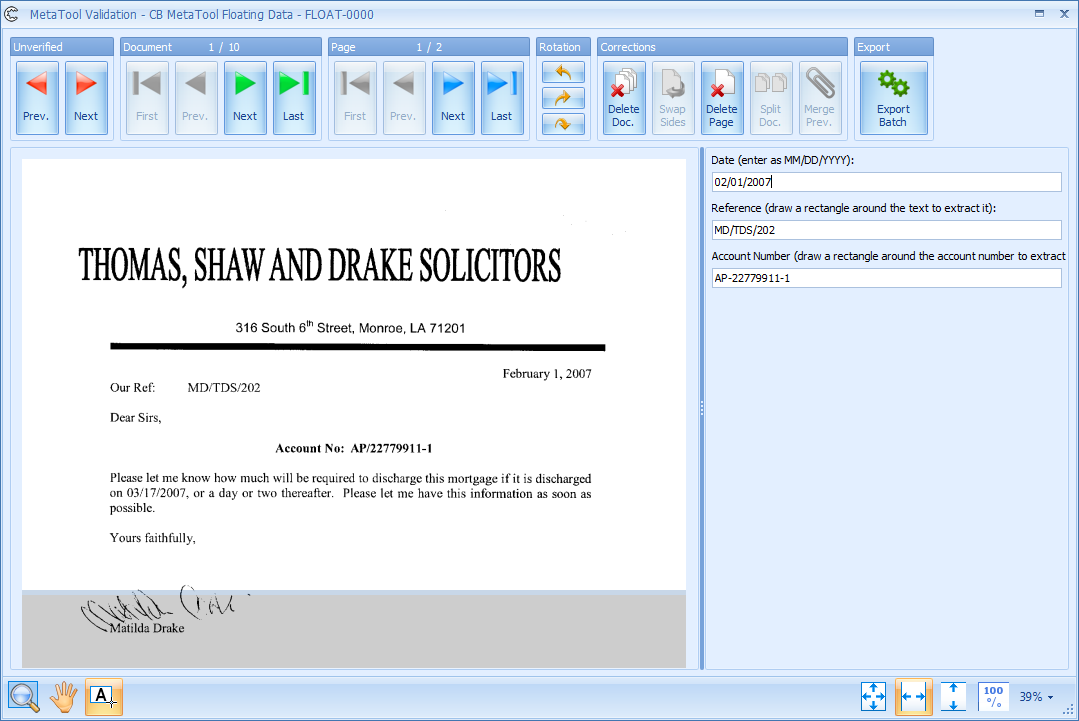
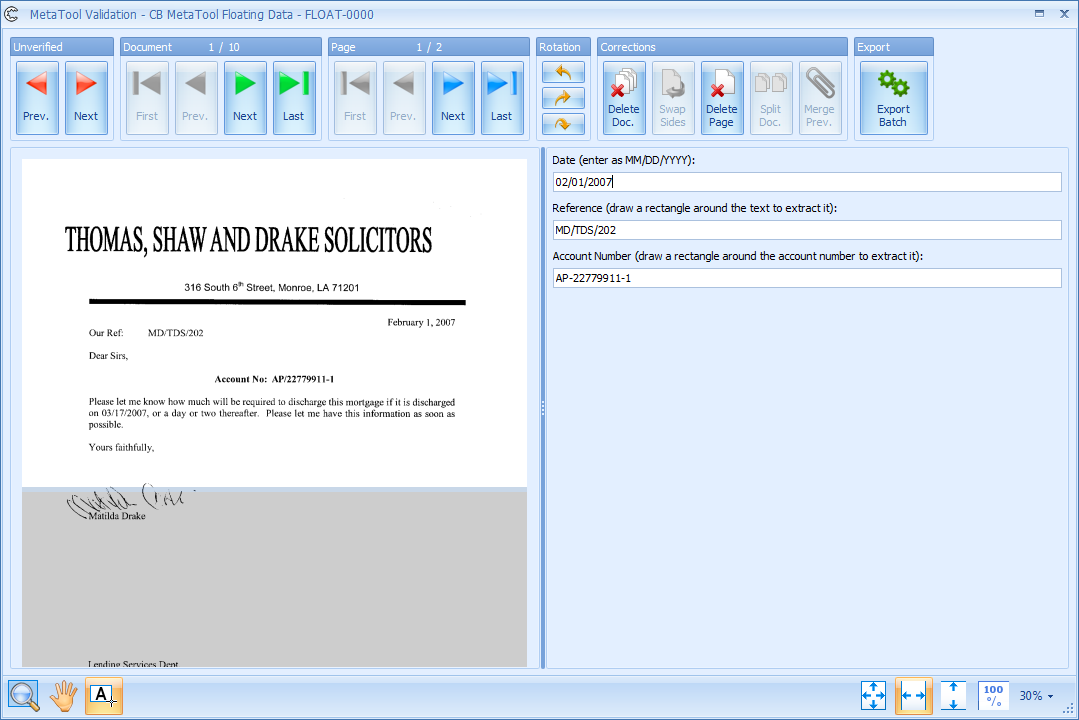
04 The Validation Screen
The validation screen will open if any of your defined validation rules fail. In this case, one of the index fields was set to “Always Check” and every document will require validation using the Validation screen.

2) Document buttons: use the green arrow buttons to navigate through all the documents, verified and unverified.
3) Page buttons: use the blue arrow buttons to page through the current document if it has more than one page.
4) Rotation buttons: use the yellow rotation buttons to rotate the current page.
5) Correction buttons: use these buttons to make corrections to the current document or page. Be aware that once you make a correction, you can’t undo it. However, you can always start validation from the beginning by canceling the validation. To cancel validation, use the Close (X button) in the right top corner of the Validation screen and re-export.
1) Delete Doc.: deletes the current document and the viewer opens the document following the deleted document.
2) Swap Sides: swaps the sides of the page of the documents that were scanned in duplex.
3) Delete Page: deletes the current page of the document and displays the page following the deleted page
4) Split Doc.: splits the current document starting with the currently selected page. The viewer displays the last page of the first segment of the split document. The second segment is considered as a new additional document in the batch. Any index data is cleared for this new document and the batch document counter increments with one.
5) Merge Prev.: merges the current document with the previous document. The index data of the previous document is preserved. The batch document counter decrements with one. In fact, the Merge Prev. tool can be used to undo a Split Doc. action.
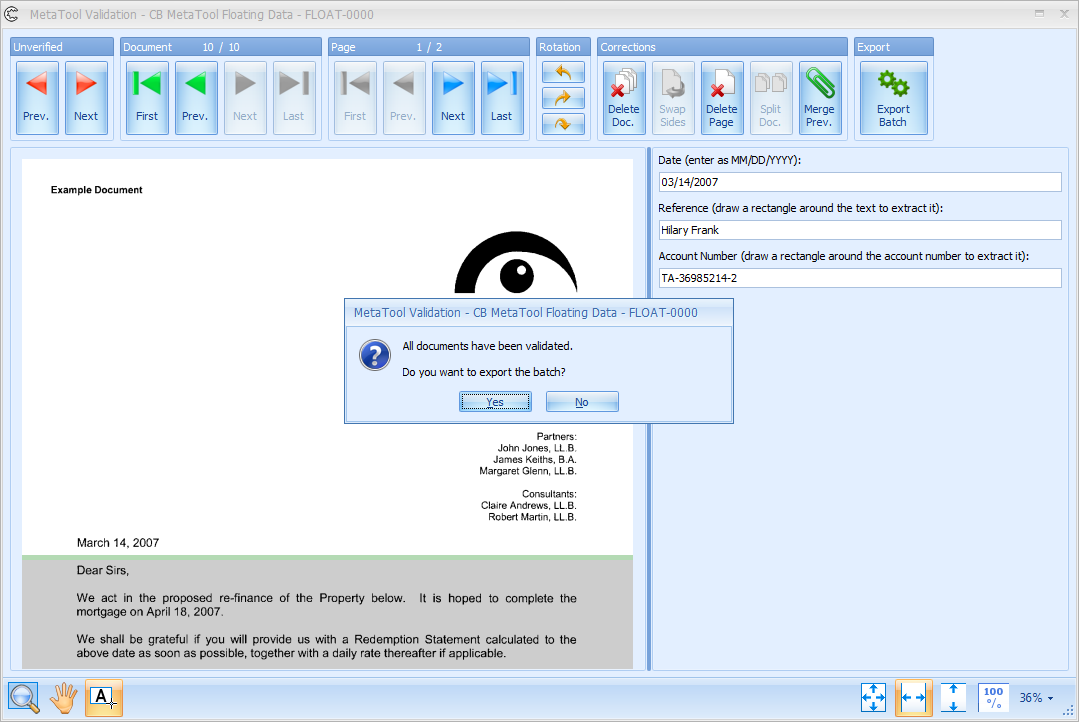
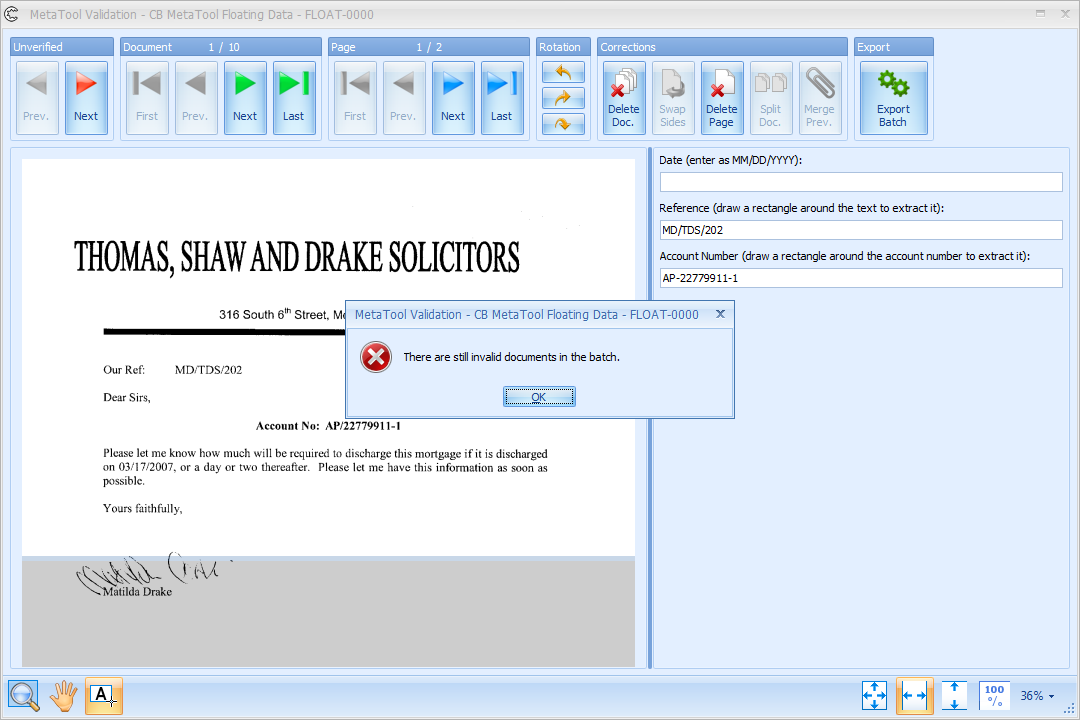
6) Export: press this button or press the Enter key to finalize validation and export.
If you have still have required values that are blank or incorrect index values in the batch, you will see a warning window pop up. Correct the missing or incorrect index field values and export again.
If you have enabled the Confirm Export option, you will see a confirmation window pop up after the last document has been validated. Press Yes to export the batch, press No if you still want to make changes to any of the index fields.
