MetaServer > Help > Kofax VRS
160-040 MetaServer Convert – Kofax VRS
With MetaServer’s Kofax VRS action, you can improve your document’s image quality.
Some of VRS’ key functions are:
Perfect Images: Get process-ready images by enhancing faint text, enabling better recognition and improving OCR extraction rates.
Color Detection: Detect and retain color in mixed batches of color and black and white documents without pre-sorting. Black and white pages are stored as very compact files. Pages containing color elements, are stored in color.
Automatic Deskew: Automatically crop and deskew each image based on lines and text on the documents. If you produce scanned documents with black borders, you can also apply edge deskew and auto-crop to remove the black edges.
Auto Orientation: Automatically rotate a page that is scanned upside down or incorrectly rotated left or right.
Blank Page Deletion: Intelligently delete blank pages.
Hole Punch Removal: Eliminate hole punch markings using the surrounding page color.
Cloud-Friendly Images: Suppress noisy backgrounds and shaded areas, resulting in ultra-compact image files that are ideal for display and rapid retrieval over the web.

To output the converted TIF or PDF:
Step 1: You add the Kofax VRS action before any Convert to Multipage TIF, JPG, Searchable PDF or PDF/A actions and before the Export action(s) used to output the converted document.
Step 2: In your Export action(s), select “Processed PDF / TIF /JPG” as the File source. More about that later.
To add the Kofax VRS action, select the action after which you want to insert the Kofax VRS action and press Add -> Convert -> Kofax VRS. The Setup window will automatically open.

You can also open the setup window of an existing Kofax VRS action by double clicking it or pressing the “…” button on the right side of the action, as shown below.

In our example, we will make use of the “KOFAX VRS” demo documents. You can find these demo documents in “C:\META-DEMO\MFP\KOFAX VRS”. You can add a Kofax VRS action to any existing or new workflow.
The “KOFAX VRS” demo documents are automatically installed with CaptureBites MetaServer.
TIP: The thumbnail on the right will follow you, so you can easily refer to the Setup window. Click on the thumbnail to zoom in.

Each demo document in the “KOFAX VRS” test folder has been selected to demonstrate specific features of Kofax VRS. You can see which features by looking at each document’s file name (e.g. “ADVANCED-CLARITY_HOLE-FILL.pdf”).
01 – Processing queues: the default is 1 queue. If you have very large document volumes, you can accelerate the processing speed by increasing the number of Kofax VRS processing queues. Setting the number of queues higher than 1 will let Kofax VRS process multiple documents in parallel. Please note that increasing the number of processing queues, will only show an effect if you have a multi-core computer.
02 – Apply: choose when to apply the rule. The default is set to “Always”, which means that the action is always applied. Press the drop-down arrow to see all other available conditions.

If you’ve selected another condition then the default “Always”, press the “…” next to the drop-down arrow to open the setup window of the selected condition.

1) If value of field: press the drop-down arrow to select the field value that needs to be evaluated.
2) is equal to / is not equal to / is greater than /…: enter the other value your field value needs to be compared with. You can also press the drop-down button to select different system and index values to compose your value.

In our example, we don’t need a special condition, so we select “Always”.
03 – Page: the Kofax VRS action has the unique ability to only convert specific pages of a document. You can specify the page number or ranges separated by commas. To convert all pages, leave the field empty.
Some examples:
1-5 = convert the 1st page to the 5th page
1,3, -1 = convert the 1st, the 3rd and the last page
-1 = convert the last page
2–1 = convert the 2nd page to the last page
1, 3-5, -2 = convert the 1st page, 3rd to the 5th page and the page before the last page.
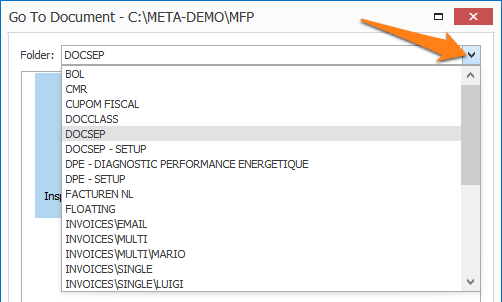
01 – Test Folder: to test your Kofax VRS settings, you need some test documents.
Just press the Test Folder button to browse to the folder containing your test documents or select one of your recently used test folders using the drop-down arrow. The last selected Test Folder is memorized per workflow.

02 – Document buttons: use the blue arrow buttons to navigate through the documents in the current test folder.
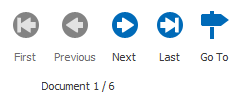
Use the Go to document button to directly navigate to a specific document.

Note: If you don’t see thumbnails in this window, you need to install a Windows PDF plugin to display PDF thumbnails. Please refer to these instructions for more details.
You can also use the drop-down arrow to browse in the test folder’s subfolders:
03 – Page buttons: if a document has more than one page, use the green arrow buttons to navigate through the pages of the document.

Use the Go to page button to directly navigate to a specific page of the current document:

04 – Mode: you can switch between three different modes:
1) Black and White: output images in black and white. This will enable the Black and White conversion settings in the settings column.
2) Color: output images in color. This will enable the Color conversion settings in the settings column.
NOTE: in color mode, if the original image is black and white, it will remain black and white.
3) Color Content Detection: Kofax VRS will automatically detect whether the original image is color or black and white and will apply the appropriate conversion settings. This will enable the Black and White and Color conversion, and Detection settings in the settings panel.
05 – Deskew: enable this option to straighten skewed pages. You can choose between the following options:
1) Deskew Edges: straighten skewed pages if the edges are skewed. This option requires dark borders around the page.
For example:

Original image

Image with deskewed edges

Image with deskewed edges and b&w conversion
2) Deskew Content: straighten skewed pages if the content is skewed.
For example:

Original image

Image with deskewed content

Image with deskewed content, b&w conversion, custom brightness, contrast and despeckle
06 – Crop: enable this option to crop the page to its edge. This option requires dark borders around the page.
NOTE: enable the Crop option to make the Edge Cleanup option available.
For example:
Original image

Image with deskewed edges and cropped

Image with deskewed edges, cropped and b&w conversion
07 – Edge Cleanup: enable this option to remove thin contour lines around the edges of the page after cropping.
NOTE: the Edge Cleanup option is only available if you’ve enabled the Crop option
For example:

Close-up original image

Image cropped with edge cleanup
08 – Hole Fill: enable this option to fill up punch holes using the background color of the page. For black and white documents, the holes will be filled with white.
09 – Blank Delete: enable this option to delete blank pages from your document. You can adjust the following settings:
1) Sensitivity: with a low sensitivity value, a page with noisy background elements (e.g. speckles and lines) is still considered as a blank page. Increase the value if you only want to delete pages that are completely blank.
2) Ignore Holes: enable this option to ignore (punch) holes along the edges of the page.
10 – Rotation: you can choose to rotate the specified page(s) in a certain direction (90° left, 90° right or 180°) or to automatically rotate them so the text orientation is corrected.
For example:

Original image
Image with deskewed content, auto rotated and cropped
01 – Test button / Auto Test Mode: press the Test button to show the converted version of the current page and get additional information like if the original page was scanned or electronic, if it was black and white or color, if the page was considered blank and if the resulting page was actually converted.
Auto test: press the drop-down arrow next to the Test button to enable Auto Testing. With this you can automatically test each document as you browse through them using the blue document navigation buttons.

02 – Result: when testing, the result column will also show if:
– The document contains scanned pages (yes/no)
– Page is black and white (yes/no)
– Page is converted (yes/no)
– Color content detected (yes/no), for Color Content Detection mode
– Page is blank (yes/no), when the Blank Delete option is enabled


When enabled, the log files can be found here:
C:\ProgramData\CaptureBites\Programs\MetaServer\Data\Log
These settings are only available in Black and White mode or Color Content Detection mode.
01 – Brightness: by increasing the brightness value, you make the scanned image brighter. Enable Auto mode to let Kofax VRS automatically optimize the brightness.
02 – Contrast: the contrast value adjusts the clarity of text and line objects. Enable Auto mode to let Kofax VRS automatically optimize for text readability and clarity.
1) Sensitivity (Auto): the default sensitivity level is 4. Higher sensitivity levels will suppress background objects like watermarks and patterns without affecting text and lines.
2) Edge aggressivity (Manual): a fine-tuning parameter for the manual contrast setting. The optimal value for this setting is typically determined by a process of trial and error. In general, very faint text (e.g. carbon copy text) will become more pronounced when decreasing this value. However, lower values will also generate noisy images. When in doubt, we recommend keeping the default value of 50.
03 – Gamma: gamma adjusts the contrast and brightness in the mid-tones. It’s a more advanced control that helps with low contrast pages (e.g. carbon copy text) to make the text more readable. We recommend only adjusting the gamma value if all the documents in the workflow are of the same quality.
1) Sensitivity (Auto): the default sensitivity level is 4. Higher sensitivity levels will suppress background objects like watermarks and patterns without affecting text and lines.
2) Edge aggressivity (Manual): a fine-tuning parameter for the manual contrast setting. The optimal value for this setting is typically determined by a process of trial and error. In general, very faint text (e.g. carbon copy text) will become more pronounced when decreasing this value. However, lower values will also generate noisy images. When in doubt, we recommend keeping the default value of 50.
For example:

Close-up original image

Image with auto-brightness and contrast

Image with brightness 20, constrast 20, gamma -10 and thickening level 3
04 – Drop out: when working with forms with lines and labels or highlights in red, green or blue, we can filter these out by using the drop out setting.
For example:

Close-up original image

Image without drop out

Image with red drop out
05 – Thickening: when extracting dot matrix printed text, you can use this option to make the text bolder. This improves text accuracy considerably. Negative values make characters thinner.
For example:
Close-up original image
Image without thickening
Image with brightness 20, contrast 20, gamma -10 and thickening level 3
06 – Despeckle: enable this option to remove speckles from your page(s). Be aware that high values may remove commas, periods or small text.
For example:

Close-up original image

Image despeckled
07 – Also convert text based PDF pages: enable this option to force Kofax VRS to also convert electronic / text-based PDFs. Because these types of documents are very compact by nature, we advise not to convert .
NOTES:
Electronic / Text-based PDFs are generated by a computer program like MS Word an Invoice or report creation software etc. Text-based PDFs already contain computer text represented by fonts. This type is very compact and, if you convert it to a black and white image, the size will typically increase. That is why we skip the conversion of these PDFs by default.
Scanned / Image-based PDFs contain an image of each of the pages of the document and require OCR (Optical Character Recognition) to convert the images to computer text.
The JPG, PNG and TIF formats only supports images. Consequently, these formats are always processed by Kofax VRS.
08 – Do not convert pages below [x] dpi: text on low resolution pages (anything below 200 dpi) may become unreadable after conversion to black and white. Enable this option to keep those pages in color. You can set the resolution limit between 50 and 600 DPI.
These settings are only available in Color mode or Color Content Detection mode.
01 – Brightness: by increasing the brightness value, you make the scanned image brighter.
02 – Contrast: the contrast value adjusts the clarity of text and line objects.
03 – Gamma: gamma adjusts the contrast and brightness in the mid-tones. It’s a more advanced control that helps with low contrast pages (e.g. carbon copy text) to make the text more readable. We recommend only adjusting the gamma value if all the documents in the workflow are of the same quality.
04 – Smoothing: enable this option to smooth the background.
1) Level: the default is level 50. This specifies the degree of smoothing applied.
2) Snap background to white: enable this option to switch the background color to white.
For example:

Original image

Image with brightness 50, contrast 55, and smoothing
These settings are only available in Color Content Detection mode.
01 – Color content detection: this specifies the overall sensitivity to color content. Increase this level to also detect pages with few color objects (e.g. small company logos, stamps, etc.). Decrease this level to, for example, ignore blue streaks or blotches created by your scanner or printer.
02 – Detect small color objects: this specifies the sensitivity to small color objects. Increase this level to also detect pages with very small objects (e.g. red check marks, highlighted text, etc.)
For example:

Close-up original image

Image with the “Detect small color objects” option disabled
03 – Ignore background color: enable this option to convert pages with a colored background to black and white.
For example:
Close-up original image
Image with the “Ignore background color” option enabled
TIP: you can copy the current settings and paste them in another setup window of the same type. Do this by pressing the Settings button in the bottom left of the Setup window and by selecting Copy. Then open another setup window of the same type and select Paste.


To export the converted documents, expand the File Source(s) list in your export action(s) and select “Processed PDF / TIF / JPG”.
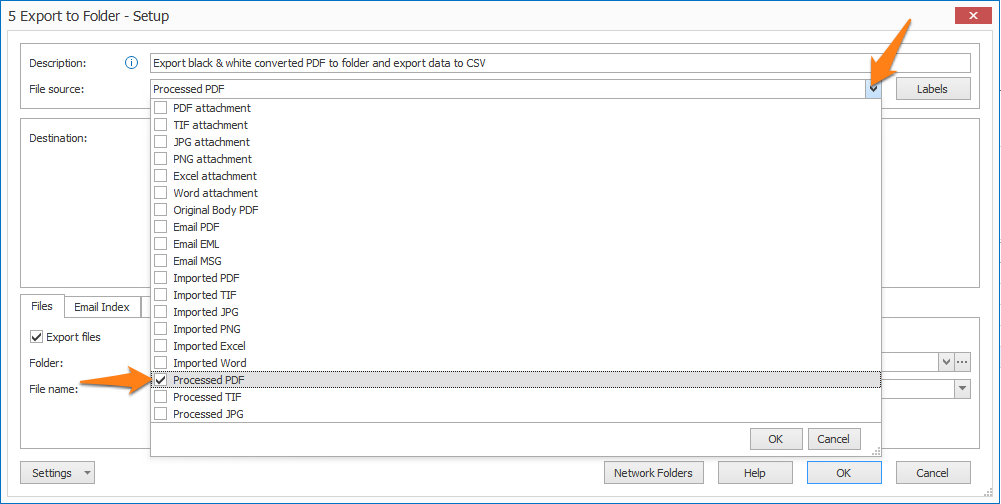
File source selection in Export to Folder
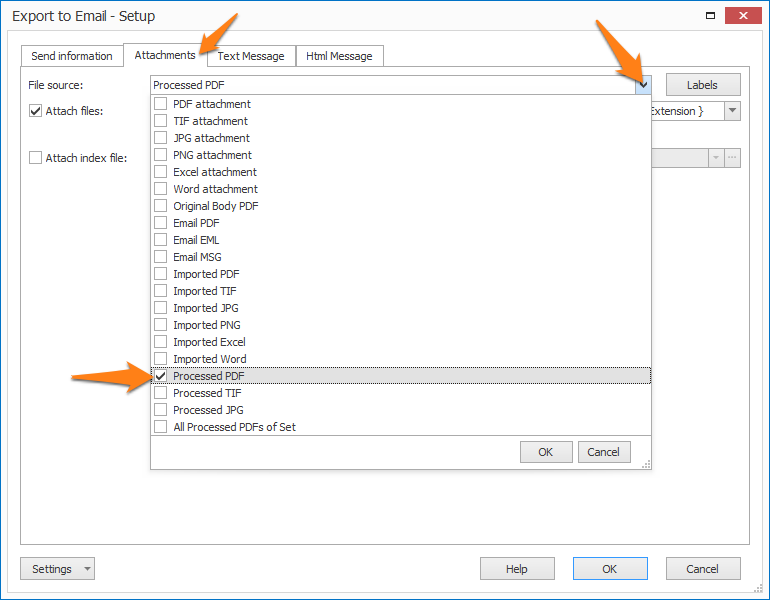
File source selection in Export to Email, if you want to attach the converted document to the email