MetaServer > Help > Extract > Set Field Value
120-470 MetaServer Edit – Set Field Value
With MetaServer’s Set Field Value rule, you can put text in an index field, replace tabs and line separators with any other text and you can extract specific segments from a value. This can all be done with or without conditions (up to 3 conditions).
It’s often used in combination with the Extract Text rule. You run the OCR engine only once and copy the result to different fields for further modification. In that way, the original extracted text stays intact and only the copied text is transformed for each field individually.
You typically define an Extract Text rule first and place the full page’s text in a “Full Text” field. Next, you would define a Set field value rule to copy the result in another field for further processing.
It’s also useful for:
– Setting default values
– Combining values
– Setting different values conditionally
– Extracting segments from a barcode value using separators such as “,”,“-“ etc.
Example: You want to send an email if someone added a note during validation. To accomplish this, you would add an Extract action after the Validate action. In that Extract action, you add a Set Field Value rule where, if the “Note” field is not blank, you set the “E-mail” field value to the recipient’s e-mail address. If there is no note, the “E-mail” field value stays blank and the e-mail won’t be .
In our example, we will make use of the “CB – INSPECTION REPORTS” workflow. This workflow is automatically installed with CaptureBites MetaServer.
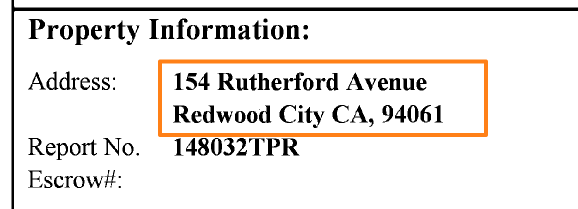
We want to extract the property’s address from the last page of each report. Using a Find Line with Mask / Words rule, we can extract the address lines using the address label.
We want to convert the 2 separate lines to 1 complete address line. To do this, we use a Set Field Value rule.
Set Field Value rules are defined in a MetaServer Extract or Separate Document / Process Page action.
To add this rule, press the Add button and select Edit -> Set Field Value
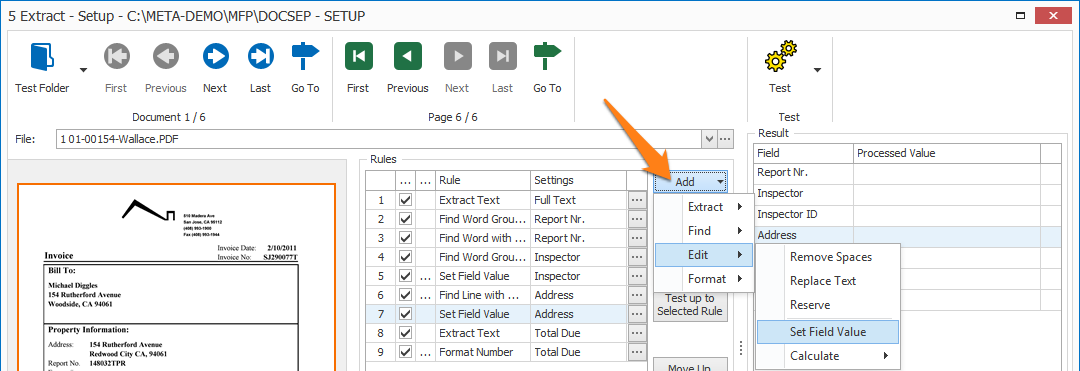
After extracting the address, we want to convert the 2 separate address lines to a single address line.
TIP: The thumbnail on the right will follow you, so you can easily refer to the Setup window. Click on the thumbnail to zoom in.
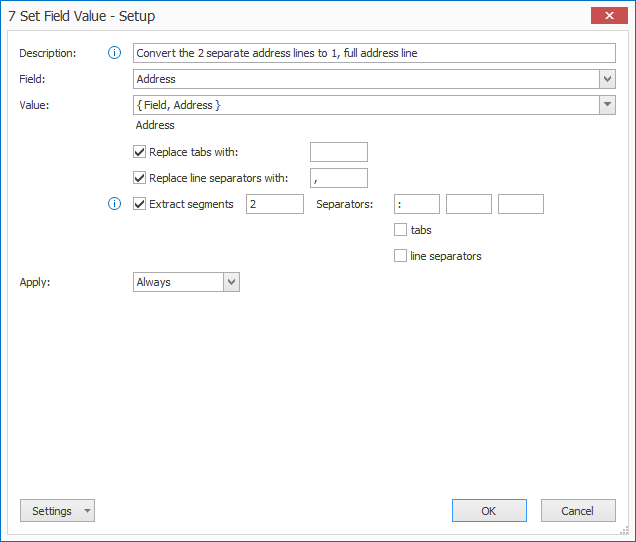
First, add a description to your rule. Then, select the field to hold the extracted data. In this case, we select the field “Address”.
01 – Value: enter the value you want to copy in the selected index field. Press the drop-down button to select different system and field values to compose your text.
In our example case, we want to edit the value in the address field, so we select the “Address” field again.
- Clear
- My text here
- {{}}
- { Space }
• Line:
-
- { Line Separator }
- { Line Number }
- { Line Count }
• System:
-
- Server:
- { Server User Name }
- { Server Computer Name }
- { Server Version }
- { Server Unit of Length }
- in
- cm
- Operator:
- { Operator User Name }
- { Operator Computer Name }
- { Operator Working Time }
- { Operator Total Working Time }
- Current Date:
- { Current Date, System }
- { Current Date, DDMMYYYY }
- { Current Date, DD }/{ Current Date, MM }/{ Current Date, YYYY }
- { Current Date, DD }-{ Current Date, MM }-{ Current Date, YYYY }
- { Current Date, MMDDYYY }
- { Current Date, MM }/{ Current Date, DD }/{ Current Date, YYYY }
- { Current Date, MM }-{ Current Date, DD }-{ Current Date, YYYY }
- { Current Date,YYYYMMDD }
- { Current Date, YYYY }/{ Current Date, MM }/{ Current Date, DD }
- { Current Date, YYYY }-{ Current Date, MM }-{ Current Date, DD }
- { Current Date, JJJ }
- { Current Date, YYJJJ }
- { Current Date, DD }
- { Current Date, DDD }
- { Current Date, MM }
- { Current Date, MMM }
- { Current Date, YY }
- { Current Date, YYYY }
- { Current Date, W }
- { Current Date, WW }
- Current Time:
- { Current Date, System }
- { Current Date, HHmmss }
- { Current Time, HH }:{ Current Time, mm }:{ Current Time, ss }
- { Current Date, HHmmsstt }
- { Current Time, HH }:{ Current Time, mm }:{ Current Time, ss }:{ Current Time, tt }
- { Current Time, HH }
- { Current Time, hh }
- { Current Time, ss }
- { Current Time, tt }
• Workflow:
-
- { Workflow Name }
• Document:
-
- { Document Unique Id }
- Reject:
- { Reject Reason Number }
- { Reject Reason }
- { Document Number }
- { Document Count }*
- Page:
- { Document Page Number }
- { Document Page Count }
- { Document Page Width }
- { Document Page Height }
- { Document File Size }
- { Document Dominant Language }
- { Document Source }*
- { Document File Type }*
- { Document PDF Compliance }
* Additional information:
| Metadata Field | Description | Value(s) |
| { Document Count } |
This variable contains the number of documents of a set OR the number of valid attachments of an email. |
|
| { Document Source } |
Typically used in a Set Field Value rule to populate a field with the "Document File Type" or "Document Source". Next, you can use a Distribute action to handle each type separately. |
Imported Document Attachment Email Body |
| { Document File Type } |
Contains the format of the imported file. |
Unknown Excel JPG TIF PNG PDF Unknown PDF Image PDF Image with text PDF Text PDF AcroForm PDF XFA PDF Corrupt PDF Password Protected Word |
• Email:
-
- Inbox:
- { Email Inbox Name }
- { Email Inbox Address }
- { Email Inbox SSL }
- { Email Inbox Port }
- { Email Inbox User Name }
- { Email Unique ID }
- { Email Import Condition }
- Date:
- { Email Date, System }
- { Email Date, DDMMYYYY }
- { Email Date, DD }/{ Email Date, MM }/{ Email Date, YYYY }
- { Email Date, DD }-{ Email Date, MM }-{ Email Date, YYYY }
- { Email Date, MMDDYYY }
- { Email Date, MM }/{ Email Date, DD }/{ Email Date, YYYY }
- { Email Date, MM }-{ Email Date, DD }-{ Email Date, YYYY }
- { Email Date,YYYYMMDD }
- { Email Date, YYYY }/{ Email Date, MM }/{ Email Date, DD }
- { Email Date, YYYY }-{ Email Date, MM }-{ Email Date, DD }
- { Email Date, JJJ }
- { Email Date, YYJJJ }
- { Email Date, DD }
- { Email Date, DDD }
- { Email Date, MM }
- { Email Date, MMM }
- { Email Date, YY }
- { Email Date, YYYY }
- { Email Date, W }
- { Email Date, WW }
- Time:
- { Email Date, System }
- { Email Date, HHmmss }
- { Email Time, HH }:{ Email Time, mm }:{ Email Time, ss }
- { Email Date, HHmmsstt }
- { Email Time, HH }:{ Email Time, mm }:{ Email Time, ss }:{ Email Time, tt }
- { Email Time, HH }
- { Email Time, hh }
- { Email Time, ss }
- { Email Time, tt }
- From:
- { Email From Name }
- { Email From Address }
- { Email From Full }
- To:
- { Email To Name }
- { Email To Address }
- { Email To Full }
- { Email To Name, 1 }
- { Email To Address, 1 }
- { Email To Full, 1 }
- Cc:
- { Email Cc Name }
- { Email Cc Address }
- { Email Cc Full }
- { Email Cc Name, 1 }
- { Email Cc Address, 1 }
- { Email Cc Full, 1 }
- { Email Subject }
- Attachment:
- { Email Attachment Name }
- { Email Extension }
- { Email Page Count }
NOTE: To get the number of valid attachments of an email, please use the { Document Count } variable.
- { Email Attachments List }
- { Email Body Text }
• Import:
-
- Date:
- { Import Date, System }
- { Import Date, DDMMYYYY }
- { Import Date, DD }/{ Import Date, MM }/{ Import Date, YYYY }
- { Import Date, DD }-{ Import Date, MM }-{ Import Date, YYYY }
- { Import Date, MMDDYYY }
- { Import Date, MM }/{ Import Date, DD }/{ Import Date, YYYY }
- { Import Date, MM }-{ Import Date, DD }-{ Import Date, YYYY }
- { Import Date,YYYYMMDD }
- { Import Date, YYYY }/{ Import Date, MM }/{ Import Date, DD }
- { Import Date, YYYY }-{ Import Date, MM }-{ Import Date, DD }
- { Import Date, JJJ }
- { Import Date, YYJJJ }
- { Import Date, DD }
- { Import Date, DDD }
- { Import Date, MM }
- { Import Date, MMM }
- { Import Date, YY }
- { Import Date, YYYY }
- { Import Date, W }
- { Import Date, WW }
- Time:
- { Import Date, System }
- { Import Date, HHmmss }
- { Import Time, HH }:{ Import Time, mm }:{ Import Time, ss }
- { Import Date, HHmmsstt }
- { Import Time, HH }:{ Import Time, mm }:{ Import Time, ss }:{ Import Time, tt }
- { Import Time, HH }
- { Import Time, hh }
- { Import Time, ss }
- { Import Time, tt }
- File:
- { Import File Page Count }
- { Import File Full Path and Name }
- { Import File Full Name }
- { Import File Name }
- { Import File Extension }
- { Import File Root }
- { Import File Full Path }
- { Import File Subfolder }
- Subfolder level (1-10):
- { Import File Subfolder, (1-10) }
- Date:
• Export:
-
- Date:
- { Export Date, System }
- { Export Date, DDMMYYYY }
- { Export Date, DD }/{ Export Date, MM }/{ Export Date, YYYY }
- { Export Date, DD }-{ Export Date, MM }-{ Export Date, YYYY }
- { Export Date, MMDDYYY }
- { Export Date, MM }/{ Export Date, DD }/{ Export Date, YYYY }
- { Export Date, MM }-{ Export Date, DD }-{ Export Date, YYYY }
- { Export Date,YYYYMMDD }
- { Export Date, YYYY }/{ Export Date, MM }/{ Export Date, DD }
- { Export Date, YYYY }-{ Export Date, MM }-{ Export Date, DD }
- { Export Date, JJJ }
- { Export Date, YYJJJ }
- { Export Date, DD }
- { Export Date, DDD }
- { Export Date, MM }
- { Export Date, MMM }
- { Export Date, YY }
- { Export Date, YYYY }
- { Export Date, W }
- { Export Date, WW }
- Time:
- { Export Date, System }
- { Export Date, HHmmss }
- { Export Time, HH }:{ Export Time, mm }:{ Export Time, ss }
- { Export Date, HHmmsstt }
- { Export Time, HH }:{ Export Time, mm }:{ Export Time, ss }:{ Export Time, tt }
- { Export Time, HH }
- { Export Time, hh }
- { Export Time, ss }
- { Export Time, tt }
- File:
- { Export File Page Count }
- { Export File Full Path and Name }
- { Export File Full Name }
- { Export File Name }
- { Export File Extension }
• Creation:
-
- Date:
- { Creation Date, System }
- { Creation Date, DDMMYYYY }
- { Creation Date, DD }/{ Creation Date, MM }/{ Creation Date, YYYY }
- { Creation Date, DD }-{ Creation Date, MM }-{ Creation Date, YYYY }
- { Creation Date, MMDDYYY }
- { Creation Date, MM }/{ Creation Date, DD }/{ Creation Date, YYYY }
- { Creation Date, MM }-{ Creation Date, DD }-{ Creation Date, YYYY }
- { Creation Date,YYYYMMDD }
- { Creation Date, YYYY }/{ Creation Date, MM }/{ Creation Date, DD }
- { Creation Date, YYYY }-{ Creation Date, MM }-{ Creation Date, DD }
- { Creation Date, JJJ }
- { Creation Date, YYJJJ }
- { Creation Date, DD }
- { Creation Date, DDD }
- { Creation Date, MM }
- { Creation Date, MMM }
- { Creation Date, YY }
- { Creation Date, YYYY }
- { Creation Date, W }
- { Creation Date, WW }
- Time:
- { Creation Date, System }
- { Creation Date, HHmmss }
- { Creation Time, HH }:{ Creation Time, mm }:{ Creation Time, ss }
- { Creation Date, HHmmsstt }
- { Creation Time, HH }:{ Creation Time, mm }:{ Creation Time, ss }:{ Creation Time, tt }
- { Creation Time, HH }
- { Creation Time, hh }
- { Creation Time, ss }
- { Creation Time, tt }
- Fields
- Field labels
- Field confidence levels
- Field line counts
Using our example:
“Address:→154 Rutherford Avenue
Redwood City CA 94061”
After replacing the tabs with a space:
“Address: 154 Rutherford Avenue
Redwood City CA 94061”
Using our example:
“Address: 154 Rutherford Avenue
Redwood City CA 94061”
After replacing the line separators with a comma and a space “, “:
“Address: 154 Rutherford Avenue, Redwood City CA 94061”
Using our example:
“Address: 154 Rutherford Avenue, Redwood City CA 94061”
After defining “:” (colon) as the separator, you can choose to extract the following segments:
Segment 1 = Address
Segment 2 = 154 Rutherford Avenue, Redwood City CA 94061
By extracting segment 2, you only keep the address part without the label.
You can also enter negative values or ranges in the segment selection box.
-1 = the last value
-2 = the value before the last value
1,-3–1= the 1st value and the three last values
Etc.
05 – Apply: choose to only apply the rule if 1 or multiple conditions are met. By default, the rule is always applied.
You can set up a condition by pressing the drop-down arrows to select a conditional field, the condition itself and, if applicable, the value the selected conditional field needs to be compared with. You can set a fixed value or select different system and index values to compose your value.
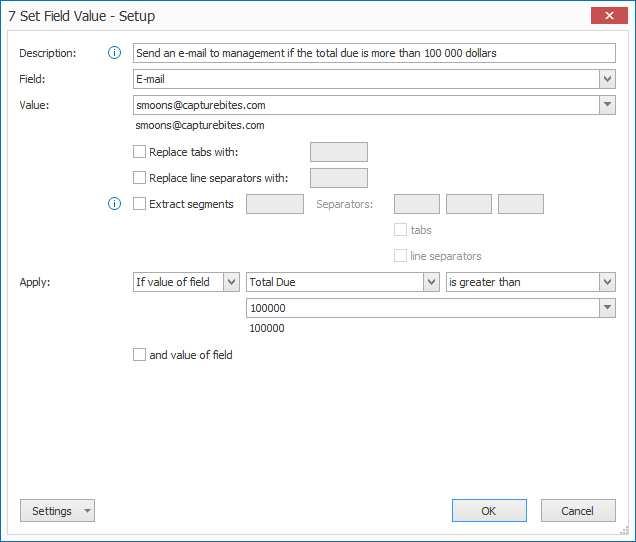
For example, management needs to receive an email with the document attached when the total due is more than 100 000 dollars. To do this, you set the “E-mail” field to the manager’s e-mail address if the Total Due value is greater than 100000:
06 – and value of field: you can define up to 3 conditions by pressing the “and value of field” button.
TIP: you can copy the current settings and paste them in another setup window of the same type. Do this by pressing the Settings button in the bottom left of the Setup window and by selecting Copy. Then open another setup window of the same type and select Paste.


IMPORTANT: Since MetaServer version 3.1.24, we have introduced the Format CSV rule which performs automatic merging and formatting of multi-line fields for compatible CSV. You can also specify each column in your CSV and further format them as CSV, Date and Time, Excel Hyperlink, Number or Text fields.
For legacy purposes, we’ll keep the below guide available.
Combining multi-line fields as CSV is important when you want to extract line items on an invoice with the Extract (Azure Form Recognizer) rule.
To validate line items as a table with different columns, you can merge all line items in 1 field using a Set Field Value rule. The line-item field would then contain all line items in a CSV format.
For example:
“5138489C”,”TRAXION MENACE CREW”,”9.00″,”EACH”,”10″,””,”90.00″
“5138489D”,”TRAXION MENACE CREW “,”9.00″,” EACH “,”2″,””,”18.00″
“5144035″,”STADIUM II BACKPACK”,”30.00″,” EACH “,”1″,”3″,”90.00″
“5142723″,”STRIKER II TEAM BACKPACK”,”22.50″,” EACH “,”1″,””,”22.50″
… would look like this in validation using a Validate CSV rule:

Step 1: Create a field for your Line Items (e.g. “Line Items”).
Step 2: Extract the line items from your document with an Extract Text (Azure Form Recognizer) rule.

Step 3: Add a Set Field Value rule for the “Line Items” field and put each field containing line items between quotation marks (“”) and separate them with a comma (,) or semicolon (;). Make sure you put them in the correct order.
Even though each field contains multiple lines, the Set Field Value rule will repeat the quotation marks and the separator character for each line item.
Using our example, if you set up your Set Field Value rule for the “Line Items” field like this:

The CSV output should be like this:
“Article”,”Description”,”Unit Price”,”Unit”,”Quantity”,”Tax Rate”,”Total”
“CB-META-SRVR-STD”,”CaptureBites MetaServer”,”2400.0″,”pcs”,”1″,”20″,”288.00″
“CB-CONSLT”,”Installation”,”175.0″,”h”,”8″,”20″,”168.00″
“CB-META-EMLI”,”Import from Email”,”55.0″,”pcs”,”1″,”20″,”6.60″
“CB-META-SHRP”,”Export to SharePoint”,”995.0″,”pcs”,”1″,”20″,”119.40″
…
NOTE: The header can be set in your Validate CSV rule and your Export to Folder action.
NOTE: If you combine fields with multiple values and a field with a single value, for example invoice header data (e.g. currency, invoice number, invoice date, vendor name, etc.), then the single value will be repeated for each line item.
For example:
“{ Field, Invoice Nr. }”,”{ Field, Line Items Article }”
Will result in:
“FV/179/2019/5076″,”CB-META-SRVR-STD”
“FV/179/2019/5076″,”CB-CONSLT”
“FV/179/2019/5076″,”CB-META-EMLI”
“FV/179/2019/5076″,”CB-META-SHRP”
“FV/179/2019/5076″,”CB-META-DOCW”
“FV/179/2019/5076″,”CB-META-EMLX”
“FV/179/2019/5076″,”CB-META-CMPR”
…
IMPORTANT: If you combine fields with muliple lines, then each field needs to contain the same number of lines. If a line item value is missing, the Extract Text (Azure Form Recognizer) takes this into account and will insert an empty line.
For example, the below invoice is missing 2 article descriptions.

To make sure the different columns can be merged correctly, the Extract Text (Azure Form Recognizer) rule automatically added 2 empty lines for these missing descriptions.

When a value in one or more columns contains an inches symbol (“) like, for example:
“Jeep Wrangler 18″ Wheels”
Then you need to double the quote character (“) for the CSV formatting to be valid.
You can do this by using a Replace Text rule to replace the single quote (“) with double quotes (“”) in the individual fields before you combine them with the Set Field Value rule.
This would then result in:
“Jeep”,”Wrangler 18 “” Wheels”,”SUV”,”5.7L V8″,”4WD”,”18″,”$61,995″
When you want to format bank card numbers or other long ID numbers when you open the CSV in Excel, you need to add an equal sign (=) in front of the value. MetaServer will automaticallly hide the equal sign during validation.
For example:
“PAGE”,”CARD_NO”,”TRAN_POST_DT”,”TRAN_AMT”
“001”,=“4129839985080530”,”2007-10-16″,”20.00″
“002”,=“4129839985080530”,”2007-10-19″,”3.00″
“003”,=“4129839985080530”,”2007-10-19″,”40.00″
By adding the “=” sign in front of the value, the card number will be correctly formatted in Excel.
Also notice that we use dates in reverse format (YYYY-MM-DD) in the CSV file. This will make it display correctly in Excel, regardless of the region.

Correctly formatted result with an “=” in front of the value

Formatted result without an “=” in front of the value
If you want to create a hyperlink to the corresponding document of your record in the CSV file, you need to add it in the CSV field value as follows:
“=HYPERLINK(“”[ FIELD CONTAINING EXPORT FILE FULL PATH AND NAME ]””,””Open PDF””)”
This will be shown in Excel as a blue “Open PDF” hyperlink and will open the document in the default viewer.

IMPORTANT: Your export file full path and name needs to be set in advance in your Extract action, using a Set Field Value, in a separate field (e.g. “Export File Path”). You can’t use the metadata field “{ Export File Full Path and Name }” for this.
Step 4: If you want to first validate your CSV before export, add a Validate CSV rule to your validation step. You can find more details about this on the Validate CSV online help page.