MetaServer > Help > Validate > Validate CSV
040-010 MetaServer Validate – Validate CSV
With MetaServer’s Validate CSV rule, you can let an Operator validate a field containing multiple lines separated by comma’s or semicolons.
If you have a table with different line items, you can use the Extract Text (Azure Form Recognizer) to extract all the line items in the table and use a Format CSV rule to format and merge them all together in a compatible CSV. Each column can then be defined as a Text, Number, Database or Date field with all the usual format checks.
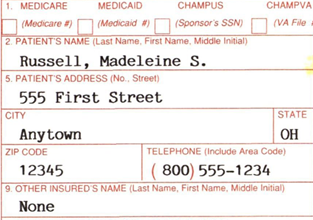
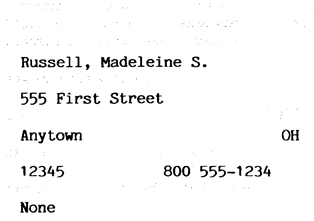
As our example, we use the below table to extract and validate the CSV content:

For more details on how to extract and format this CSV using the Extract Text (Azure Form Recognizer) rule and the Format CSV rule, please refer to the Format CSV online help page.
Extracting the data from such a table with MetaServer would result in a field with data looking like this:
“Hyundai”,”Santa Fe Hybrid/Hybrid Blue”,”SUV”,”1.6L I4″,”4WD”,”32-34″,”$33,650″
“Hyundai”,”Sonata Hybrid/Hybrid Blue”,”Sedan/Wagon”,”2.0L I4″,”FWD”,”47-52″,”$27,950″
“Hyundai”,”Tucson Hybrid/Hybrid Blue”,”SUV”,”1.6L I4″,”4WD”,”37-38″,”$30,900″
“Jaguar”,”F-PACE P340/P400 MHEV”,”SUV”,”3.0L V6″,”4WD”,”22″,”$64,800″
“Jeep”,”Wagoneer 4WD”,”SUV”,”5.7L V8″,”4WD”,”17″,”$61,995″
“Jeep”,”Wrangler 4dr 4×4″,”SUV”,”3.6L V6″,”4WD”,”21″,”$34,045″
Etc.
The Validate CSV rule will convert the CSV to a table. More details about this later.
Validate CSV rules are defined as part of a MetaServer Validate action.
If you are not familiar with adding a Validate Action to your workflow, please refer to our Validate action help guide.
After adding a Validate action to your workflow or opening the setup of an existing one, you can add a Validate CSV rule. In the Validate action, press the Add button and select “CSV”.

TIP: The thumbnail on the right will follow you, so you can easily refer to the Setup window. Click on the thumbnail to zoom in.

First, add a description to your rule. Then, select the field containing your CSV value. In this case, we select the field “TABLE 1”.
01 – Zone: in the Validate Text setup window’s toolbar, you will find two Zone tools to specify a highlighted zone on the page where your table is typically located.
The purpose is to draw the attention to the correct part of the page to assist the operator to find the data on the page:
1) Automatic: this automatically jumps to the page where the data that was found by your previous Extract rules, frames it with a pink border and and highlights the column’s zone (1 cm / 0.5 inch around the pink frame).
As long as there are invalid cells or cells that need to be checked, the table will have a red frame.
This helps to draw the Operator’s attention to the exact location on the page.
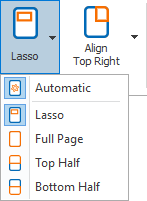
Only if the Extract rules failed to extract the data, the defined highlight zone will be used (Lasso, Full Page, Top Half or Bottom Half). By default, the “Automatic” highlighting is enabled.

In this table, the column with the automatically extracted cellls wer found on page 1 and shows its exact location.
2) Lasso / Full Page / Top Half / Bottom Half: you can choose what part should be highlighted on the page when the operator navigates in the validation field if the data was not automatically extracted.
You can highlight the full page, the top or bottom half of the page or you can specify a custom zone with the Lasso option. You can do this by drawing a zone with the select tool which will be framed with an orange border.
The area around that highlighted zone will be dimmed in the validation viewer.

TIP: while drawing, you can see the zone’s dimensions in cm/inches (depending on your regional settings) and in pixels. You’ll also find the page’s resolution in DPI and the page size in cm/inches and pixels.
We recommend you scan your documents with a resolution of 300 DPI for the best OCR result and compact file size.
02 – Align: when your documents vary in size or have mixed orientations (portrait and landscape mixed together), you can align your highlight zone in relation to any of the 4 corners of the image: the top left or right corner or the bottom left or right corner.
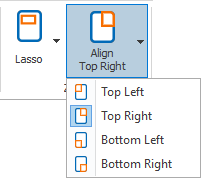
That way, the zone will be positioned correctly on all sizes and orientations.
Bottom right alignment of a zone on a portrait-oriented image
Bottom right alignment of a zone on a landscape-oriented image
03 – Label: the label displayed during validation above your current field’s input box. The default label is the same name as your field, but you can change this to a custom label. For example, the full field name, name with hints, abbreviations, etc.
In our example we have set the label to an instruction “Optional notes in case of repetitive mistakes (e.g. Invoice Nr. is never found” for this vendor”.
NOTE: The colon (:) following the label is automatically added.

04 – View: select the view mode of the field when the user navigates in the field:
2) Input (manual navigation): disables highlighting and automatic page loading when there is no automatically extracted data.
The operator will need to navigate to the correct position manually during validation. Only when a cell of the columns was extracted automatically, the page will be automatically loaded and the column will be highlighted. This is often used when the cells needs to be manually entered and the columns are never in the same position (e.g. invoices from different companies with varying layouts).
3) Read-Only: this grays out the field value. This only allows the operator to view the extracted field values. The operator cannot change the values of the cells.
It still highlights and automatically loads the page where the data was found. If the read-only field does not hold any data, the viewer will stay in its current position.
05 – On page: set the page number to where the data is most likely located. This page will be loaded when the value was not extracted automatically. Otherwise, the page where the value was extracted from will be loaded.
The default is page 1.
For example:
– Enter 1 for the 1st page
– Enter -1 for the last page
– Enter -2 for the page before the last page
– Etc.
If a document does not contain the specified page, it will load the last page. For example, validating page 3 on a 2-page document will show page 2.
06 – Zoom: set the Zoom to the preferred level when the operator navigates in the field.
You can choose between:
1) Whole page: shows the whole page in the validation viewer. This can be useful if you want to show the location of the field value in context of the whole page.
2) Page width: fits the page horizontally in the validation viewer and focuses automatically onto the part where the extracted value is located.
This option is most often used on smaller displays. It gives you a good overview of the page while still being very readable.
3) Page height: fits the page vertically. This can be useful when validating landscape-oriented page.
4) 100%: shows the page without scaling. This option is most commonly used on a large HD monitor with the same resolution as the scanned pages (typically 300 DPI).
5) Font size: zooms the page to a size so that normal text on the page is shown in the specified font size.
6) Zone: the viewer will automatically zoom in on the result. That means that if the result is only a short text like the report number, the viewer will be completely zoomed in on the number and show it very large in the viewer.
07 – Height: by default, the “height” of a CSV field is 5 columns. This value can be increased or decreased by entering a new value or by using the spinner control.
Please make sure you set this value to the maximum number of columns that can appear in your documents. If there are tables with less than the maximum number of columns, the remaining columns will just appear as blank columns in your validation.
08 – Expand highlight to page width: this option is enabled by default. It automatically hightlights the entire column, fit to the page width. When disabled, it only highlights the zone around the extracted cells.

“Expand highlight to page width” enabled

“Expand highlight to page width” disabled
With the Select Text Tool, the operator can draw a rectangle around a part of the text to OCR it. It will then automatically fill out the value in the selected column.
IMPORTANT: The current “Select text tool” settings are global settings that will be applied to all columns in the CSV field. In a future release, all columns will have individual “Select text tool” settings.

If the operator prefers to use the Zoom tool first to manually zoom in on the value before selecting the text, you may want to choose “Zoom” as the default tool.

Brightness value: default (75)

Brightness value: 140
02 – Drop out: When working with forms with lines and labels in red, green or blue, we can filter these by using the drop out setting.
Drop out: None
Drop out: Red
Thickening value: Default (0)

Thickening value: 2 horizontal, 3 vertical
Most of these settings are related to the OCR and Barcode engine and the processing of the resulting text.
01 – Read barcodes: enable if the field value needs to be extracted from a barcode.
02 – Confidence: characters with a confidence level lower than the set confidence level, will be ignored and not returned in the result. If set to 0, all characters are accepted.
03 – Font size: you can set up a range of acceptable font sizes to only return lines or words containing at least one character within the specified range. You can also choose to only keep the characters matching the selected font size.
04 – Space length: if the result shows too many spaces, like spaces between individual characters, increase this value. If spaces are missing and words start sticking together, decrease the value.
The value is a percentage of the font size of the character following the space. So, spaces in large font type words are automatically considered to be larger than spaces in small text.
05 – Tabs: by default, lines are segmented in multiple word groups that are separated by tabs (long spaces). If you want no tabs at all, press the drop-down button to select the “Remove” option and all the words will be grouped as 1 single word group for each line.
06 – Tab length: define the length of long spaces to convert them to tab characters. If you only want to convert very long spaces to a tab, increase this value. Spaces shorter than the set value will be converted to a single space.
The value is a percentage of the font size of the character following the tab character.
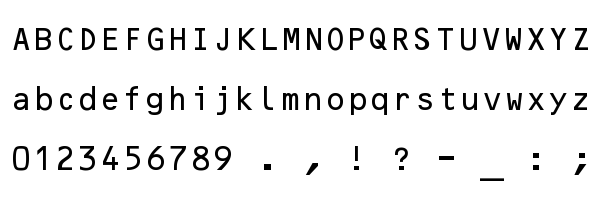
Open the character setup window to exclude or include certain characters during extraction. This can avoid confusion with other characters that never occur in the drawn zone. For example, if the zone only contains a numeric value, disable all alphabetic characters to avoid confusion between 0 and O or 1 and I.
In our example, the operator will draw a rectangle around the report number, so we only select digits.

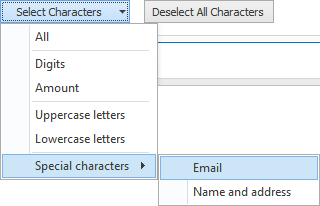
1) Languages: select the primary language(s) of the documents. Selecting a language, will automatically select that language’s character set in the character table.
2) Deselect All Characters: unchecks all characters in the character set. This can be helpful to set up your own custom character set, which is explained in the next step.
3) Select Characters: next to manually selecting / deselecting characters directly in the table, you can press the dropdown button to select a preset of special characters, like digits, uppercase letters, characters for e-mail addresses, etc.
TIP: don’t use the character set as a method to exclude elements from the text.
For example, if you want to extract a code like “123/456/789” and filter out the “/” characters, you may be tempted to just uncheck the “/” character from the character set. But if you do this, the “/” character will most likely be recognized as a 1, which makes the code illegible.
It’s recommended to leave the characters in the set that appear in the actual text and later remove characters with the Edit text option or change the result with the Format Amount / Date and Time settings in this setup or with Format rules in an Extract action following the Validate action.
NOTE: these settings do not alter the actual image permanently, they are temporary corrections to correctly extract the text.
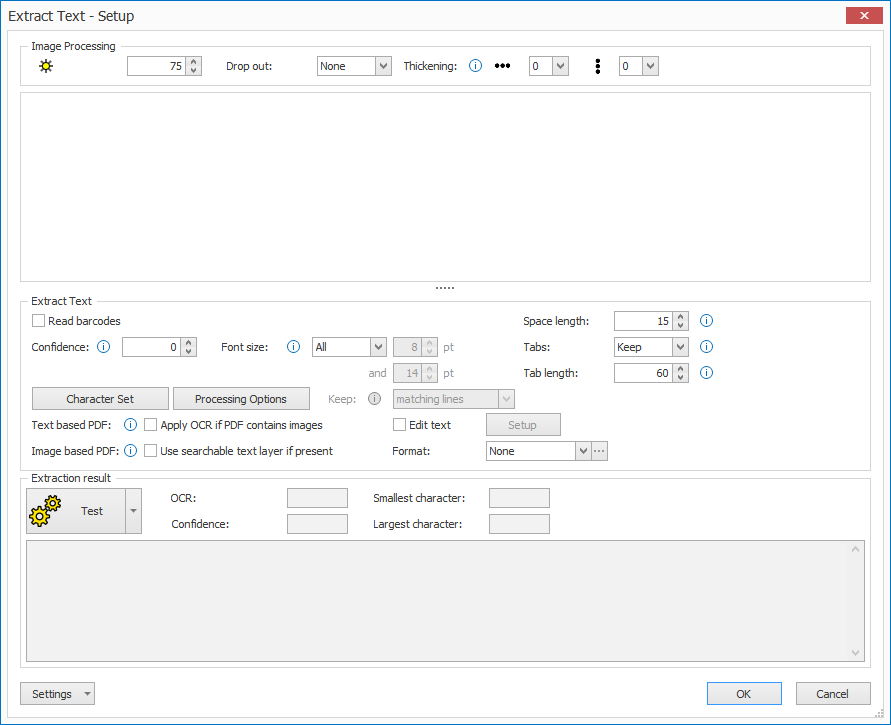
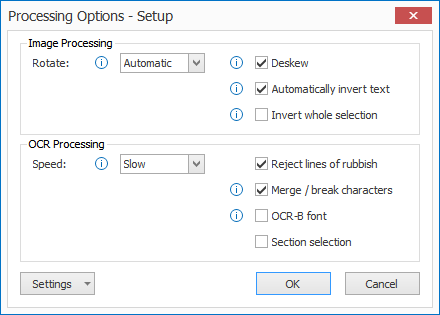
There are 2 types of processing options:
01 – Image Processing:
1) Rotate: the selection will be rotated as specified. The rotation occurs just before the OCR extraction takes place. In Automatic mode, the OCR engine will try to detect the orientation of the text automatically. Only use the fixed rotation settings (90° right, 180° and 90° left) if the text on your documents has a fixed orientation that never changes.
2) Deskew: straighten skewed text before OCR processing.
3) Automatically invert text: automatically detects inverted text (white text on a dark background) in the selection and inverts it before OCR processing.
4) Invert whole selection: forces to invert the whole selection before OCR processing.
02 – OCR Processing:
1) Speed: the speed option indicates how exhaustive the OCR process should be looking for improvements. There is a small loss in accuracy if you set it to a faster speed option.
2) Reject lines of rubbish: this detects random characters with a low confidence level caused by noise in the image. Enable this option to automatically delete lines of rubbish.
3) Merge/break characters: enable this option when characters stick together. This technology uses font size detection to determine the breakpoints, so it’s not recommended to use this option on text blocks with a high variety of font sizes on a single line.
4) OCR-B font: only enable it when the text you want to extract is created with the OCR-B font.
Section selection: Experiment with this setting when there are different font sizes on the same line. Sometimes sectioning may drop results when different font sizes occur on the same line.
03 – Text based PDF: text-based PDFs, also known as electronic PDFs, contain computer text. They are typically generated by a text-editor programs like MS Word, Excel or by invoice or report creation software.
By default, we directly extract the original electronic text and don’t need to perform any OCR. This results in to a very fast and accurate extraction of the text.
Apply OCR if PDF contains images: some electronic PDFs contain one or more small images that have logos or small header or footer text. These elements are seen as images, not text. If you want to extract the text in these images, enable this option so it automatically converts the full page to a 300 DPI image. It will then apply OCR to extract the text.
04 – Image based PDF: image-based PDFs, also known as scanned PDFs, are typically generated with a document scanner. They contain an image of each page of that document. By default, we apply OCR to these pages, so the images are converted to text.
Use searchable text layer if present: some scanned PDFs contain an invisible, searchable text layer. If you want to extract this existing searchable text layer instead of applying OCR, enable this option.
If, in a previous Extract action, you have used an Extract Text (Azure Computer Vision) rule with the Convert to searchable PDF option enabled, you are able to use that high-quality text layer when you enable the “Use searchable text layer” option.
This way, you will be able to use the Select text tool on hand-written, arabic, cyrillic or low-quality text:

Enable the “Edit text” option to automatically remove spaces and replace words from the selected text.
The video below shows the Edit text option in action. The alphabetic month is automatically converted to a numeric format:
Press the Setup button to open the Edit text settings.
Below, we show an example for the “Inspection Date”, which is related to the a Validate Date and Time rule, but it’s a very good example on how to effectively use the Edit option.
If you select something like “November 19, 2020” on the document, the replacements will be instantly applied, and the value will become “11/19/2020”.

01 – Remove spaces: you can choose to remove spaces preceding, between or following digits. You can also combine these three different options.
02 – Replace: here you set up any replace rules for your extracted text. You can also apply the following options:
1) Match whole word: enable this to only replace text exactly matching the specified word(s). When disabled, it will also replace the specified text if it’s a part of a word.
For example: when disabled and replacing the word “jan” with “01”, words containing “jan” like “january” will be replaced and become “01uary”.
2) Match case: enable this to only replace text that exactly matches the defined word(s)’ case. When disabled, it will replace the specified word(s), regardless the case.
For example: when enabled and replacing the word “JANUARY” with 01, it will only replace “JANUARY” and ignore words like “January”, “january”, etc.
Enter the text you want to replace in the left column. In the right column, you enter the values that the text in the left column will be replaced with.
Press the drop-down arrow to select different system and index values to compose your text.
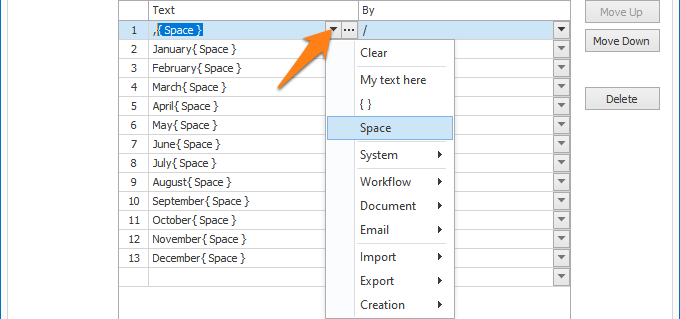
In the example above, we replace the months in long name format followed by a space with their MM/ format. We also replace “,” followed by a space with a “/”. So, a date like “August 15, 1969” would become “08/15/1969”.
You can also specify the location of that text to get a more accurate result. Press the “…” button next to the drop-down arrow to open the setup window for the text location.
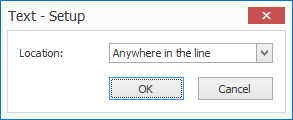
You can select one of the following options:
– Anywhere in the line
– Beginning of line
– End of line
– Beginning of word group
– End of word group
– Beginning of word
– End of word
For example:
Assume you are extracting codes always starting with 1 letter followed by 4 digits like
O-1204
P-5048
W-7042
Etc.
The OCR engine may occasionally make a mistake and read an “O” as a “0” resulting in something like:
0-1204
If you would automatically replace all “0”s with “O”s with the Edit option, you would get “O-12O4” which is not correct either.
However, if you also specify that the element to be replaced (0) needs to be in the beginning of a word. It will only replace the “0” in the beginning of the word and not touch any “0”s in the middle of the word, perfectly correcting the OCR mistake and outputting: O-1204.
To learn more about the difference between lines, word groups and words, please refer to this guide.
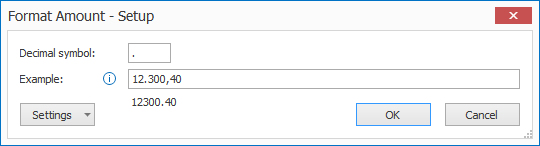
You can use the Format option to convert different value types to standardized formats. Press the “…” button to open the setup window.
01 – Amount: with the Format Amount option, you can normalize the decimal symbol of amount values, remove thousand separators and currency symbols. This makes the amount format consistent.
02 – Date and Time: with the Format Date and Time option, you can convert date and time values to a standardized format.
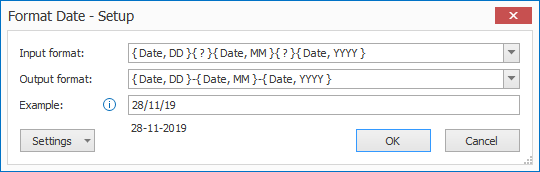
Input format: enter the format that matches the input date and time. You can press the drop-down arrow to select different format types to compose your date and time format.
In this example case, we set up a DD(?)MM(?)YYYY date format. The (?) indicates any character, so if the Date’s separator varies, it will still convert it to the output format.
Output format: here you enter the format for the output date and time. You can press the drop-down arrow to select different format types to compose your date and time format.
In this example case, the date is converted to a DD-MM-YYYY output format.
This feature is to test your Select Text Tool setup and is planned for a future release.
Your CSV field value consists of lines with different values separated by a comma (“,”) or semicolon (“;”).
For example:
“Page 7 of 12″,”Audi”,”A3″,”Sedan/Wagon”,”2.0L I4″,”FWD”,”32″,”34800″
“Page 7 of 12″,”Audi”,”A3 quattro”,”Sedan/Wagon”,”2.0L I4″,”AWD”,”30″,”36800″
“Page 7 of 12″,”Audi”,”A4 quattro/Allroad/S-Line”,”Sedan/Wagon”,”2.0L I4″,”FWD”,”26-28″,”39900″
“Page 7 of 12″,”Audi”,”A5 quattro Coupe/Cabriolet/Sportback/S-“,”Sedan/Wagon”,”2.0L I4″,”AWD”,”26-28″,”44100″
…
From the first line in the above CSV value, we derive the following fields, in order:
Page: Page 7 of 12
Make: Audi
Model: A3
Type: Sedan/Wagon
Engine Size: 2.0L I4
Drivetrain: FWD
MPG: 32
MSRP: 34800
For each of these fields, you need to add the appropriate column.

01 – Database: double-click the Database validation field or press the “Edit” button to open the setup window.

The setup is just like regular Validate Database fields. But, instead of mapping other fields, you map other columns.
For more detailed instructions on how to set up a Database validation field, please refer to the Validate Database help page.
NOTE: There is a limitation for the Cursor options. “In front” and “At the end” options are not supported. The cells are always in “Preselect all” mode.
02 – Date and Time: double-click the Date and Time validation field or press the “Edit” button to open the setup window.

For more detailed instructions on how to set up a Date And Time validation field, please refer to the Validate Date and Time help page.
03 – Number: double-click the Number validation field or press the “Edit” button to open the setup window.

For more detailed instructions on how to set up a Number validation field, please refer to the Validate Number help page.
04 – Text: double-click the Text validation field or press the “Edit” button to open the setup window.

1) Align right: enable this option if you want to align the text value to the right side of your column. By default, this option is disabled and the text value is aligned to the left side of the column.
| Example Text | Example Text |
For more detailed instructions on how to set up a Text validation field, please refer to the Validate Text help page.
TIP 1: When you want to format bank card numbers or other long id numbers when you open the CSV in Excel, add an equal sign (=) in front of the value before validation. MetaServer will automaticallly hide the equal sign during validation.
For more details on how to set this up, please refer to the guide on the Set Field Value online help page.

Correctly formatted result with a “=” in front of the value

Formatted result without a “=” in front of the value
TIP 2: When a value in one or more columns contains an inches symbol (“) like, for example:
“Jeep Wrangler 18″ Wheels”
Then you need to double the quote character (“) for the CSV formatting to be valid.
For more details on how to set this up, please refer to the guide on the Set Field Value online help page.
TIP 3: If you want to create a hyperlink to the corresponding document of your record in the CSV file, you need to add it in advance to the CSV field value.
This will then be shown in Excel as a blue “Open PDF” hyperlink and will open the document in the default viewer.
For more details on how to set this up, please refer to the guide on the Set Field Value online help page.
TIP: you can copy the current settings and paste them in another setup window of the same type. Do this by pressing the Settings button in the bottom left of the Setup window and by selecting Copy. Then open another setup window of the same type and select Paste.


In the validation viewer, if you select a line in the table, the viewer automatically jumps to the correct page and highlights the line where the data was extracted.
You can easily check blank cells or cells with invalid data by just hitting the Enter key, which will jump from invalid cell to invalid cell. Then, you just enter or adjust the value.
NOTE: as long as there are invalid cells or cells to be checked, the table will have a red frame.
When your document passed validation, MetaServer updates the CSV based on the adjustments that were applied during validation, ready for export to a system of choice.