MetaTool > Help > Extraction > Find Word with Mask / Words
060-600 MetaTool Extraction – Find Word with Mask / Words
MetaTool’s Find Word with Mask / Words makes it possible to find certain words or words matching a mask. It’s frequently combined with a Find Line with Mask / Words rule.
The Find Word with Mask / Words rule is very useful when you need to extract data from documents that don’t have a fixed format. The classic example is a supplier invoice. All invoices have an invoice date, number, total amount etc. but the data is located on a different place for each supplier.
You typically define an OCR extraction rule first to hold the full text of a scanned document in an index field we typically call Text Block or Full Text. Next, you would define a Find Line with Mask / Words rule to filter the full text and only keep relevant lines.
Finally you would define a Find Word with Mask / Words to extract the actual index value you are interested in.
For example, to extract the invoice number from an invoice, you can search for lines containing the words: Invoice Number, Invoice Nr., Document Number, Invoice# etc. This would reduce the lines to the lines containing the invoice number. With a Find Word rule you can then extract the invoice number from the remaining lines using a mask.
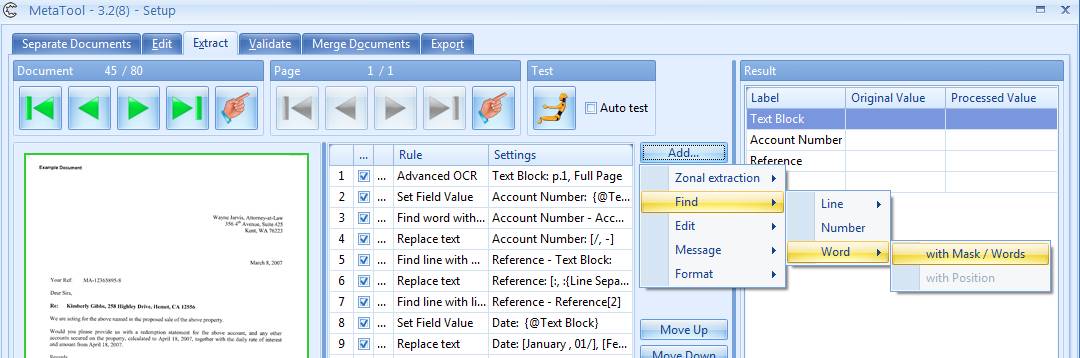
01 Find Word with Mask / Words – Add Rule
Find Word with Mask / Words is defined in the MetaTool Extract tab.
Press the Add button and select Find – Word – with Mask / Words to add the find rule.
02 Find Word with Mask / Words – Setup
In our example we will make use of the CB MetaTool Floating Data job. This job is automatically installed when you install CaptureBites MetaTool.
From below image samples we want to extract the account number.


The Account Number always has the same fixed length of 13 characters and starts with two letters. Sometimes the first separator is a “-“ like in the first example and sometimes it is a “/” like in the second and third example. The second separator is always a “-“.
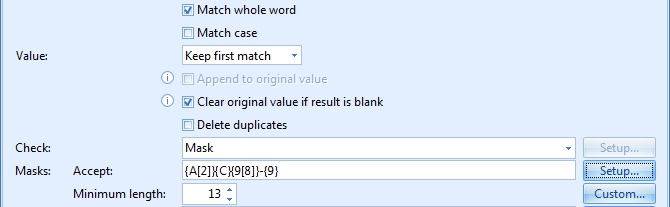
In this case, the mask is {A[2]}{C}{9[8]}-{9} (AM/21568790-2, for example). A more in-depth explanation of using Masks will be given later.
To extract the account number, select the index field to hold the extracted data.
In this case we select the index field “Account Number”.
Optionally enter a description.
TIP: The thumbnail on the right will follow you, so you can easily refer to the Setup window. Click on the thumbnail to make the image larger.
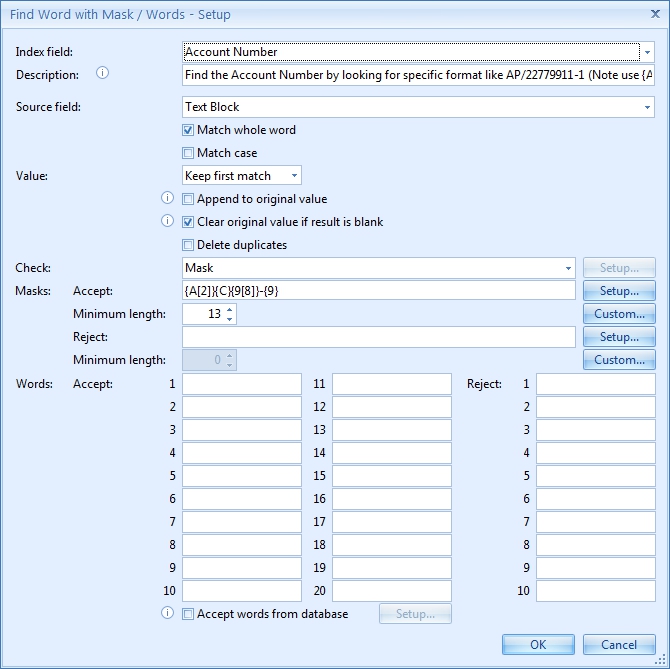
1) Match whole word: only returns words exactly matching the defined mask or word(s). When disabled, it will also return words containing the Accept mask or any of the Accept words. For example: with “Match whole word” disabled and when searching for “apple”, it would also return words like “pineapple”.
2) Match case: will make the search Case Sensitive. If the required word is “AA/567729511-1”, for example, it will only return words in exactly the same case. Disable the option to also find “aa/567729511-1” or “Aa/567729511-1”. You can always force the case afterwards to Upper Case for example by using a Format / Change case rule.
02 – Value: you can specify which lines you want to keep, there are 3 options:
1) Keep all matches: this will return all words matching the defined accept mask or accept words and will skip words matching the defined reject mask reject word(s).
2) Keep first match: this will return the first word containing the matching accept mask or accept words and will skip words matching the defined reject mask reject word(s).
3) Keep last match: this will return the last word matching the defined accept mask or accept words and will skip words matching the defined reject mask reject word(s).
03 – Append to original value: the result will be added to the value that is already in the index field. It will otherwise overwrite the result.
04 – Clear original value if result is blank: if the rule does not result in any value, the selected index field will be cleared.
05 – Delete duplicates: this will delete all duplicate matches and the result will only return unique values.
06 – Check: here you can choose to use a Format (Mask) or a predefined checksum.
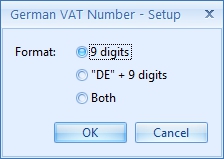
A checksum is used to verify codes, like VAT numbers. A popular one, for example, is the “Luhn” or “modulus 10” algorithm. In the following example document, we want to extract the correct German VAT number (the one with a smiley next to it) from a list of very similar looking codes.


03 Find Word with Mask / Words – Masks Setup
Select the Mask option in the Check dropdown list to create your own mask.
Masks are used to search for words using a format also known as a regular expression. However you don’t need to use the complex regular expression syntax. Instead, you can construct your mask by selecting the elements you need from an easy to use formatting pick list.
01 – Accept Masks: Words matching the Accept mask will be returned.
Assume we want to extract the loan account number from below images. The Account Number always has the same fixed length of 13 characters and starts with two letters. Sometimes the first separator is a “-“ like in the first example and sometimes it is a “/” like in the second example. The second separator is always a “-“.


The first separator character could be a “-“or “/” character, that’s why we used a custom character for the first separator instead of a fixed text. For the second separator we used a fixed text “-“.
We specified a minimum length of 13 characters. Because of this minimum length we only accept complete Account Numbers. The minimum length will be explained more later.

Example: you want to find the first date on the document that is a date in the 21st century. Any dates from 1900 to 1999 should be ignored.
The Accept mask 20{9(2)} keeps all words containing 2007 or 2016 etc. (dates in the 21st century)
The Reject mask is to skip words with the defined mask. For example, if you want to skip all words containing dates between the years 1900 and 1999, you could define a reject mask like 19{9(2)}. See below for in-depth details about the mask syntax and how to define a mask.
When you have both Accept and Reject defined in a single rule: Accept and Reject work in an AND relationship. In other words all the words matching the reject mask or any of the reject words are first eliminated. Then the remaining words are used to only keep the words matching the accept mask or any of the accept words.
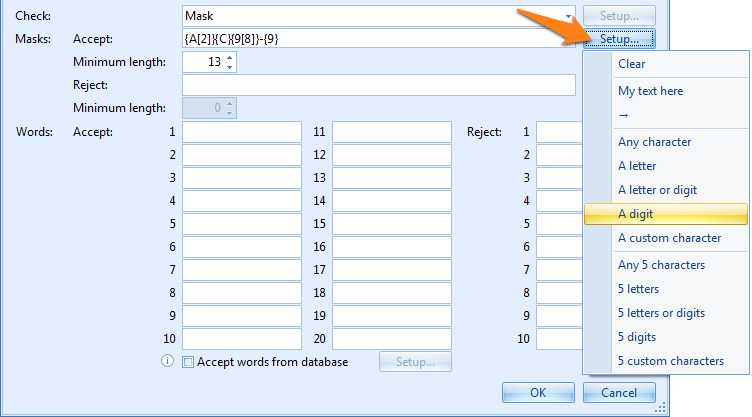

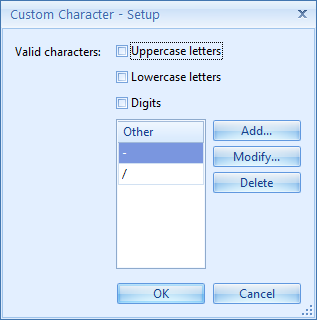
1) Valid characters: you can choose if the engine should return formats that are Uppercase letters, Lowercase letters or Digits.
2) Other: Here you can add, delete or modify specific custom characters. In the example above, a custom character can only be a – or /.
05 – Minimum length: If you want read partial masks, set the minimum length lower than the total length of the mask.
To explain how the Minimum length setting works, consider below settings:
Examples:
AB/15687945-2:
OK because the number of characters is greater or equal than the defined minimum of 13 and the value contains 2 letters, a custom character (“/“ in this case), 8 digits, a dash and a single digit.
AB/157945-2:
NOT OK because the number of characters is smaller than the defined minimum length of 13.
AB/156870945-02:
NOT OK because longer (15 digits) than the total length of the defined mask, if you want to accept words containing more digits, you would need to disable “Match whole word”.
4B/15687945-2:
NOT OK because it contains another type of character than a letter in the first 2 characters and therefore does not comply with the defined mask.
04 Find Word with Mask / Words – Words Setup
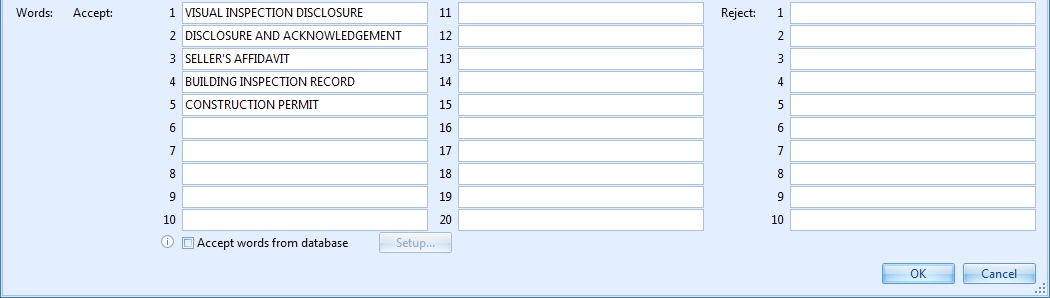
Here you can specify fixed words that should be extracted (Accept words) or should be skipped (Reject words).
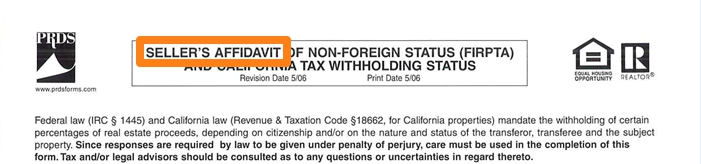
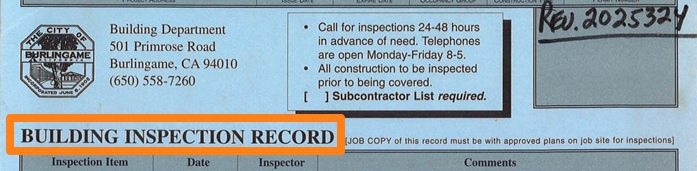
A typical example to use fixed word extraction is to find the document type like in below examples.

05 Find Word with Mask / Words – Accept words from database Setup
With the “Accept words from database” option, you can maintain a list of Accept Words outside MetaTool using an external database.
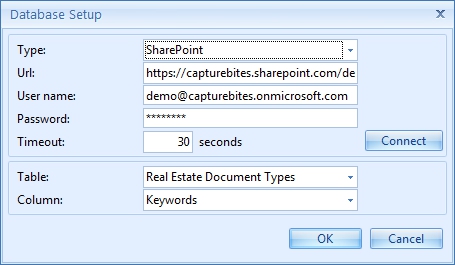
Press the Setup button to select the database table and column containing the Accept Words. Any changes you make in the database list are automatically taken into account.
This is an example how to set up an Accept words list in SharePoint:
01 – Type: here you select your database type:
1) ODBC: This is the default database type. ODBC is a standard to connect to a wide range of databases. Configuring an ODBC data source is straightforward. For detailed instructions how to do so, please have a look at this post. The post explains how to define an ODBC source for our database connector which uses exactly the same technology as used for the MetaTool Database lookup functionality.
2) ABN Lookup: We can also integrate cloud based databases through web services. The Australian ABN number lookup is an example of such integration. The ABN database is maintained by the Australian government and contains information about Australian based companies. The access to the database is free of charge. You just have to register here to receive a GUID (Globally Unique Identifier) which you can then enter in the ABN Lookup settings in MetaTool to get access the database.
3) Jobpac: This is similar to ABN Lookup, and is also using a web services integration. It is specifically designed to access a supplier table in the Jobpac ERP system.
4) PostAssist: PostAssist is a mail service management system. This integration accesses the recipients table in PostAssist to select the correct recipient of a registered mail piece based on its bar code.
5) SharePoint: SharePoint stores all information in a SQL database. You can maintain tables (called lists in SharePoint) in SharePoint with your document types, customer lists, supplier lists etc. You can use MetaTool to directly lookup in those tables. Both SharePoint on-premise and online is supported. SharePoint online is a very economical way to maintain your lookup tables and documents in the cloud with low cost online plans.
Each database type has its specific settings which are often self-explanatory.
This is an overview of the ODBC settings:
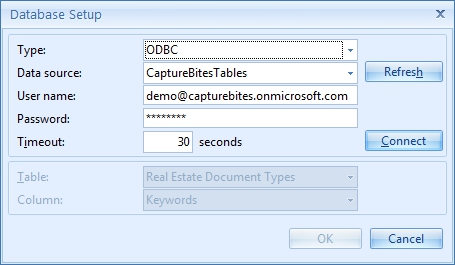
02 – Data source: Select the ODBC data source you want to use. A data source needs to be defined first using the ODBC Data Source Administrator tool in Windows. To find step by step instructions how to define an ODBC Data Source in Windows, have a look here.
03 – User name: Some databases require to login. If so, enter the User name in this field.
04 – Password: Some databases require to login. If so, enter the Password in this field.
05 – Timeout: When the database does not respond in the defined time, the export will fail.
06 – Table: A database typically stores data in one or more tables, such as a document types table, a suppliers table, a products table, a customers table etc. Specify the correct table containing the Accept words you want to use in your rule.