MetaServer > Help > How Does MetaServer Work?
How Does MetaServer Work?
MetaServer consists of the MetaServer service (the server), Administration Client and Operator Client:

The MetaServer Administration Client gives access to all functionality. This includes access the configuration of the Workflows, server status, error management, client settings, etc.

The MetaServer Operator Client hides all administrative functions to avoid accidental changes to the configuration. It can be used for validation, organizing and error management. Through the Administration Client, you can configure the Operator Clients and hide certain functions to simplify the user interface even further.
MetaServer dynamically extracts relevant data from imported documents (metadata) using text extraction and easy to configure rules. You can export the metadata to an export destination of choice such as Email, Folder Structure, FTP Server, Database etc.. With the Export to Folder action, you can automatically create a folder structure and name PDF files using any combination of extracted metadata.
MetaServer runs as a service on both Windows Server (Server 2008 and higher) and Windows Desktop (Windows 7 or higher).
A list of some popular functions:
– Import PDF / TIF / JPG files from folders and subfolders and other Workflows
– Watch email inboxes and import PDF / TIF / JPG attachments
– Automatic Document Separation and Page Processing based on keywords, blank pages, bar codes etc.
– Organize documents using the Organizer to visually check and correct document separation points
– Metadata Extraction based on rules
– Lookup of additional metadata from an external database
– Scale documents, delete pages
– Convert documents to multipage TIF and convert all or specific pages to black and white
– Convert all or specific pages to searchable PDF
– Sending the PDF / TIF / JPG as an attachment to an email
– Metadata Validation with Validation using the MetaServer Operator Client
– Export to a File server, FTP server, Database or another Workflow
You can find an overview of all available actions below.
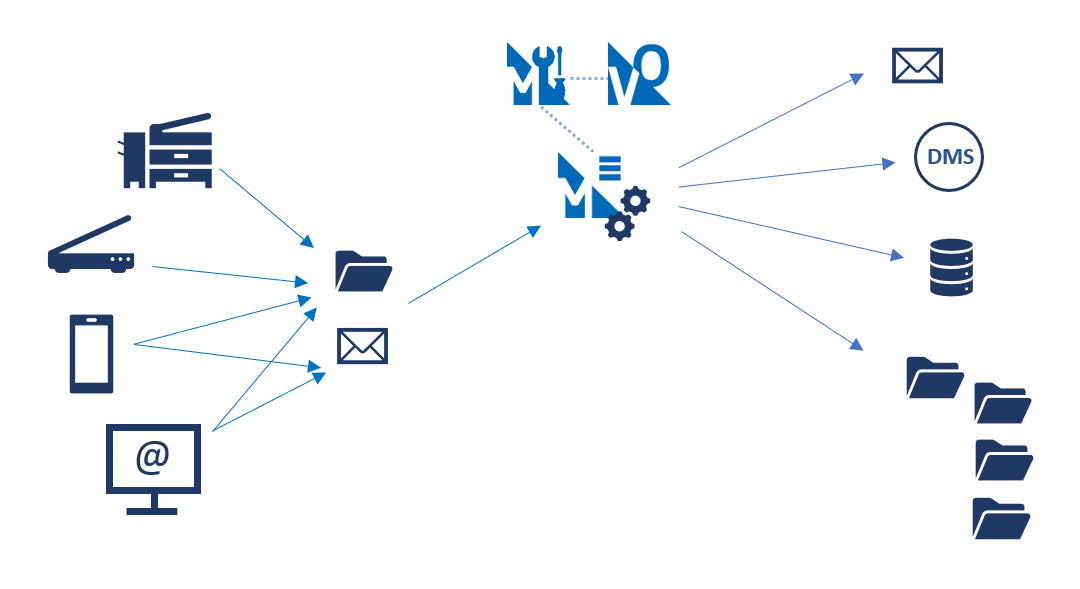
| Documents are scanned to a folder or emails arrive in a watched email inbox |
MetaServer automatically processes these documents | Optionally, use the Operator Client(s) to organize and validate the documents |
The documents and/or data are exported to the specified destination(s) |
|---|
To get a functional overview, you can refer to the MetaServer Product Page.
If you want to become a MetaServer expert, you can download a free training tutorial.
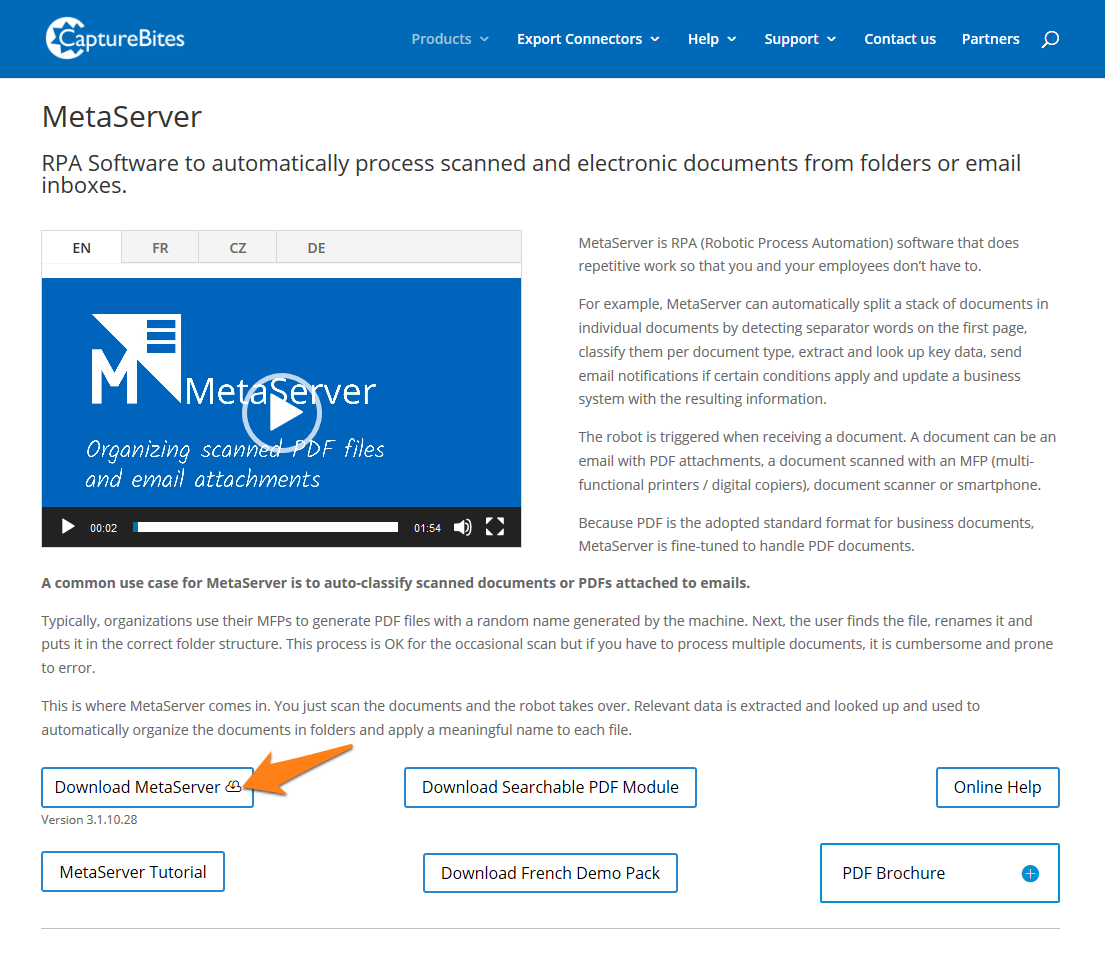
To download MetaServer, go to the CaptureBites MetaServer product page and click the “Download MetaServer” button.
This installer includes the latest version of MetaServer, the Administration Client, the Operator Client, sample images and demo workflows to try the functionality.
For more detailed installation instructions, including silent installation and uninstallation, please refer to our How to Prepare for a MetaServer Installation online help page.
When downloading is complete, launch the installer.
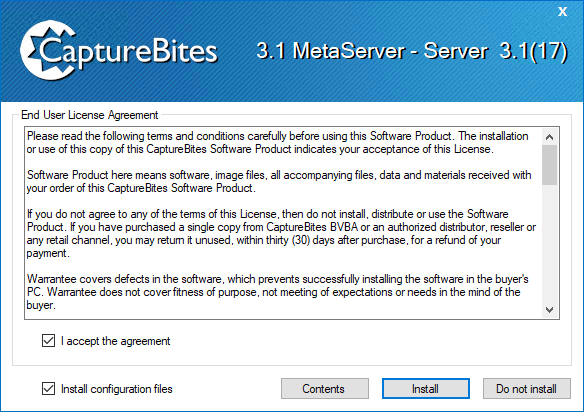
If you just want to install MetaServer without any of the sample images and workflows, disable the “Install configuration files” option in the installer.

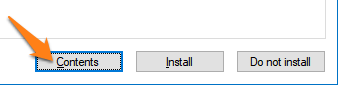
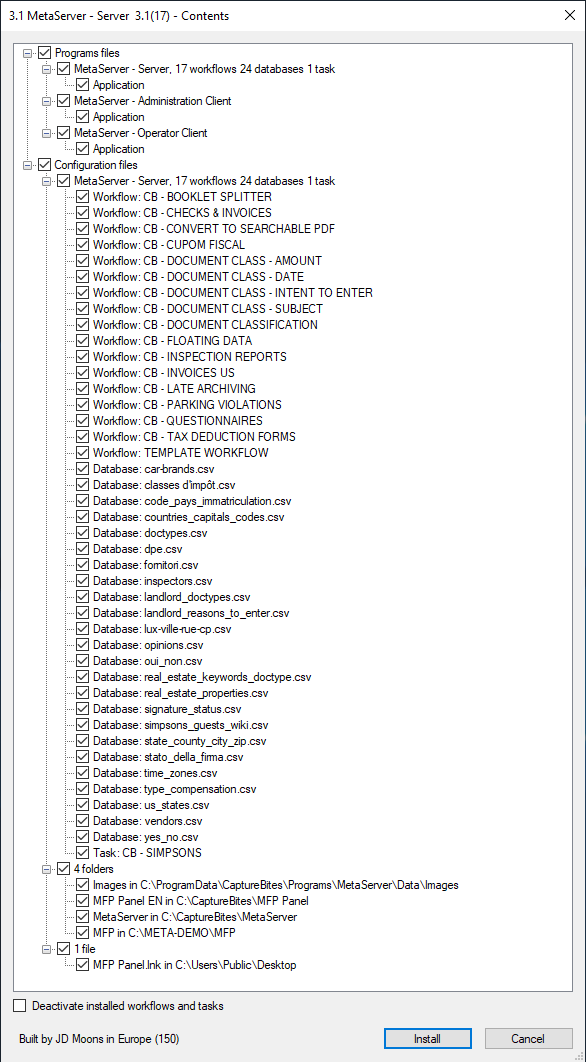
You can view the contents of the installer by pressing the Contents button.
TIP: To open the Contents window in custom mode, hold the Shift + Control key on your keyboard and press the Contents button. In this mode, you can select specific applications, workflows, etc. to be installed.
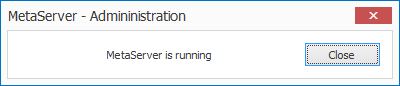
After the installation is complete, the MetaServer service will start automatically.
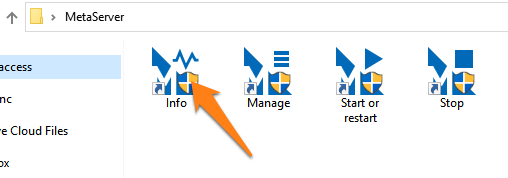
If you want to see the status of the server, open the MetaServer folder on your desktop and run the Info program.
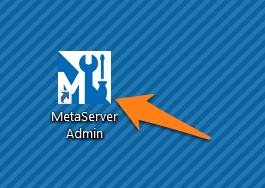
Next, we launch the MetaServer Administration Client.
If your MetaServer is unlicensed, the following window will pop-up with 3 options:
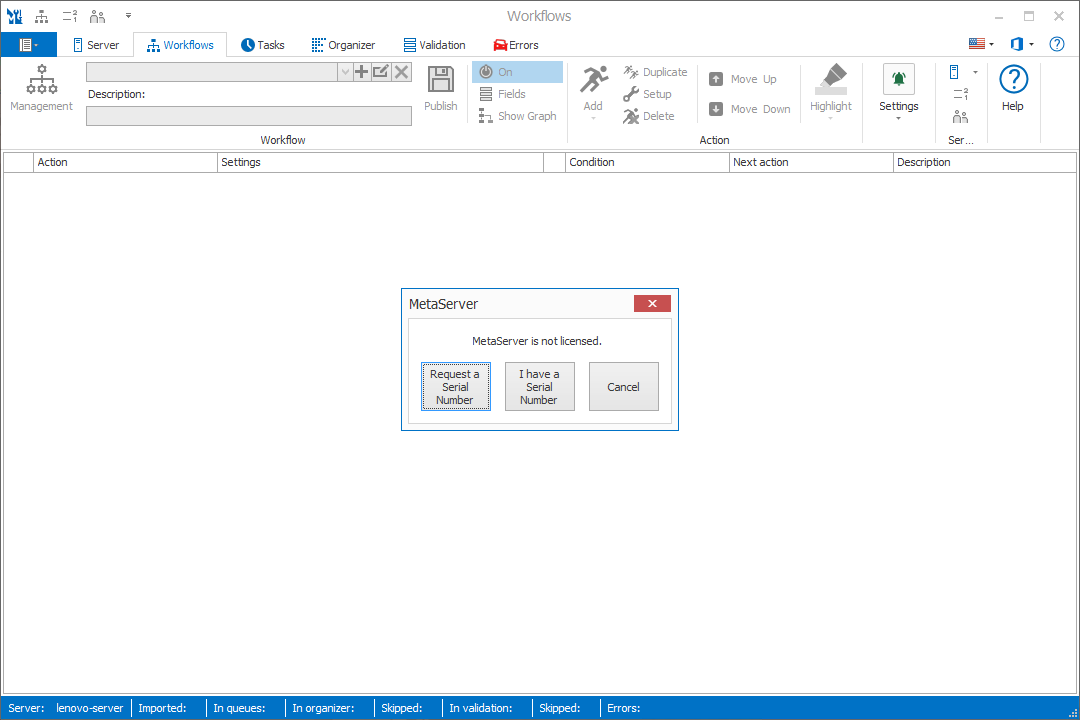
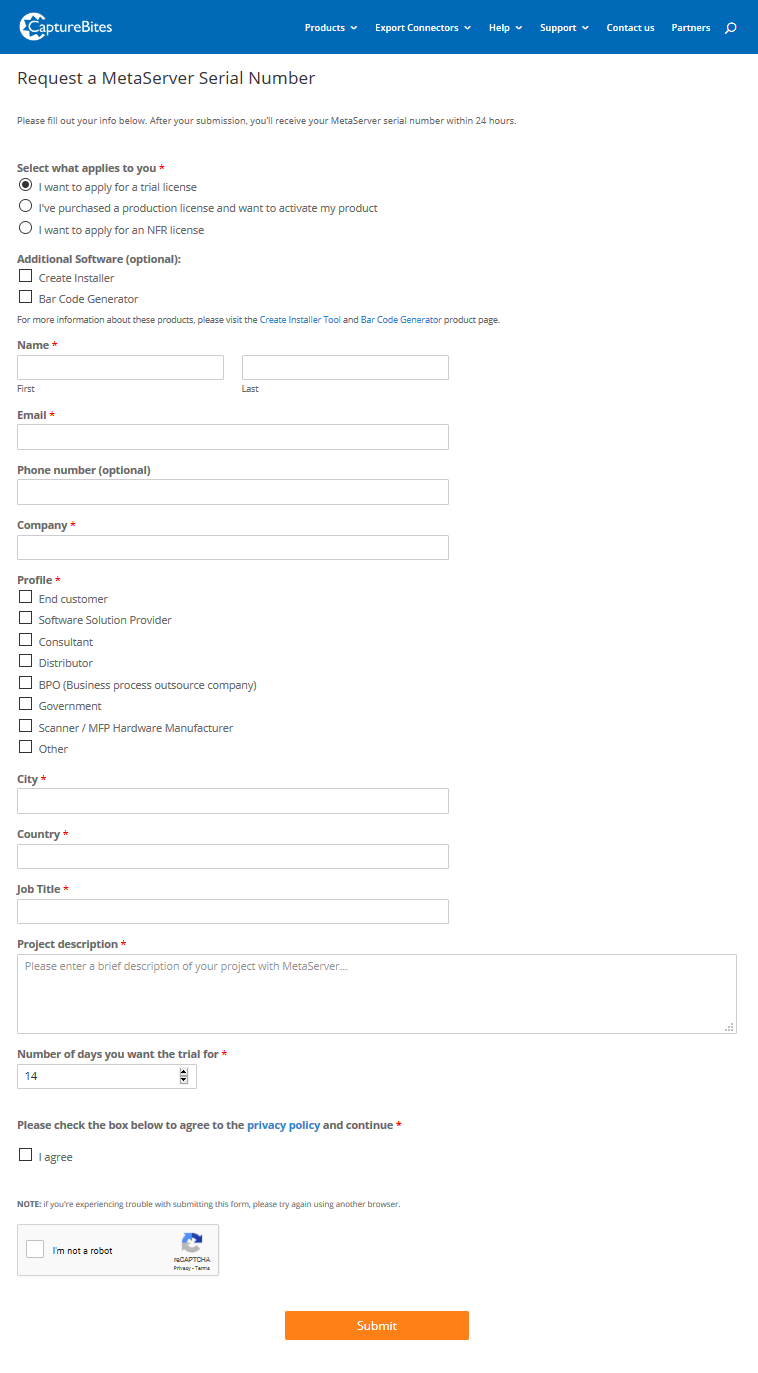
You can choose if you want to request a trial license or if you want to activate your purchased license. Fill out the rest of the required fields and press Submit. We will email you your serial number within 24 hours.
2) I have a Serial Number: choose this option if you already have a valid MetaServer serial number. This will open the Licenses tab where you can enter your serial number.
3) Cancel: use this option to use MetaServer in unlicensed mode. Unlicensed mode means you can create workflows, but you can't use them in run time. The activation window will always pop-up when opening Validation, so you still have the option to request a trial serial number or enter a production serial number in the Licenses tab.
When you have received a serial number, enter it in the Serial Number input box and enter your company and contact information.
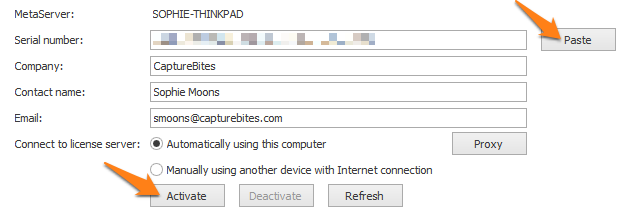
If you have been upgraded from a trial to a production license or requested to test an additional module to your existing production license, please press the "Refresh" button to activate these changes.

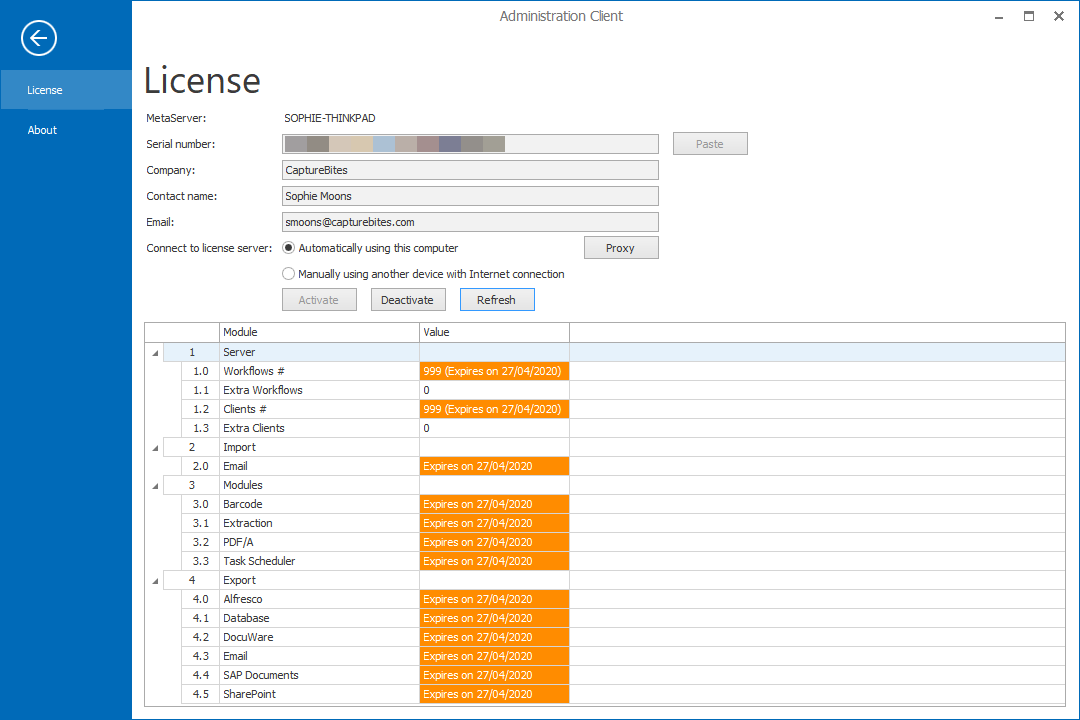
After a successful activation, you will see the activated module(s) with a “Licensed” or “Expires on [Date]” status, if the production license is limited in time.
If your system does not have a network connection, you can activate your license using the “Connect to license server manually using another device with Internet connection” option.

1) Press activate and open your downloads folder where your activation request file has been stored (“ActivationRequest.ALIC”).
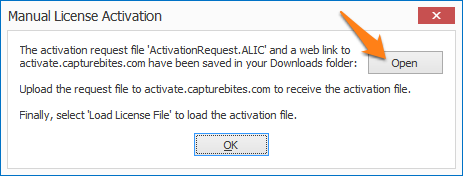
2) Share this activation request file with a device that has an internet connection. Browse to activate.capturebites.com and upload your activation request file ("ActivationRequest.ALIC”).
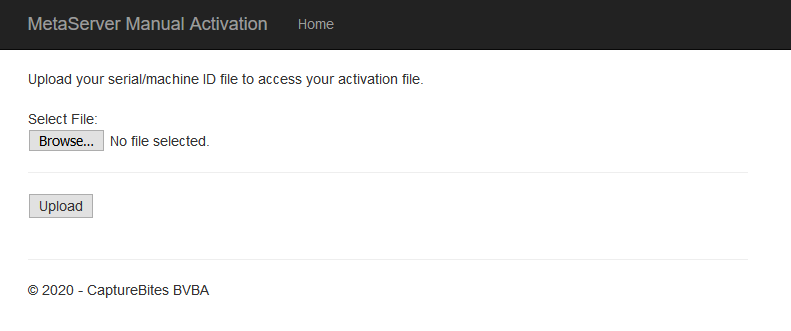
3) After a successful activation, download the activation file and share it with your system running MetaServer.
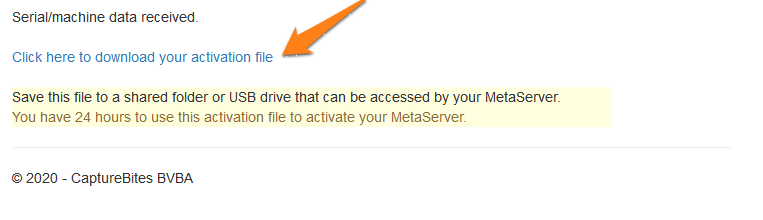
4) Press the “Load License File” button to upload the activation file.

After a successful activation, you will see the activated module(s) with a “Licensed” or “Expires on [Date]” status if the production license is limited in time.
02 Choosing a MetaServer
The first time you run the client, it will look for available MetaServers. This can take a few seconds.

If there are multiple MetaServers available, select the MetaServer you want to connect to:

Next time you open the MetaServer Administration or Operator Client, it will immediately connect to the last selected MetaServer.
TIP: When you open the MetaServer Administration or Operator Client, and there is no MetaServer found, follow this help guide.

You can use the Backstage button to check the MetaServer licenses and the current MetaServer Client’s version.
By default, the Licenses tab is selected when going backstage.
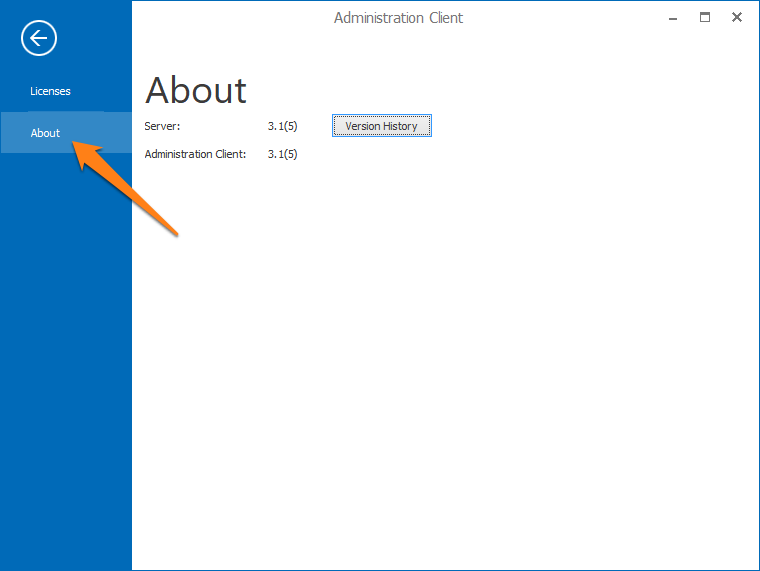
03 Checking your MetaServer Server and Administration / Operator Client Version
If you want to check the current version of your MetaServer Server and current MetaServer Client (in this case, the Administration Client), open the About tab.
Press the Version History button to open CaptureBites’ online version history page containing details of each published version of MetaServer.
Under the Configuration files, you will find 21 different demo workflows and a template workflow to help you get acquainted with MetaServer and its functions.
A quick overview of these demo workflows:
1) CB – BOOKLET SPLITTER
Uses following actions:
– Import from Folder
– Split Booklets
– Organize
– Export to Folder
Find the sample documents in:
C:\META-DEMO\MFP\BOOKLET SPLITTER
Watched Folder:
C:\META-IN\MFP\BOOKLET SPLITTER
Find output after processing in:
C:\META-OUT\MFP\BOOKLET SPLITTER
Import booklets, automatically split the booklets so the the pages are in the correct order, show the split booklet in the Organizer and export to a folder.
All pages of the booklet needs to be present, including blank pages.
This is a simple workflow that demonstrates the Split Booklets action.

2) CB – CHECKS & INVOICES
Uses following actions:
– Import from Folder
– Extract
– Add External Documents
– Validate
– Export to Folder
Find the sample documents in:
C:\META-DEMO\MFP\CHECKS & INVOICES
Watched Folder:
C:\META-IN\MFP\CHECKS & INVOICES
Find output after processing in:
C:\META-OUT\MFP\CHECKS & INVOICES
Import a check, look for the associated invoices and append these to the document.
This is a simple workflow that demonstrates the Add External Documents action.

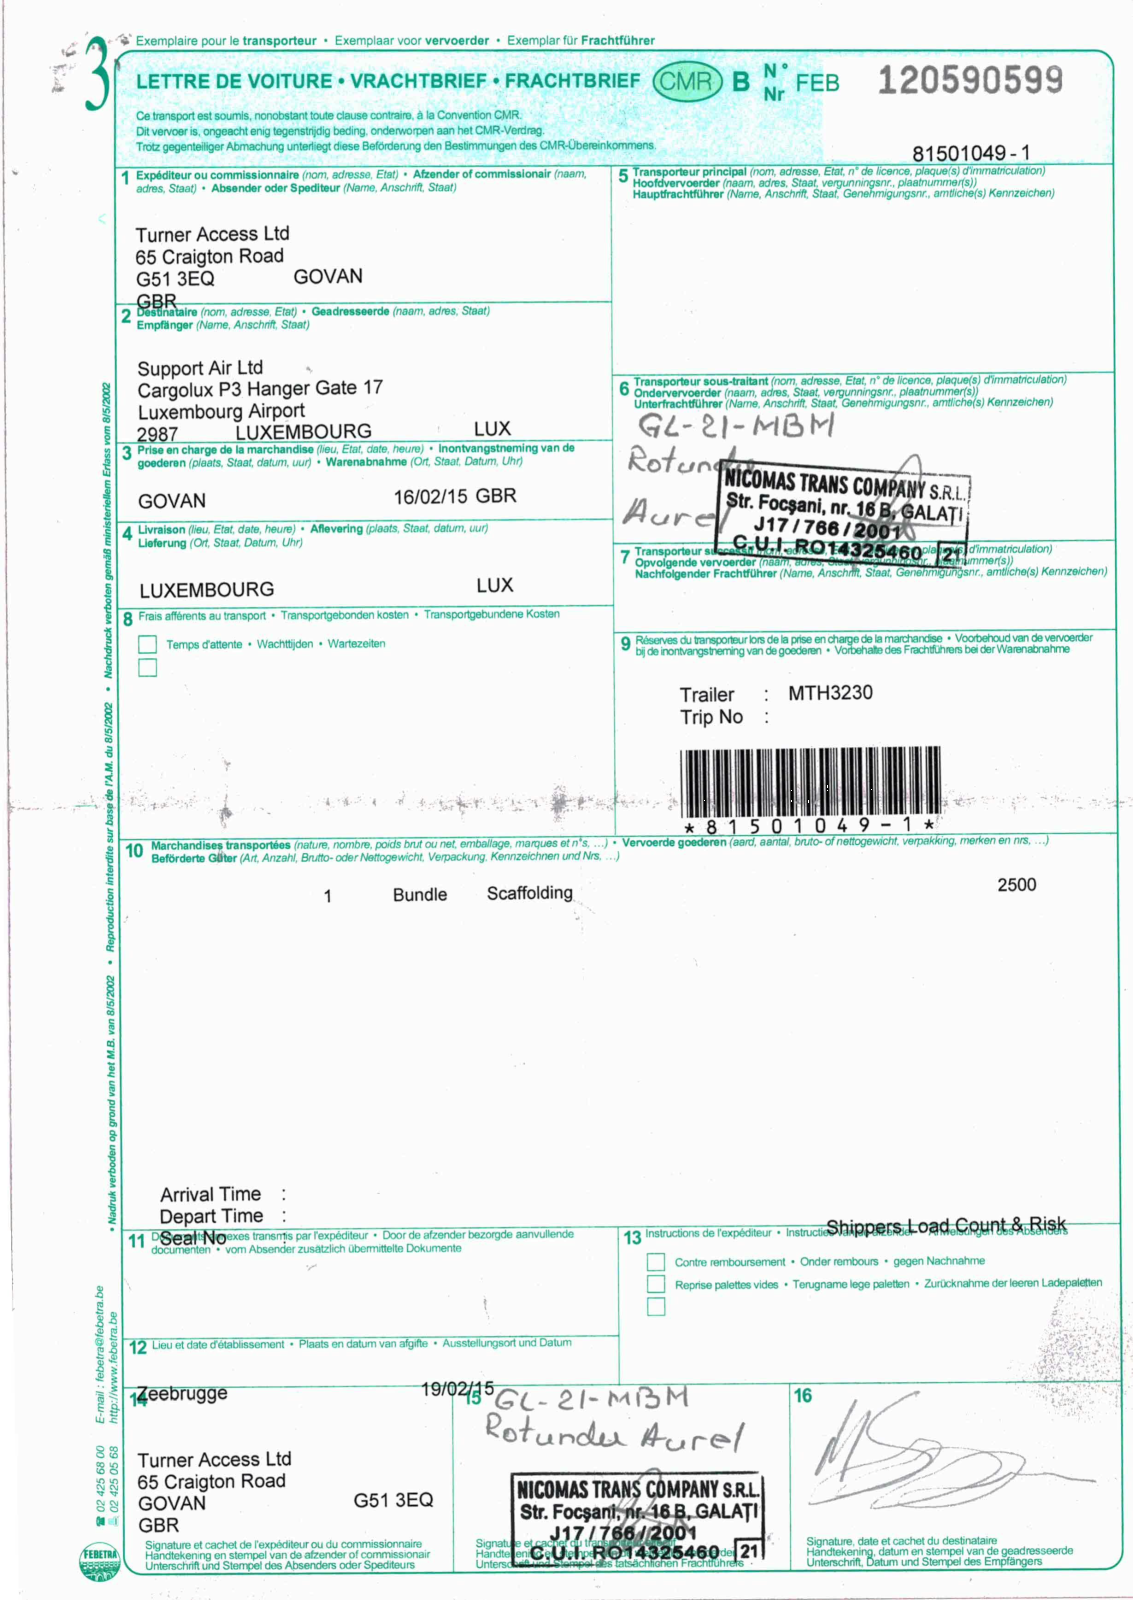
3) CB – CMR
Uses following actions:
– Import from Folder
– Extract
– Validate
– Export to Folder
Find the sample documents in:
C:\META-DEMO\MFP\CMR
Watched Folder:
C:\META-IN\MFP\CMR
Find output after processing in:
C:\META-OUT\MFP\CMR
Extract the barcode, postal code, date and CMR number from shipping documents, Export to Folder and update a daily created XML. If the barcode is not present or unreadable, OCR extraction is used to read the text under the barcode or look for the text using its format.
This is a simple workflow that makes use of the Extract Barcode and Extract Text rule.
4) CB – CONVERT TO SEARCHABLE PDF
Uses following actions:
– Import from Folder
– Convert to Searchable PDF
– Export to Folder
Find the sample documents in:
C:\META-DEMO\MFP\CONVERT TO SEARCHABLE PDF
Watched Folder:
C:\META-IN\MFP\CONVERT TO SEARCHABLE PDF
Find output after processing in:
C:\META-OUT\MFP\CONVERT TO SEARCHABLE PDF
Import different types of documents and convert them to searchable PDFs.
This is a simple workflow that demonstrates the Convert to Searchable PDF action.
5) CB – CUPOM FISCAL
Uses following actions:
– Import from Folder
– Extract
– Validate
– Export to Folder
Find the sample documents in:
C:\META-DEMO\MFP\CUPOM FISCAL
Watched Folder:
C:\META-IN\MFP\CUPOM FISCAL
Find output after processing in:
C:\META-OUT\MFP\CUPOM FISCAL
Import Brazilian receipts and extract the registration number (CPF), VAT number (CNPJ), transaction date and total amount, regardless where they are located.
This workflow is a good example on how to use the Find Word based on check sums feature to extract the CNPJ and CPF numbers.

6) CB – DELETE AND ROTATE
Uses following actions:
– Import from Folder
– Separate Document / Process Page
– Organize
– Export to Folder
Find the sample documents in:
C:\META-DEMO\MFP\DELETE AND ROTATE
Watched Folder:
C:\META-IN\MFP\DELETE AND ROTATE
Find output after processing in:
C:\META-OUT\MFP\DELETE AND ROTATE
Import a document set and automatically rotate pages, delete blank pages and check the result in an Organize action.
This workflow is a good example on how to optimally set up auto-rotation and how to delete blank pages using the Separate Document / Process Page action.
You can use our detailed online guide that uses this workflow as an example to guide you through each rule for auto-rotation and deleting blank pages.
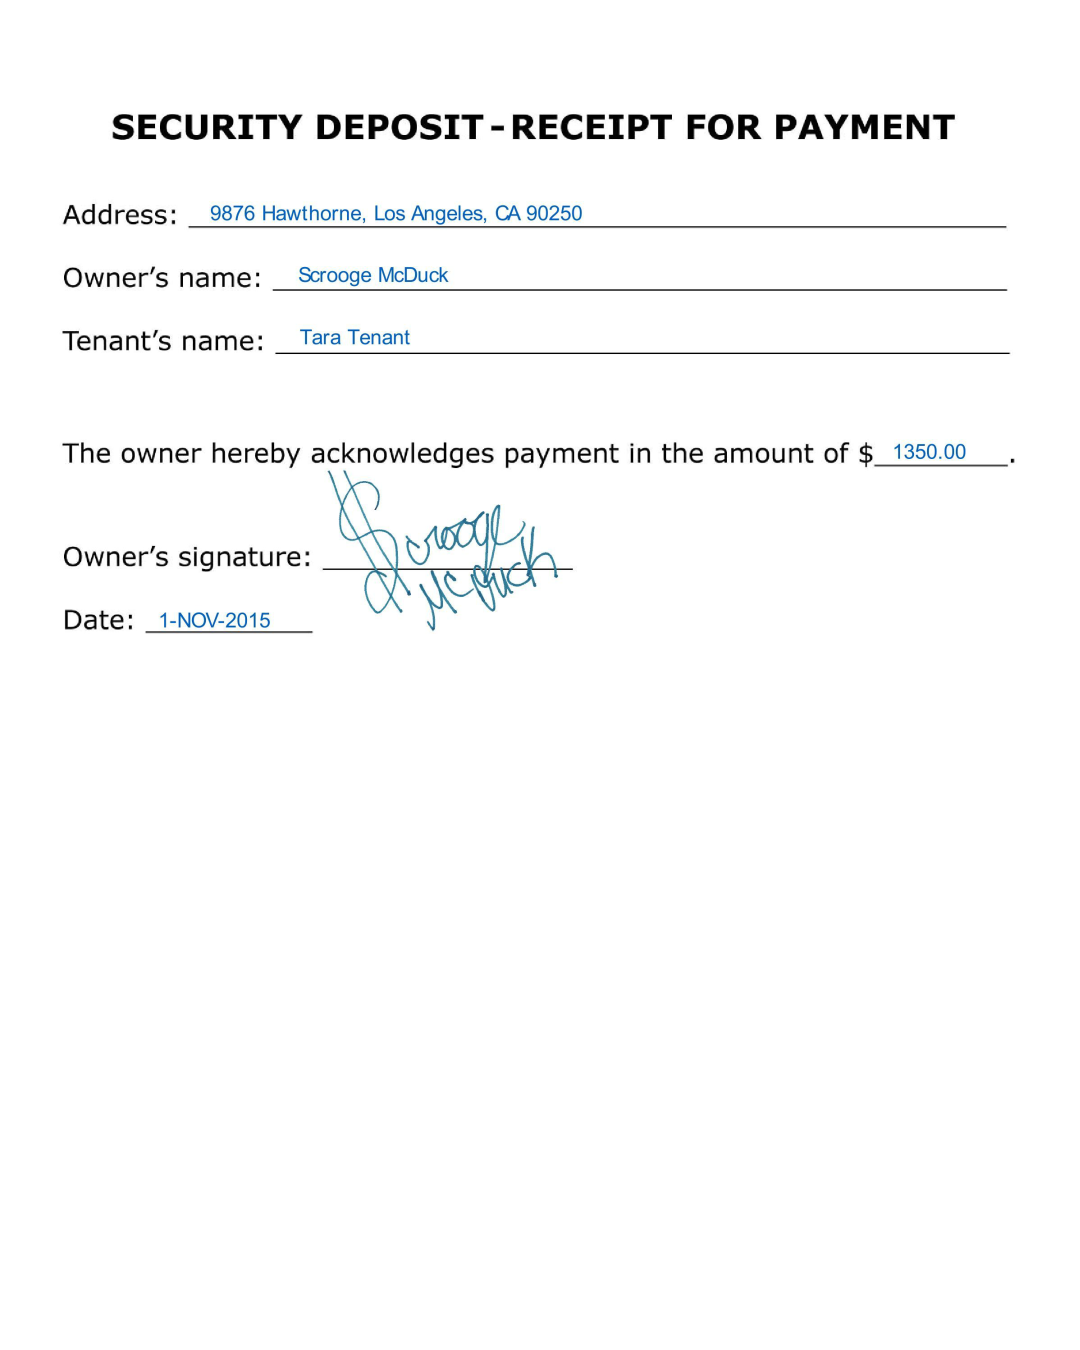
7) CB – DOCUMENT CLASS – AMOUNT
Uses following actions:
– Import from Workflow
– Extract
– Validate
– Export to Folder
– Export to Workflow
Find the sample documents in:
C:\META-DEMO\MFP\DOCUMENT CLASSIFICATION
Watched Workflow:
CB – DOCUMENT CLASSIFICATION
Find output after processing in:
C:\META-OUT\MFP\LANDLORD FORMS
This workflow watches the CB – DOCUMENT CLASSIFICATION workflow using the Import from Workflow action.
Inherits the already extracted values from the previous workflow and extracts the amount on the documents.
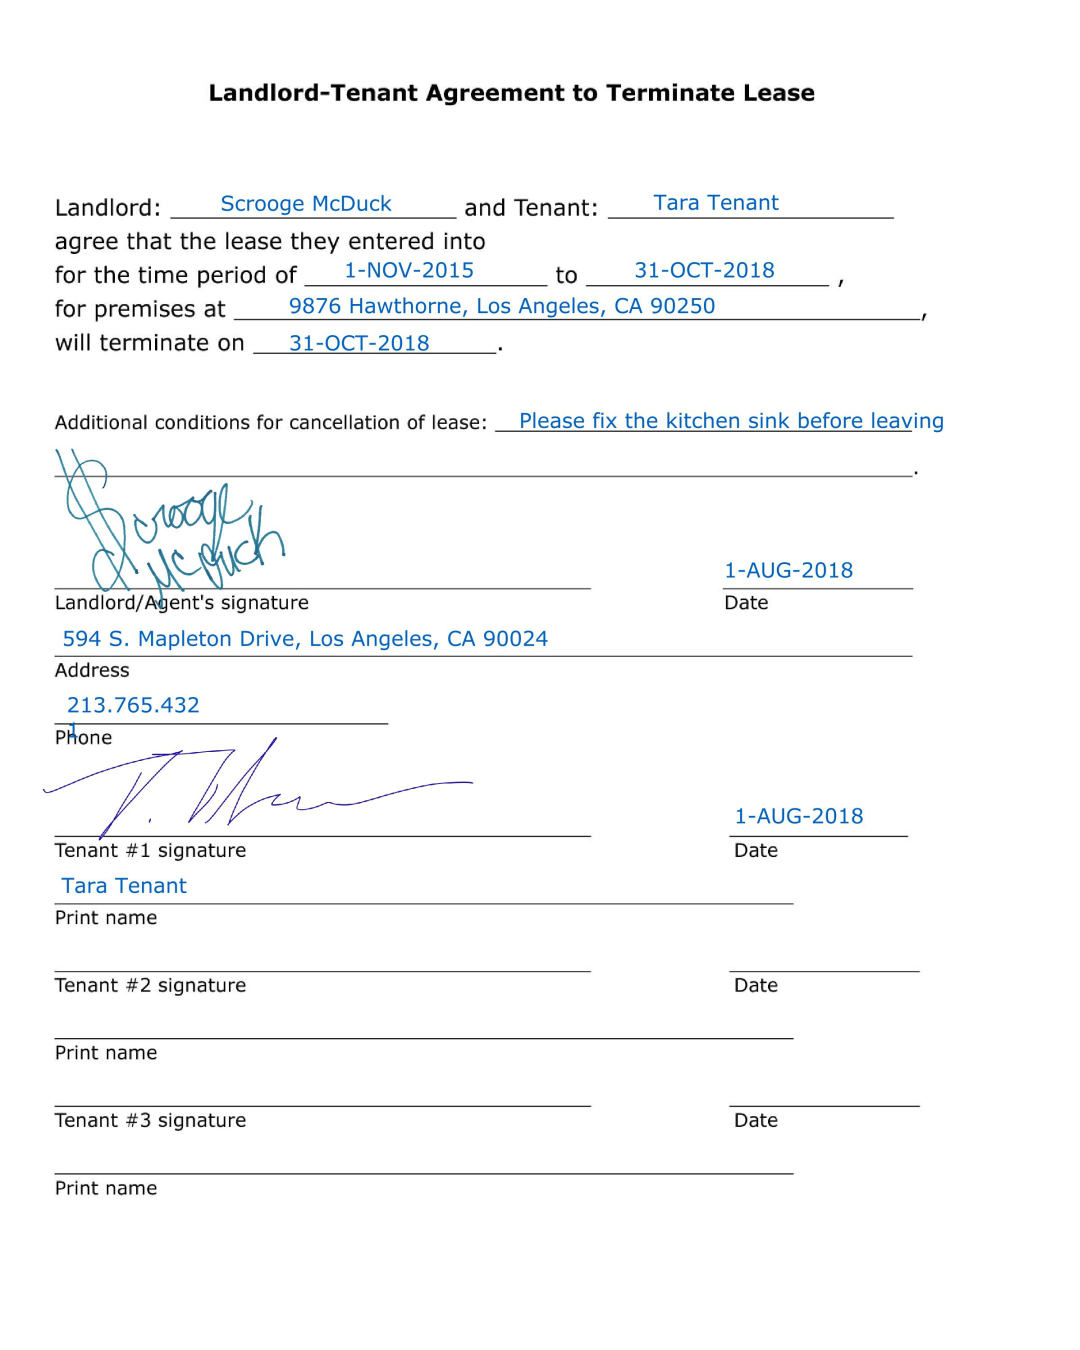
8) CB – DOCUMENT CLASS – DATE
Uses following actions:
– Import from Workflow
– Extract
– Validate
– Export to Folder
– Export to Workflow
Find the sample documents in:
C:\META-DEMO\MFP\DOCUMENT CLASSIFICATION
Watched Workflow:
CB – DOCUMENT CLASSIFICATION
Find output after processing in:
C:\META-OUT\MFP\LANDLORD FORMS
This workflow watches the CB – DOCUMENT CLASSIFICATION workflow using the Import from Workflow action.
Inherits the already extracted values from the previous workflow and extracts the date on the documents.
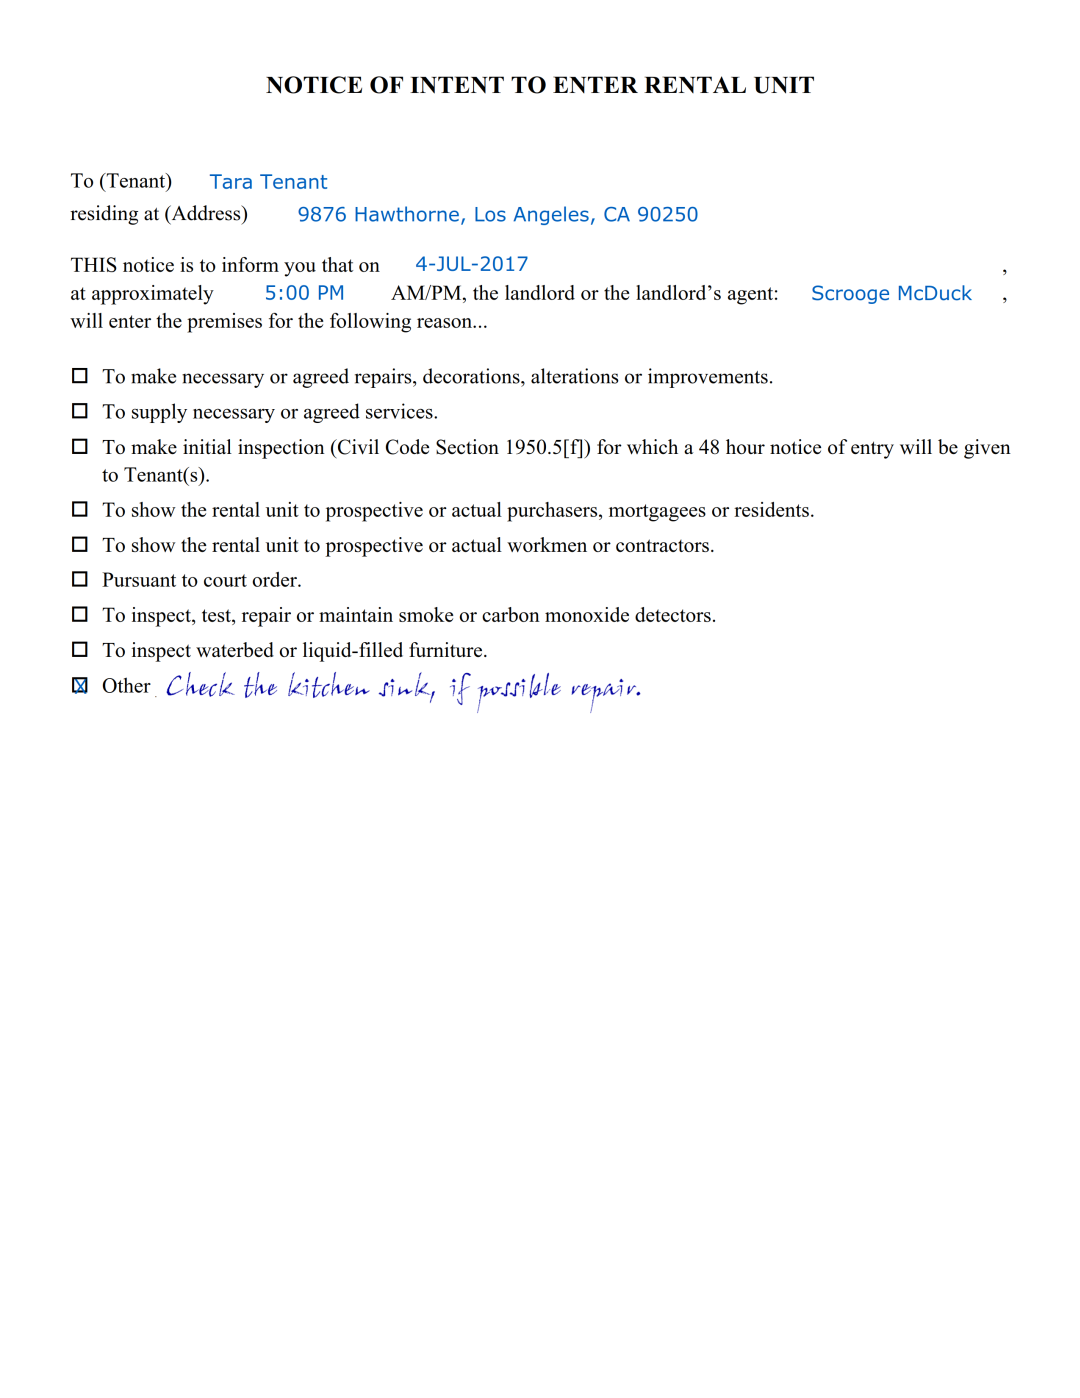
9) CB – DOCUMENT CLASS – INTENT TO ENTER
Uses following actions:
– Import from Workflow
– Extract
– Validate
– Distribute
– Export to Folder
– Export to Workflow
Find the sample documents in:
C:\META-DEMO\MFP\DOCUMENT CLASSIFICATION
Watched Workflow:
CB – DOCUMENT CLASSIFICATION
Find output after processing in:
C:\META-OUT\MFP\LANDLORD FORMS
This workflow watches the CB – DOCUMENT CLASSIFICATION workflow using the Import from Workflow action.
Inherits the already extracted values from the previous workflow and extracts the “Reason” using Mark Detection. If the reason is “other”, the operator needs to enter the value manually during validation.
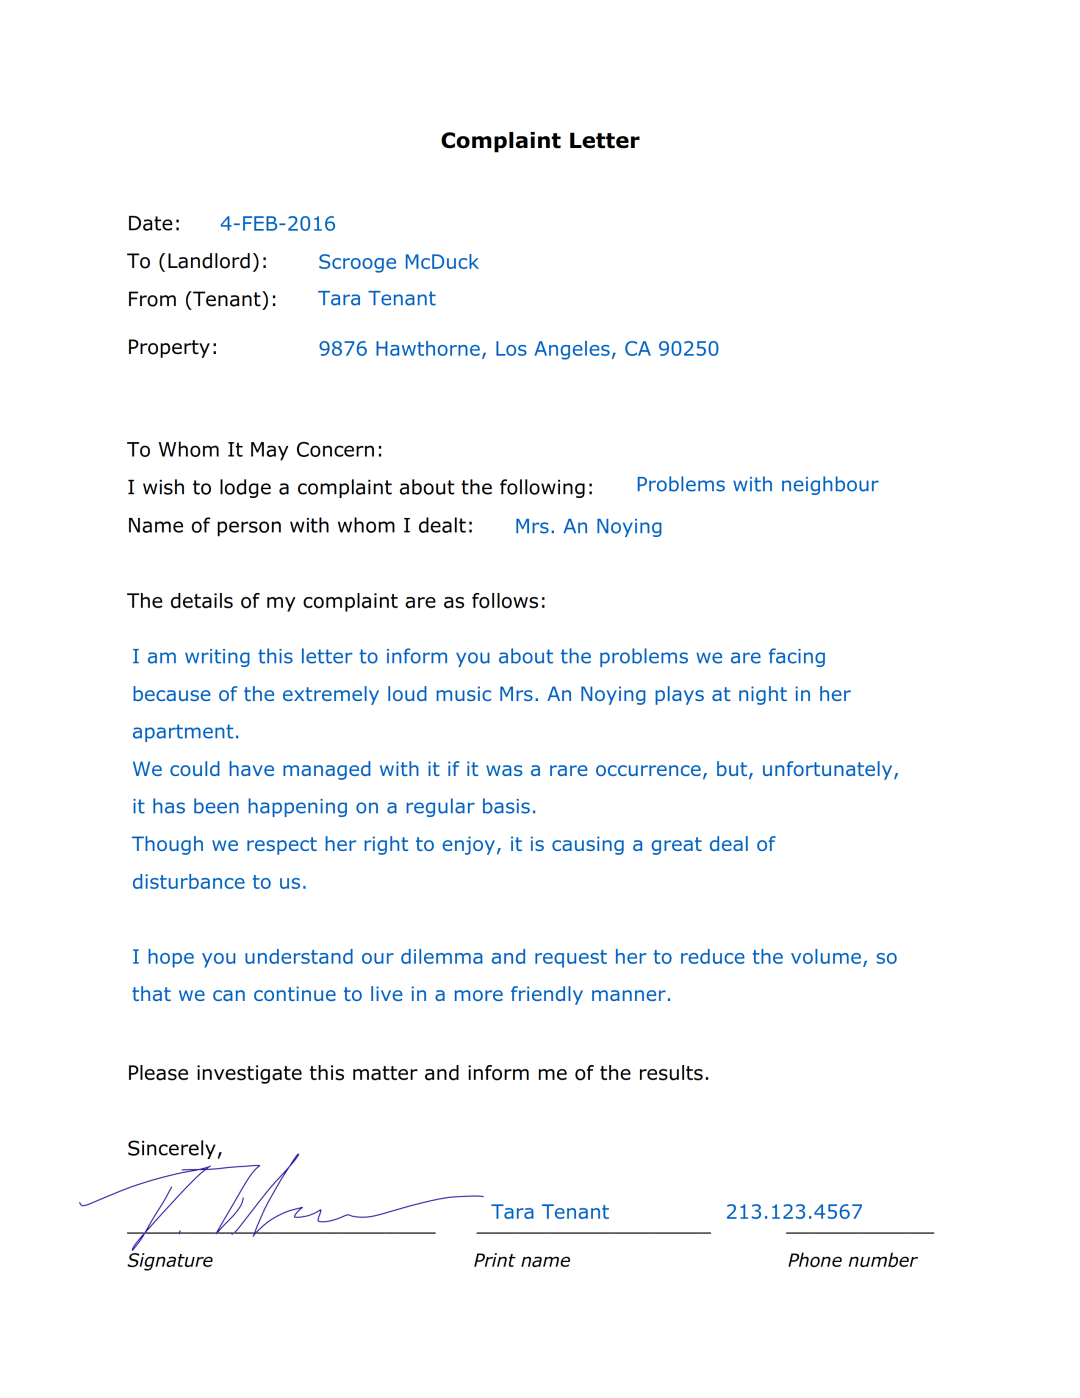
10) CB – DOCUMENT CLASS – SUBJECT
Uses following actions:
– Import from Workflow
– Extract
– Validate
– Export to Folder
– Export to Workflow
Find the sample documents in:
C:\META-DEMO\MFP\DOCUMENT CLASSIFICATION
Watched Workflow:
CB – DOCUMENT CLASSIFICATION
Find output after processing in:
C:\META-OUT\MFP\LANDLORD FORMS
This workflow watches the CB – DOCUMENT CLASSIFICATION workflow using the Import from Workflow action.
Inherits the already extracted values from the previous workflow and extracts the subject and summary of the letter.
11) CB – DOCUMENT CLASSIFICATION
Uses following actions:
– Import from Folder
– Import from Workflow
– Extract
– Validate
– Distribute
– Export to Workflow
– Export to Email
Find the sample documents in:
C:\META-DEMO\MFP\DOCUMENT CLASSIFICATION
Watched Folder:
C:\META-IN\MFP\DOCUMENT SEPARATION
The documents get exported to the following workflows:
CB – DOCUMENT CLASS – AMOUNT
CB – DOCUMENT CLASS – DATE
CB – DOCUMENT CLASS – INTENT TO ENTER
CB – DOCUMENT CLASS – SUBJECT
This workflow is a good example on how to use the Distribute action in combination with the Export to Workflow action.

12) CB – TAX DEDUCTION FORMS
Uses following actions:
– Import from Folder
– Import Email
– Separate Document
– Extract
– Distribute
– Validate
– Export to Folder
– Export to DocuWare
Find the sample documents in:
C:\META-DEMO\MFP\TAX DEDUCTION FORMS
Watched Folder:
C:\META-IN\MFP\TAX DEDUCTION FORMS
Find output after processing in:
C:\META-OUT\MFP\TAX DEDUCTION FORMS
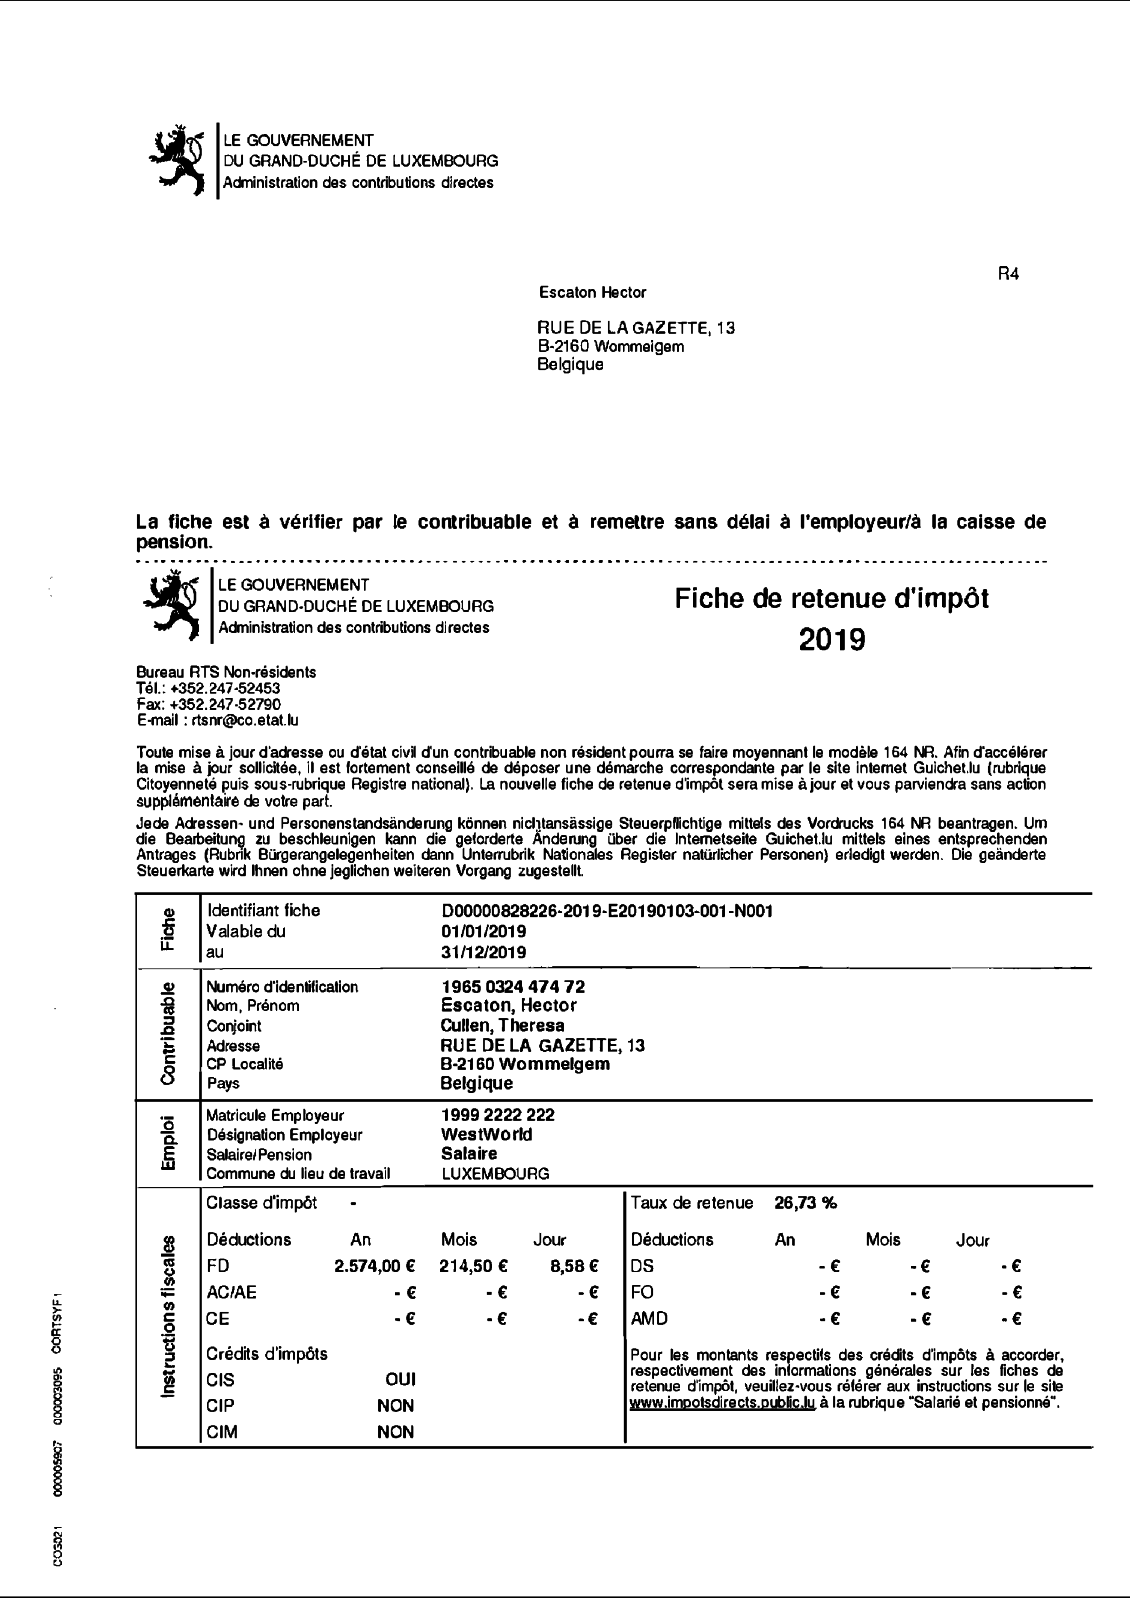
Import Luxembourgian tax deduction forms (Fiches de retenue d’impôt) from folder (scanned document sets) and email (already separated forms). The latter will go straight to Extract while the sets are automatically separated.
It extracts fields like the form ID, the employee’s ID number, the employer’s ID, location, common place of work, tax rate, deduction rates, etc.
When importing photos of tax forms (JPG) they get sent to a special validate action. This is because photos tend to be a of poor quality and each field needs to be double-checked by the operator.
This is a popular workflow for job agencies in Luxembourg and HR departments.
This workflow is a good example on how to use the Export to DocuWare action.
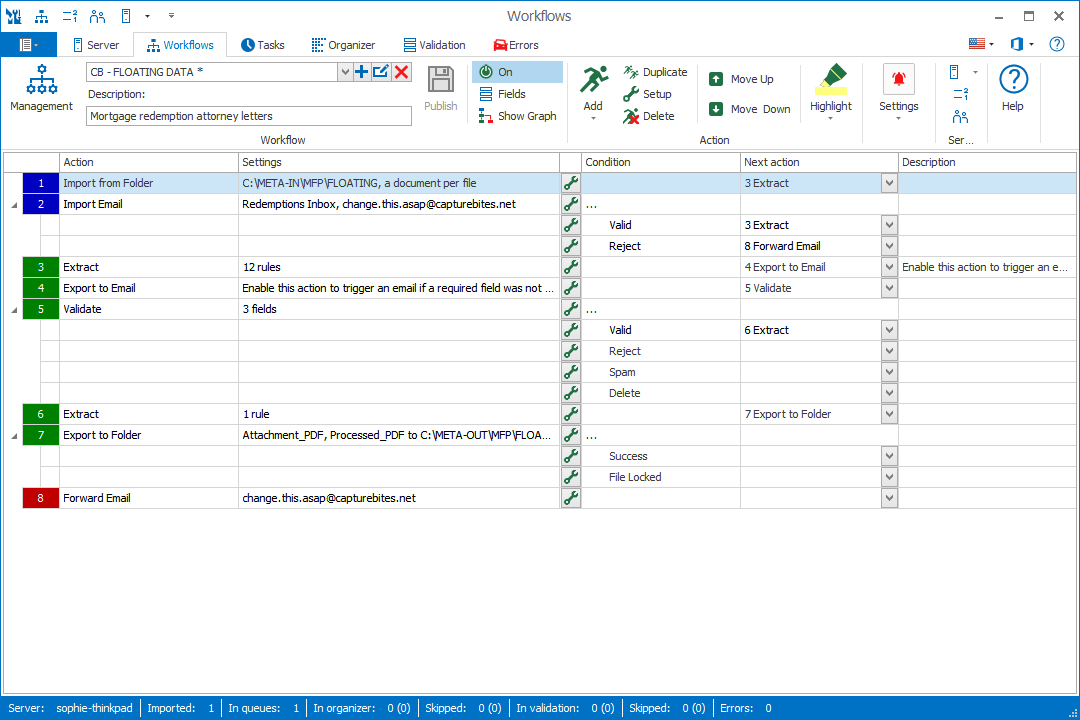
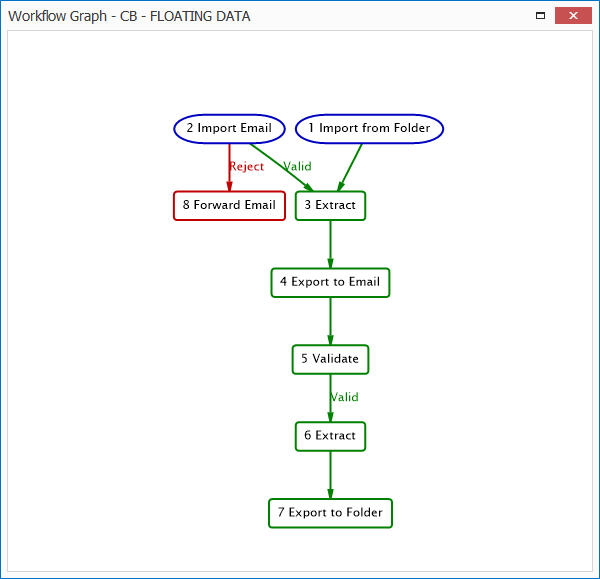
13) CB – FLOATING DATA
Uses following actions:
– Import from Folder
– Import Email
– Extract
– Validate
– Export to Folder
– Forward Email
Find the sample documents in:
C:\META-DEMO\MFP\FLOATING
Watched Folder:
C:\META-IN\MFP\FLOATING
Find output after processing in:
C:\META-OUT\MFP\FLOATING
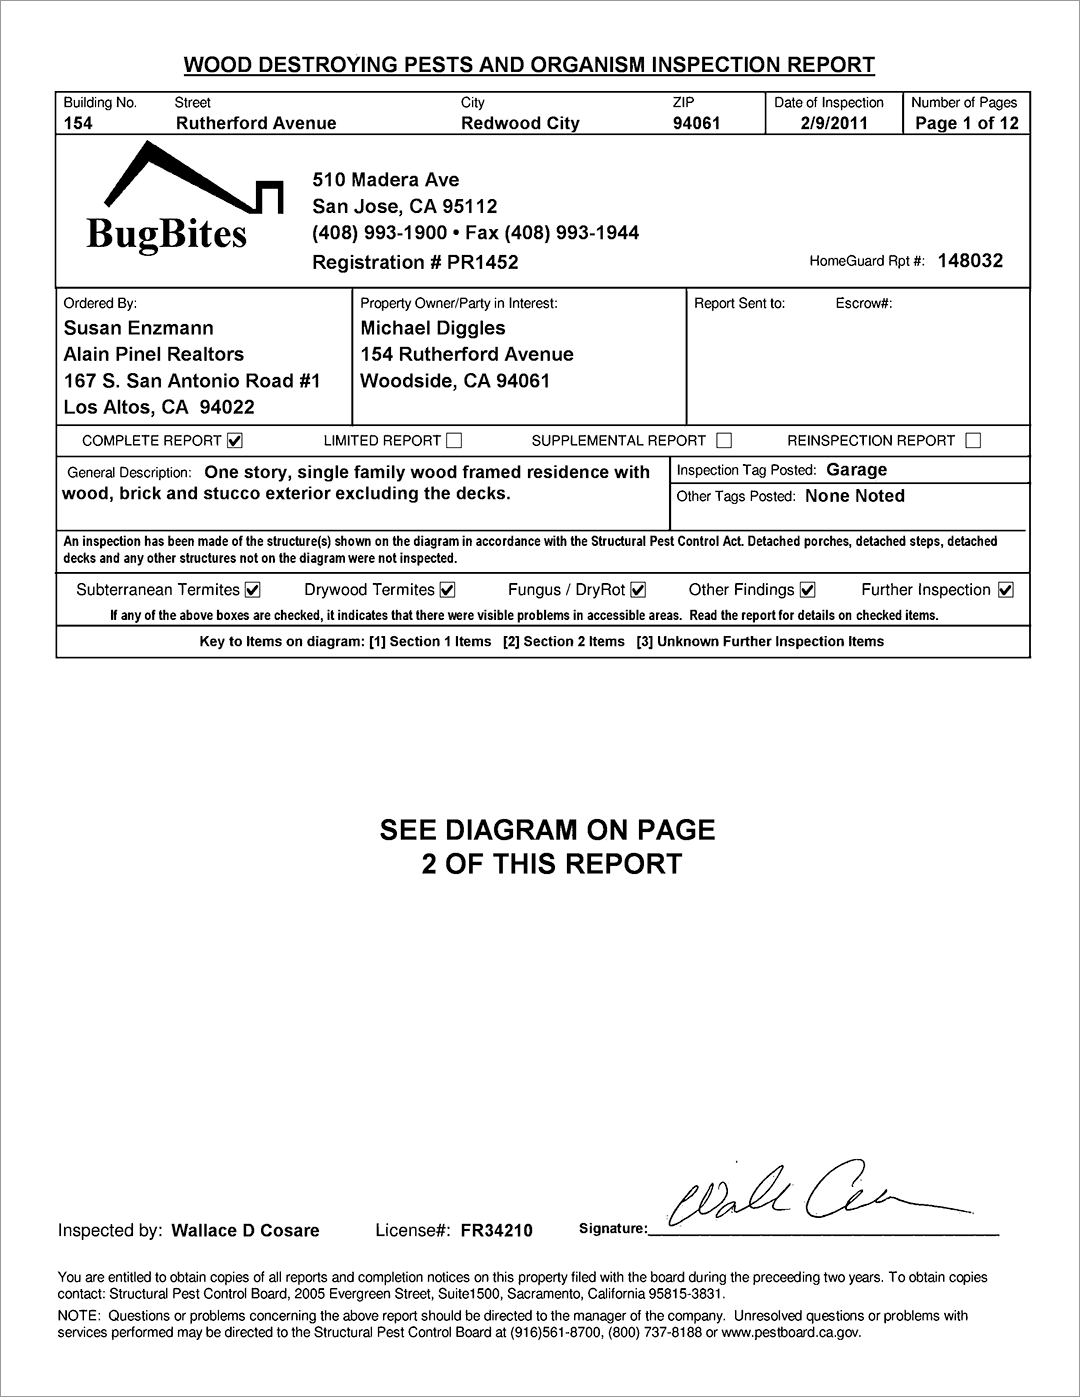
14) CB – INSPECTION REPORTS
Uses following actions:
– Import from Folder
– Import Email
– Separate Document
– Organize
– Extract
– Validate
– Export to Folder
Find the sample documents in:
C:\META-DEMO\MFP\INSPECTION REPORTS-SETUP
Watched Folder:
C:\META-IN\MFP\INSPECTION REPORTS
Find output after processing in:
C:\META-OUT\MFP\INSPECTION REPORTS
Import inspection reports from folder (scanned PDF holding multiple reports) and email (e-PDF). Automatically separate files holding multiple inspection reports using keywords. Extract the report number, inspector name and total due value.
This workflow is a good example on how you can use the document separation feature.
You can configure a more advanced version of this workflow step-by-step, adding the use of database look-up and configuring index files, by following our free training tutorial.
15) CB – INVOICES US
Uses following actions:
– Import from Folder
– Import Email
– Organize
– Extract
– Validate
– Export to Email
– Export to Folder
Find the sample documents in:
C:\META-DEMO\MFP\INVOICES
Watched Folders:
C:\META-IN\MFP\INVOICES\SINGLE
&
C:\META-IN\MFP\INVOICES\MULTI
Find output after processing in:
C:\META-OUT\MFP\INVOICES
Extract data from US invoices. These can range from e-PDF to scanned PDF, multiple invoices in 1 PDF, etc.
This workflow makes use of most of the MetaServer Extract, Lookup and Validate rules. It also uses the Export to Email action.
16) CB – LATE ARCHIVING
Uses following actions:
– Import from Folder
– Separate Document / Process Page
– Validate
– Export to SAP R/3
Find the sample documents in:
C:\META-DEMO\MFP\LATE ARCHIVING
Watched Folders:
C:\META-IN\MFP\LATE ARCHIVING
Find output after processing in:
SAP server
Separate documents based on barcodes on invoices and export the barcode value to an SAP server.
This workflow is a good example on how to use the Export to SAP R/3 action with a Late Archiving with barcode scenario.
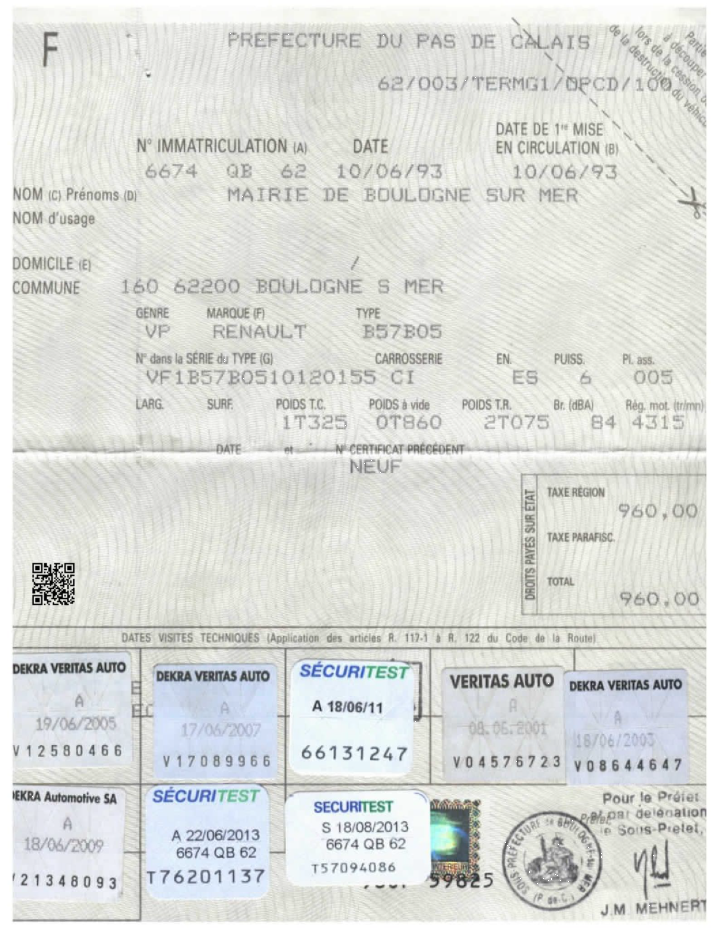
17) CB – PAGE SIZE SEPARATION
Uses following actions:
– Import from Folder
– Separate Document / Process Page
– Organize
– Extract
– Export to Folder
Find the sample documents in:
C:\META-DEMO\MFP\PAGE SIZE SEPARATION
Watched Folders:
C:\META-IN\MFP\PAGE SIZE SEPARATION
Find output after processing in:
C:\META-OUT\MFP\PAGE SIZE SEPARATION
Separate vehicle documents based on the page size, automatically rotate pages based on the QR code and extract data.
This workflow is a good example on how to use the { Unit of Length } variable.
It works for both US and Metric regions. It separates on A5 pages which can be scanned in portrait and landscape mode. Both orientations are detected and trigger document separation.
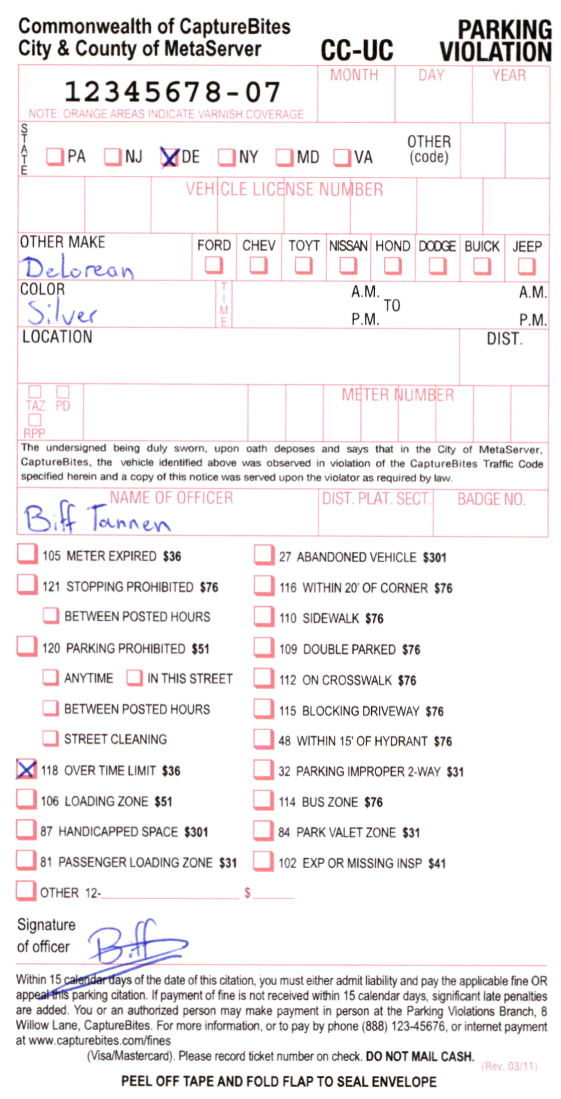
18) CB – PARKING VIOLATIONS
Uses following actions:
– Import from Folder
– Extract
– Validate
– Export to Folder
Find the sample documents in:
C:\META-DEMO\MFP\PARKING VIOLATIONS
Watched Folders:
C:\META-IN\MFP\PARKING VIOLATIONS
Find output after processing in:
C:\META-OUT\MFP\PARKING VIOLATIONS
Extract data from Parking Violation Tickets reading the check boxes and detect if the ticket is signed or not.
This workflow is a good example on how to use the Mark Detection rule and to see how page registration works for perfect mark detection on incorrectly aligned documents.
19) CB – QUESTIONNAIRES
Uses following actions:
– Import from Folder
– Extract
– Validate
– Export to Folder
Find the sample documents in:
C:\META-DEMO\MFP\QUESTIONNAIRE
Watched Folders:
C:\META-IN\MFP\QUESTIONNAIRE
Find output after processing in:
C:\META-OUT\MFP\QUESTIONNAIRE
Extract the answers from training questionnaires.
This workflow is a good example on how to use the Mark Detection rule and make use of red drop out color on your forms to get a highly accurate mark detection result.

20) CB – SHIPPING
Uses following actions:
– Import from Folder
– Extract
– Validate
– Export to Email
– Export to Folder
Find the sample documents in:
C:\META-DEMO\MFP\SHIPPING
Watched Folder:
C:\META-IN\MFP\SHIPPING
Find output after processing in:
C:\META-OUT\MFP\SHIPPING
Extract the document type, barcode and PO number. Export to folder, but export exceptions to email.
This workflow makes use of the Extract Barcode and Extract Text rule.
21) CB – STATISTICS
Uses following actions:
– Import from Folder
– Import from Email
– Extract
– Validate
– Export to Folder
– Export to Database
Find the sample documents in:
C:\META-DEMO\MFP\STATISTICS
Watched Folder:
C:\META-IN\MFP\STATISTICS
Find output after processing in:
C:\META-OUT\MFP\STATISTICS
Import inspection reports and extract the report number, inspector name (using a DB), telephone number, inspection date and total due.
Export the document to a folder and export all the extracted data + export extra metadata to an MS-Access database.
This workflow is a very good introduction to the Export to Database action.
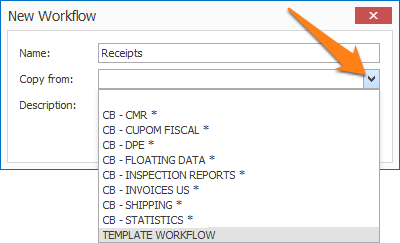
22) TEMPLATE WORKFLOW
Uses following actions:
– Import from Folder
– Extract
– Validate
– Export to Folder
When making a new workflow, you can “copy from” this basic workflow to use as a template. See screen shot.
The template comes with a predefined set of fields, and actions to import from folder, extract, validate and export to a folder. Adjust the settings to your needs.
Vous pouvez télécharger et installer le French Demo Pack à partir de la page produit de MetaServer. Assurez-vous de laisser l’option “Install configuration files” activée, dans le programme d’installation. Le French Demo Pack installera 7 workflows de démo en français pour vous aider à vous familiariser avec MetaServer et ses fonctions avec des documents en français.
Un aperçu de ces workflows:
EN
You can download and install the French Demo Pack from the MetaServer product page. Make sure you leave the “Install configuration files” option in the installer enabled. The French Demo Pack will install 7 different French demo workflows to help you get acquainted with MetaServer and its functions with french descriptions and labels.
A quick overview of these demo workflows:
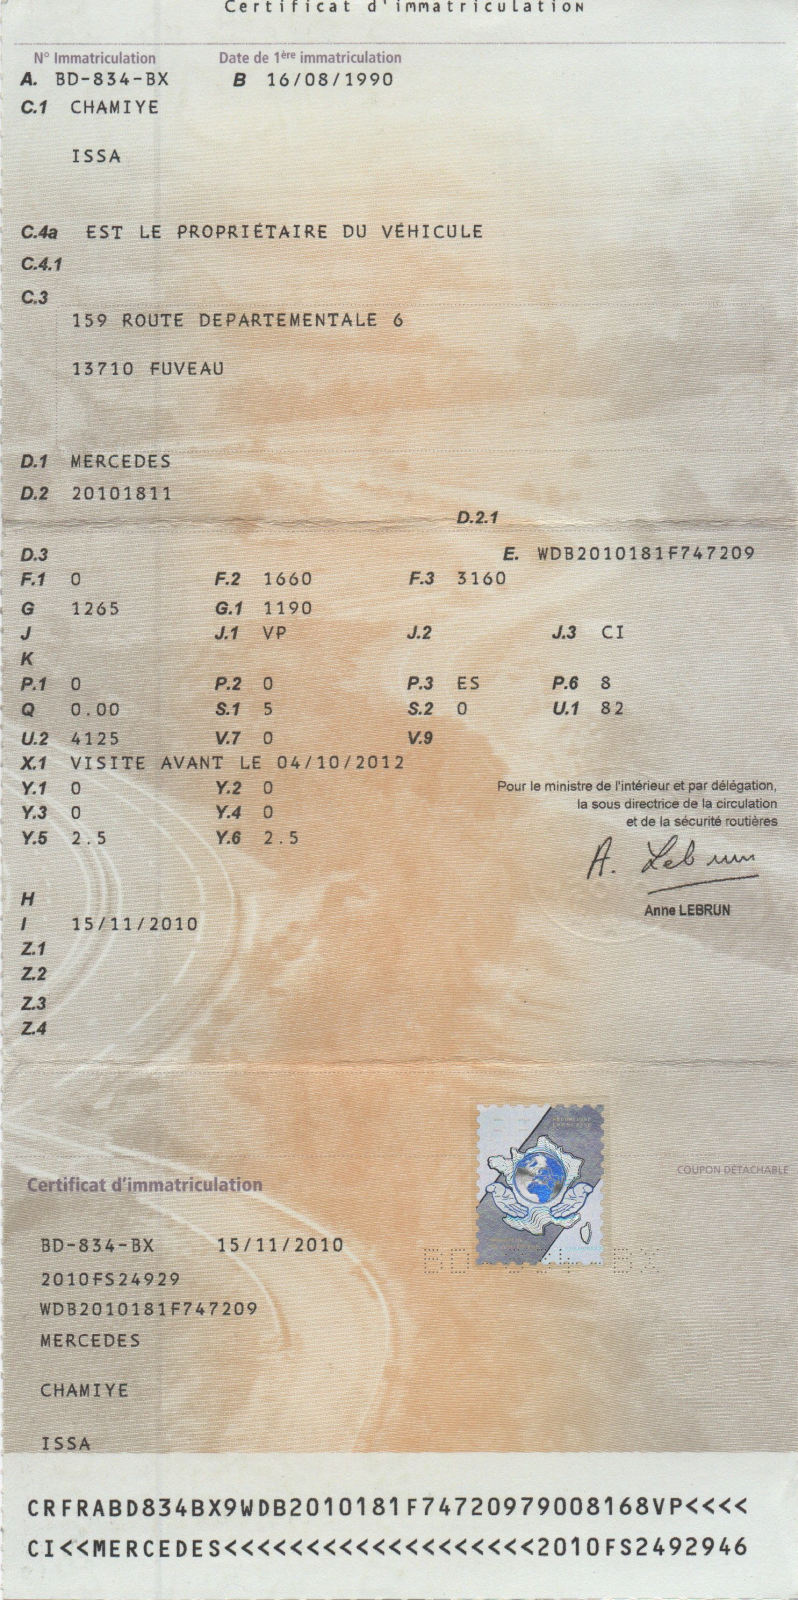
1) CB – CARTE GRISE
Il utilise les actions suivantes:
– Import from Folder
– Extract
Des exemples de documents:
C:\META-DEMO\MFP\CARTE GRISE
Dossier surveillé:
C:\META-IN\MFP\CARTE GRISE
Extraire le numéro d’identification du véhicule et la marque des certificats d’immatriculation (cartes grises).
C’est un workflow simple pour l’extraction des données avec des règles Extract comme Find Word Group with Mask / Words, Replace Text, Set Field Value, etc.
EN
Extract the vehicle identification number and brand from car registration forms.
This is a simple workflow demonstrating how to extract values using different Extract rules like Find Word Group with Mask / Words, Replace Text, Set Field Value, etc.
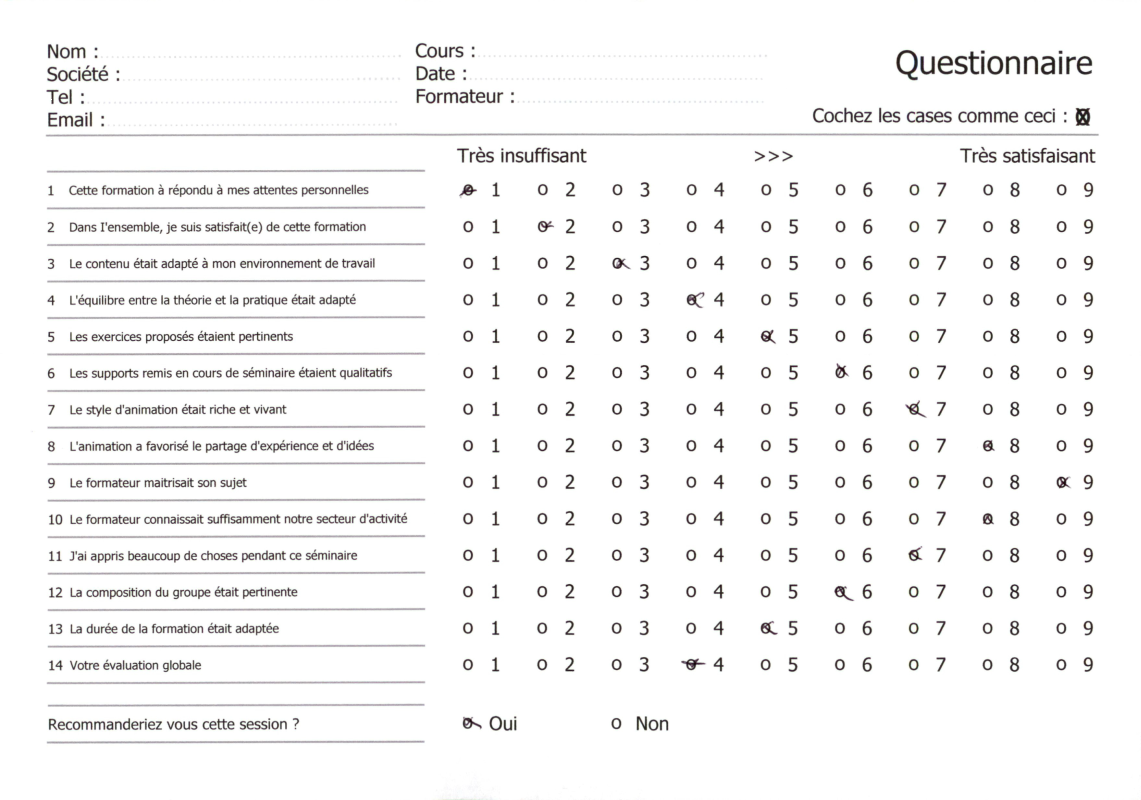
2) CB – CHOIX MULTIPLE
Il utilise les actions suivantes:
– Import from Folder
– Extract
– Validate
– Export to Folder
Des exemples de documents:
C:\META-DEMO\MFP\CHOIX MULTIPLE
Dossier surveillé:
C:\META-IN\MFP\CHOIX MULTIPLE
Dossier de sortie:
C:\META-OUT\MFP\CHOIX MULTIPLE
Extraction des questionnaires à choix multiple (cases à cocher) concernant une évaluation d’une formation. Exportation en format PDF et mise à jour d’un fichier CSV avec les résultats.
Ce workflow est une bonne démonstration de la règle Mark Detection.
EN
Extract the answers from multiple choice questionnaires about a training evaluation, export the PDF and update a CSV file with the results.
This workflow is a good example on how to use the Mark Detection rule.
3) CB – CMR
Il utilise les actions suivantes:
– Import from Folder
– Extract
– Validate
– Export to Folder
Des exemples de documents:
C:\META-DEMO\MFP\CMR
Dossier surveillé:
C:\META-IN\MFP\CMR
Dossier de sortie:
C:\META-OUT\MFP\CMR
Extraction d’un code à barre, du code postal et du numéro CMR des lettres de voiture. Exportation en format PDF et mise à jour d’un fichier XML.
Si le code à barre est illisible, nous utilisons à la place une règle d’extraction de texte pour lire le texte sous le code à barre.
C’est un workflow simple qui utilise des règles Extract comme Extract Barcode et Extract Text conditionnel.
EN
Extract the barcode, postal code, date and CMR number from shipping documents, export the PDF and update a daily created XML.
If the barcode is unreadable, we use a conditional extract text rule to read the text below the barcode instead.
This is a simple workflow that makes use of the Extract Barcode and conditional Extract Text rule.
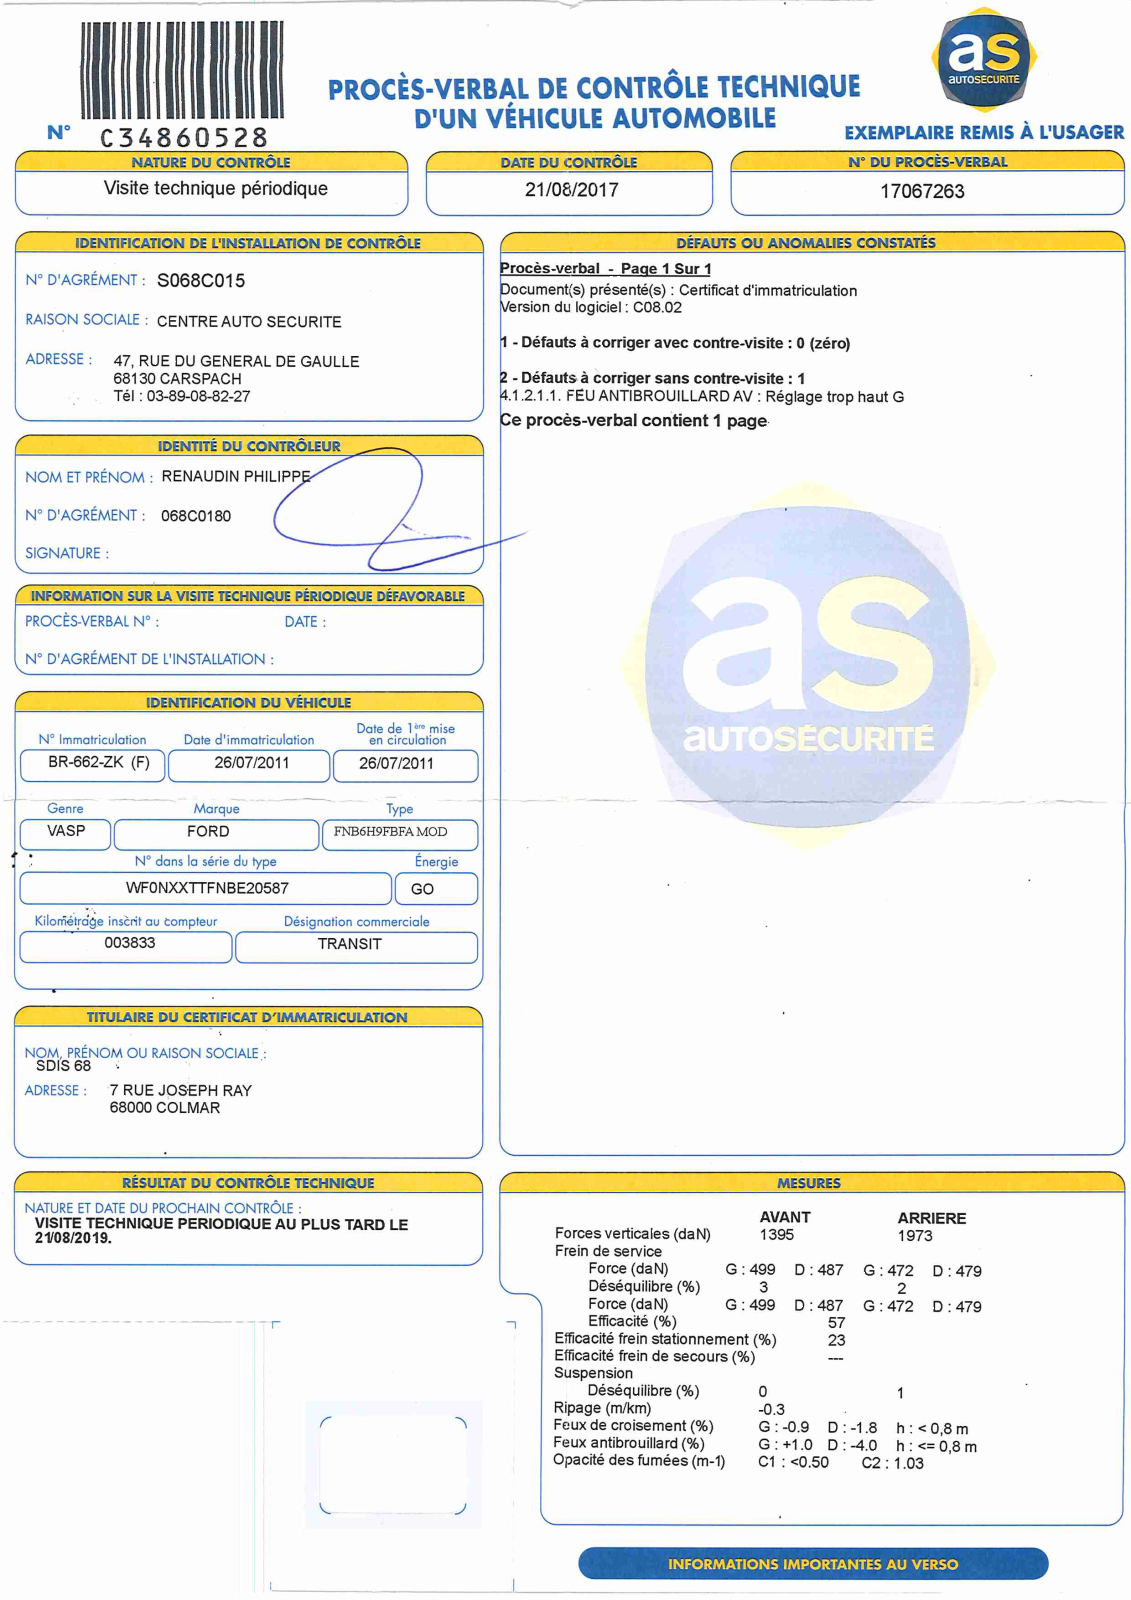
Il utilise les actions suivantes:
– Import from Folder
– Extract
– Validate
– Export to Folder
Des exemples de documents:
C:\META-DEMO\MFP\CONTROLE TECHNIQUE
Dossier surveillé:
C:\META-IN\MFP\CONTROLE TECHNIQUE
Dossier de sortie:
C:\META-OUT\MFP\CONTROLE TECHNIQUE
Extraction du numéro du procès-verbal, de la date du contrôle et d’immatriculation et de la première mise en circulation, la marque et le numéro VIN. Exportation du PDF et mise à jour d’un fichier XML.
C’est un workflow qui utilise des règles Extract comme Find Word Group with Mask / Words, Format Date and Time, etc.
EN
Extract the report number, inspection, registration and first circulation date, brand and VIN number, export the PDF and update an XML.
C’est un workflow qui utilise des règles Extract differentes comme des règles Find Word Group with Mask / Words, Format Date and Time, etc.
Il utilise les actions suivantes:
– Import from Folder
– Separate Document
– Organize
– Validate
– Export to Folder
Des exemples de documents:
C:\META-DEMO\MFP\DPE
Dossier surveillé:
C:\META-IN\MFP\DPE
Dossier de sortie:
C:\META-OUT\MFP\DPE
Séparation des jeux de documents de rapports de performance énergétique avec visualisation du résultat de la séparation dans le Organizer. Puis, les documents passent l’action Extract pour extraires les données clés. Finalement les documents passent en validation et sont exportés vers un dossier en format PDF. Les fichiers PDF sont nommés selon les données extraites des rapports.
Extraction du numéro d’enregistrement ADEME (agence de l’environnement et de la maîtrise de l’energie) et recherche de l’adresse associée à l’aide du recherche de base de données (DB Lookup).
EN
Separate documents holding multiple energy performance reports and show the separation results in the Organizer. Any individual reports are sent directly to the Extract action.
Extract the ADME (Agency for Environment and Energy Management) registration number and find the associated address using database lookup.
6) CB – FACTURES
Il utilise les actions suivantes:
– Import from Folder
– Organize
– Extract
– Validate
– Export to Folder
Des exemples de documents:
C:\META-DEMO\MFP\FACTURES
Dossier surveillé:
C:\META-IN\MFP\FACTURES
Dossier de sortie:
C:\META-OUT\MFP\FACTURES
Extraction du numéro de facture, du numéro de TVA, de la date, etc. Les documents contenant plusieurs factures vont d’abord à l’Organizer.
Ce workflow utilise des règles Extract différentes comme des règles Find Word with Type, Find Number, Format Date and Time, etc.
Le workflow utilise également tous les différents types de règles de Validation.
EN
Extract the invoice number, tax number, date, etc. from invoices. Individual invoices are sent directly to the Extract action, documents holding multiple invoice are first sent to the Organizer.
This workflow uses different Extract rules like Find Word with Type, Find Number, Format Date and Time, etc.
It also uses all different types of Validate rules.

7) CB – IMMOBILIER
Il utilise les actions suivantes:
– Import from Folder
– Extract
– Validate
– Convert to Searchable PDF
– Export to Folder
Des exemples de documents:
C:\META-DEMO\MFP\IMMOBILIER
Dossier surveillé:
C:\META-IN\MFP\IMMOBILIER
Dossier de sortie:
C:\META-OUT\MFP\IMMOBILIER
Séparation des jeux de documents immobiliers avec des intercalaires à code à barre. Aprés séparation, les intercalaires de séparation sont supprimés. Puis, MetaServer fait l’extraction du type de document et de la date. Les autres données, adresse et code postal, sont introduit pendant la validation en utilisant l’outil d’extraction text. L’introduction du code postal déclenche automatiquement la recherche de la ville dans la base de données des codes postaux FR.
Avant l’exportation, le document est d’abord converti en format PDF consultable (Searchable PDF).
EN
Separate real estate documents using barcode separator sheets and delete these separator sheets. After this, extract the document type and date.
Before Export, the document is converted to a Searchable PDF.
A workflow is like a configuration to process a certain document type. It’s a combination of actions and rules to process documents and starts with one or more import actions followed by a combination of separation, organizing, processing, extraction and validation actions to exit the workflow through one or more export actions.
Typically, you have a workflow per document type. For example, a Vendor Invoice workflow, a POD workflow, a Delivery Ticket workflow and so on. Multiple workflows can run on the same server at the same time.
You configure your workflows in the MetaServer Administration Client under the Workflows tab.

TIP: Please refer to the help pages for a more in-depth explanation of all the actions and rules. We also have a MetaServer tutorial available which includes a complete workshop to learn how to create a workflow from scratch.
In a Workflow, you set up how your documents are going to be processed. You do this using different actions in a certain sequence. Each action has its own setup and conditions, which allows flexible chaining of each action.
This is a short summary of the available actions:
– Import Email*: import email from a specified inbox (using IMAP) or from disk.
– Import from Folder: import PDF / TIF / JPG / PNG / *Word / *Excel / *Text (TXT, CSV) files from a specified folder and its sub folders.
– Import from Workflow: import documents and metadata from another workflow. This action is the entry point for another workflow’s Export to Workflow action.
– Separate Document / Process Page: automatically separate documents and delete or rotate pages based on rules.
– Organize: send the file to the organizer to visually separate the document, edit the order of pages, delete pages, etc.
– Extract*: define a sequence of rules to extract and format data.
– Validate: based on the validation rules, send invalid documents to the validation viewer to complete or check the data.
– Distribute: based on the value of a specific field, you can send a document to a different action in the workflow
– Run Programs: run one or more windows commands or external programs accepting command line parameters before and after Export.
– Delete Page(s): delete certain pages of the document (e.g. delete separator sheets)
– Add External Documents: append or prepend additional documents that already exist on disk to the document processed by MetaServer.
– Digital Imprinter*: digitally imprint fixed text, field or metadata values or a QR code on the first page, on all pages of your documents or on an additional blank header sheet, automatically prepended to each document
– Split Booklets*: split booklets in individual pages in the correct order without cutting the original document.
– Convert to Black and White: convert specific pages of your document to black & white.
– Convert to Image PDF: convert any of the supported file types to an Image-only PDF.
– Convert to JPG: convert any of the supported file types to JPG.
– Kofax VRS*: enhance scanned images with Kofax VRS to autorotate, deskew, detect color, remove background noise, convert to black and white to optimize file size, OCR processing and overall readability.
– Convert to Multipage TIF: convert your document to a multipage TIF.
– Convert to PDF/A*: convert standard PDF files to archivable PDF files for long-term preservation (PDF/A).
– Convert to PDF MRC*: reduce the size of a 300 dpi JPG image to about 90 to 95%. You can also compress images using JPEG 2000 (J2K). This results in excellent image quality with a file that is about 70% smaller than a traditional JPG compressed image.
– Scale Page(s): automatically scale your document images and reduce the file size.
– Set PDF Properties: password-protect PDFs and set permissions for certain operations.
– Convert to Searchable PDF: convert image-based (scanned) PDF / TIF / JPG / PNG / *Word / *Excel or *Text (including CSV, XML and JSON) files to searchable PDF files, partially or completely.
– Export to Alfresco*: send the result to an Alfresco server.
– Export to Box*: send the result to Box.
– Export to Database*: send the result to a file server, FTP server and database.
– Export to DocuWare*: send the result to File Cabinets in and Document Trays DocuWare Cloud and On-Premise.
– Export to Email*: send the result to a specified email address.
– Export Processed Set: send an email or export an index file after all documents of a set have been processed.
– Export to Enadoc*: send documents to a specific Enadoc library using a Tag profile of choice to set the document’s security level.
– Export to Folder: send the result to a folder or FTP Server.
– Export to SAP R/3*: send the result to SAP R/3.
– Export to SharePoint*: send the result to a SharePoint server.
– Export to Workflow: send the result to another workflow for further processing. The receiving workflow will need an Import from Workflow action to function as an entry point.
– Forward Email: forward the original imported email including its original body text and attachments to a specified email address.
* = Optional module
There are 5 columns in the workflow action list:
– Action: shows the type of action.
– Settings: shows a short summary of the settings for each action.
– Condition: there can be multiple outcomes of an action, for example an imported email can be valid (has attachments) or rejected (no attachments).
– Next action: after each action you define the next action. For example, after importing an email, the attachments are sent to extraction to extract some key data.
– Description: shows that action’s description (if applicable).
Some actions allow you to choose different next actions depending on their conditions. Press the dropdown arrow on the left side of these actions to expand them.

To construct a workflow, you simply add actions using the Add button.
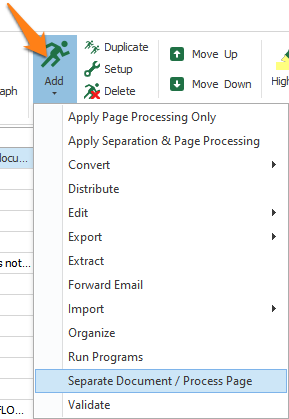
TIP: any actions added after your current action will automatically be connected to each other. You can manually adjust these next actions by expanding your action (if applicable), pressing the drop-down arrow of the action’s “Next Action” column and selecting the correct next action.
If you make the next action blank, the document will be deleted for that conditition.

You can also move the position of each action by using the Move Up and Move Down buttons:

IMPORTANT: Be aware that, when you move actions, your next action is not automatically adjusted. So don’t forget to check if your next actions are still correct.
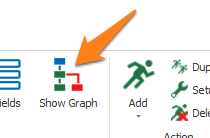
TIP: you can visualize your workflow by pressing the Show Graph button.
This will open the Workflow Graph window:
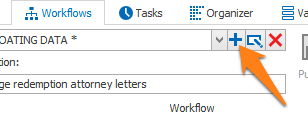
To add a new workflow, you press the “+” button right from the workflow drop down list.
Next, you enter the name and a description of your new workflow.
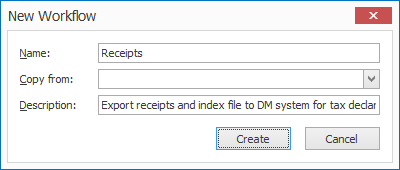
If you don’t want to configure your workflow from scratch, you can copy from an existing workflow and use it as a template, like the basic “TEMPLATE WORKFLOW”.
You can find more detailed information about the Workflows tab here.
The Email Alert function will notify one or more people in case of errors. When making a new workflow, you need to change the Email Alert settings to your own email address and SMTP Server settings.
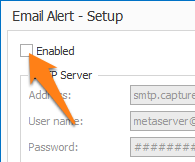
Press the Email Alert button under Settings, this will open the setup window:


1) SMTP Server: Replace the placeholder CaptureBites SMTP Server settings with your own SMTP Server details. The default SMTP Server is only meant for demo purposes and testing.
Your SMTP Server settings can be found by contacting your IT department or through your email provider. SMTP settings for Gmail can be found as step 2 here. For Office 365, you can find the SMTP settings here.
TIP: If you want to use Gmail as your SMTP server, first login to Gmail on the station running MetaServer via a browser. In that way, the IP address of that station becomes white listed on the Google SMTP servers and you can send emails from MetaServer.
Gmail’s security strategy changes frequently and Gmail also sets limits to the number of emails you can send through smtp.gmail.com. So, we advise to only use smtp.gmail.com for tests or if the number of emails sent by MetaServer is limited.
2) Email Header: edit your email header information. You can optionally specify the display name of your recipient by separating it with a comma “,”.
For example: ed.elric@company.com,Edward Elric.
You can also enter one or more recipients by separating them with a semi-colon “;” or colon “:”.
For example: al.elric@company.com,Alphonse Elric;winrockbell@company.com,Winry Rockbell
Some more examples of valid email addresses:
– timmarcoh@company.com
– timmarcoh@company.com:trisha.elric@company.com
– timmarcoh@company.com:trisha.elric@company.com;rthomas@company.com
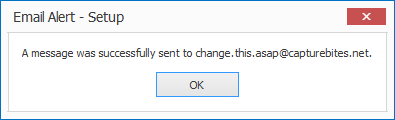
3) Test: press the Test button to check if your connection is successful. If you have specified yourself as the recipient, check your inbox for a confirmation mail.
NOTE: you can also disable the Email Alert feature by unchecking the “Enabled” checkbox in the top left corner of the setup window.
TIP: for more information about the other buttons under the Workflows tab, please refer to the Workflows online help page.
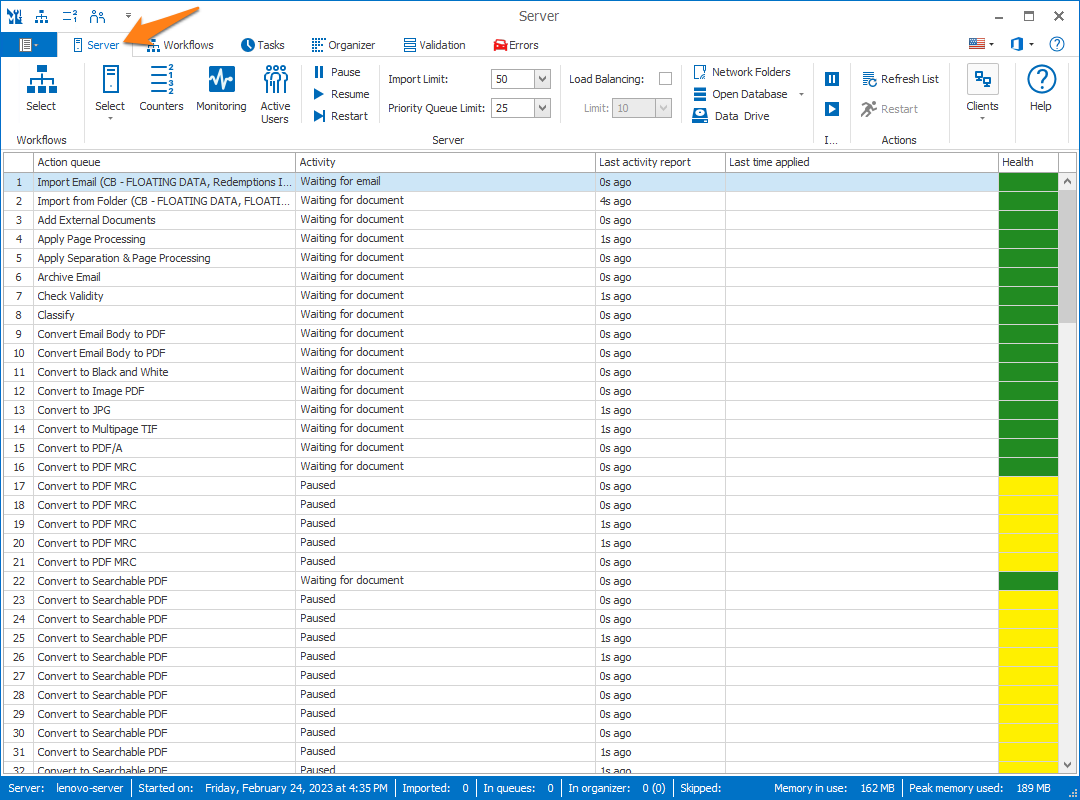
Under the Server tab, you can control the server (pause, resume and restart) and check the status of MetaServer. You can also set the import limit, set up Network folders, hide certain functions in the Operator Clients, etc.
For a more in-depth guide through the Server tab, please refer to the Server online help page.
Network Folders make it possible to define user credentials for shared network folders. This gives MetaServer access to import and export to these shared network folders. For a more in-depth guide on how to set up Network Folders, follow this guide.
The information refreshes every 10 seconds. If you want to instantly refresh the data, press the Refresh List button.
Here you can see when each action has been last applied…

…and when the Server was last (re)started:

The colored blocks signify the action’s health:
Green = running
Yellow = paused
Orange = non-critical error that will be auto-resolved by MetaServer (e.g. network connection lost)
Red = critical error: action or server restart is required. Red errors and the documents that caused them can be managed in the Errors tab.
If a critical error keeps occurring, you can contact us through our online support form. Please describe the issue as detailed as possible.
If the cause of the error is related to pending documents in the server, you can reset the server by following steps documented here.